We are in the edge of a new era of the new iPhone 11 series ((iPhone 11, 11 Pro, 11R and 11 Max) with iOS 13. Also, there is good news, the 5G technology will be available for iPhone 11 in 2020. In the 10th September of 2019, Apple is about to finalize the products announced in the July WWDC 2019. One of them is the next desktop software called macOS 10.15 Catalina, yet it is in beta, but soon, it will be final. The macOS 10.15 Catalina contains a whole set of new features, design, look and the best privacy ever provided by apple. Since it is about to be final, but yet folks who are trying to utilize and compare it with the other macOS versions, have to install it on PC- Hackintosh, VMWare, and VirtualBox. Regardless of whether you are running a Windows machine, test it inside the VMWare or VirtualBox. Despite the VMware, VirtualBox and Finally the PC- Hackintosh has there on Guidance and required files. If you want to install macOS Catalina on PC- Hackintosh, first, a bootable USB of macOS Catalina is required. Then you must prepare the Post-Installation files to configure the bootloader, brightness control, Audio, Ethernet and more. It has a more drawn out procedure than testing it on Windows on VMware and VirtualBox.
Steps to Install macOS Catalina on PC- Hackintosh
Step #1. Download the Required Files
Installing macOS 10.15 Catalina on PC- Hackintosh is pretty much, however configuring the Kexts with bootloader is little be confusing. Since the acquired files of macOS 10.15 Catalina for PC- Hackintosh little bit longer than the other posts, I will guide to the process.
- Buy 8 GB USB-C: A USB Flash Drive is always required for performing a clean installation of any operating system in a laptop or PC. But if it is USB-C, how better it is, its performance with copying files can really save your time. This 8 Gigs of USB will be bootable with the macOS 10.15 Catalina. Do not fear if you are on a Windows PC or you are using a Mac, Linux, or Ubuntu, cause in any platform you can create bootable USB Flash Drive for macOS Catalina.
- Download macOS 10.15 Catalina DMG File or macOS Catalina Installer: There is a slight difference between the macOS Catalina DMG file and macOS Catalina Installer. The default extension for macOS Apps are called dmg, as for image, the extension is JPEG, PNG and other. If you have noticed while downloading an app from the App store, it is directly added to the application directory. It means it is not contained inside the DMG file format, the developers and coders are containing that. So, when you are downloading the DMG file, you have to open it and then add it to the Applications. This is the slight difference between the DMG file and Installer.
- Download TransMac for Windows Users and Unibeast for Mac Users: CMD and PowerShell can not answer the quest of creating bootable USB for macOS Catalina on Windows. That’s why you have to use third-party software to create bootable USB for macOS 10.15 Catalina. Here is the guide for creating bootable USB for macOS 10.15 Catalina using the TransMac on Windows. macOS users can use the Terminal, or third-party software can accomplish the job easily, a good example is Unibeast. The above link for creating bootable USB for Windows also contains a guide for mac Users using the Terminal to Create bootable USB for macOS Catalina.
- Download Bootloader: The bootloader is a piece of code which is specifically designed for computers, each company configures it depending on the default operating system. Windows computer and laptops do not have the bootloader codes of Apple’s Operating system. It is simple I could ever explain to you, in other words, it runs before the operating system and boots to the Kernal OS. If you have ever dual boot mac with Ubuntu, you will face an error of not going to the other OS. That’s why there is a third party software known as GRUB and GRUB2 which can let you choose from the OS. So, the macOS 10.15 Catalina Bootloader must be configured in order to boot to the macOS after power off.
- Download Post Installation Files: In Windows, we are updating the computer to download the drives for Sounds, screen brightness, Network, and others. So, they are called drivers but in macOS, it is called Kext. Since updating the macOS 10.15 Catalina can not solve the Kexts errors, that’s why the post-install files are required. So, the Post Install files are Clover configurator.app, EFI Mounter.app, Nvidia WebDriver.app, MaciASL.app, IORegistryExplorer.app, FakeSMC.kext, GenericUSBXHCI.Kext, IntelMausiEthernet.Kext, Lilu.Kext, WhateverGreen.Kext, and unpkg.app.
- Fix the Ethernet connection using the Ethernet App: There is a piece of code which 90% fix the problem of Ethernet connection but the other 10% won’t response. So, for that, you have to use the old way, and that is known as Wifi Adapter. It costs some but it is the quickest answer to the internet connection on PC- Hackintosh.
- Fix Audio Problem: The open-source VoodooHDA.kext is the replacement of the AppleHDA on Mac OS X. The VoodooHDA.kext works for devices compliant with the Intel High Definition Audio specification and it is the answer to fix the audio problem on macOS 10.15 Catalina. However, in the end, I have introduced some common errors with Audio with AppleALC to fix the problem.
- Download Kext Utility: Installing Kexts can be done manually with copy and paste inside the EFI Directory of the operating system. Copying and pasting the Kexts really takes the time that’s why I recommend you to use the Kext Utility to add them. The way it works is, the drag and drop option, just take it and drop it over the Kext Utility. You can do manually copying and pasting the Kext to the /System/Library/Extensions and /Library/Extensions directories.
- Download Post-Installation files: (Bootloader, Internet fixer, Audio Fixer, Kext Utility, EFI Mounter, All the required Kexts of macOS 10.15 Catalina.
Step #2. Create a Bootable USB installer for macOS 10.15 Catalina
A clean installation needs bootable USB of the OS, so as I said before Windows Users can use TransMac and the macOS Users can use the Terminal or alternative apps. Here is the guide in case you don’t know how to create bootable USB for macOS Catalina.
Step #3. Install Clover Configurator
Clover Configurator is the software or the app by which you are going to configure the bootloader. Whenever the bootable of the USB for Catalina is finished, there will be a specific directory alongside the USB itself. And that folder is called the EFI partition, which is hidden there are mounting the clover configurator. I think it ‘s better, that I should you through all the steps one by one.
launch the clover configurator which you have downloaded before> then from the left pane there is a Mount EFI, click on it. After the EFI Partition is mounted a new partition will appear on the clover configurator under all the other Partition by the name of Beta version. You have to mount that partition.
Since the EFI Partition is not hidden anymore, it appears on the desktop, there you have to copy the bootloader (It is the bootloader of your system). After that, you have to paste that inside the EFI Partition of the USB Flash Drive which is also on the Desktop.
if you have another USB Flash Drive, copy all the Post Installation files inside that if not simply copy it inside the bootable macOS 10.15 Catalina USB.
Step 4. Boot and install macOS Catalina on PC- Hackintosh
Installing macOS 10.15 Catalina is easy enough but before getting into the installing of macOS Catalina. You must find the Boot Key of your computer, It is a key which allows the user to load the other operating system there is one. Different manufacturers have different boot keys, for Apple, the Boot key is options key which is mostly for windows user the Alt key. Dell, HP, Asus, Lenovo, Acer have different boot Keys.
Dell and Acer’s Boot key is F2, Asus Boot Key is ESC, Lenovo’s boot key is Fn + F12, HP’s Boot Key is F9. Please in mind, these boot keys are the overall keys, each computer, each laptop differs some time where these boot keys are not responsive. a good example is a OneKey Recovery inside the some Lenovo products.
Attach the USB to the computer, then hit the boot key of your computer, select the USB flash drive which contains the macOS 10.15 Catalina from the boot menu.
When the USB is selected you will be on the clover manager where you have to boot again from the USB.
On the macOS Utility window, Disk utility is the option where you have to select.
Go to the View Menu> and select show all devices.
Choose the drive where you want to install the macOS 10.15 Catalina, but before choosing that you need to format that with APFS File system and GUID Partition map settings. Keep in mind you have to provide a name for the drive which you formatting.
Once the drive is formatted, once again you will be on macOS utility window, this time select Install macOS.
- Click Continue.
- Agree to the license and agreement of apple.
- Select the macOS 10.15 Catalina drive which you formatted and named it.
After the computer restarts, on the boot clover menu> select boot from drive where you installed macOS 10.15 Catalina.
- Select the country where you live and the keyboard language.
- For the Network, select my computer does not connect to the internet.
- You have to agree to the Data & Privacy of Apple.
- Do not transfer any information to this PC is the next option which you have to select.
- Now you have to agree to the terms and conditions of the macOS.
- Create an account for your operating system with a password to log in.
- For the next three steps, you have to click continue, continue and continue.
- Choose a look for your operating system Light, Dark or auto.
- Wait, until the mac should setup the window for you.
That’s all to Install macOS Catalina on PC- Hackintosh, I know it takes time but once it is done, it is magnificent. Now you need to configure the Kexts, otherwise, you have wasted your time to Install macOS Catalina on PC- Hackintosh.
Install Post Installation Files (Kexts)
Imagine, can you on a computer without sound control, Network control, brightness control, That’s obvious no one can work except if you are a writer. What about the boot, can you boot every time using a USB flash drive to the OS. So, the answer is no. Kexts are the small pieces of codes, combined together by coders to solve the issues.
- FakeSMC.kext: It is required for booting into the operating system without a USB.
- GenericUSBXHCI.kext: It is the only kext which lets the USB 3.0 works on a computer.
- IntelMausiEthernet.kext: It is the Kext for intel Network, without you can not connect to the internet.
- Lilu.kext: It is an extension which brings for the arbitrary kext, library, and program patching on the macOS and working for audio.
- WhateverGreen.kext: It fixes the black screen error on the AMD, Nvidia, boot screen distortion and more.
So, here we are going to configure the post-installation Files with step by step guide.
Step #1. Let’s start the Post Installation
- Go to the finder> preferences and check all the boxes of Hard Disks, external hard disks, CD/DVDs, iPods and finally servers.
- Copy all the Post Install Files from the USB on your desktop.
- Open the clover configurator inside the post-installation directory, select Mount EFI on the Left pane with APFS Mount EFI under the partition.
- Go ahead and delete the EFI partition of the Hard Disk, instead, paste the new one which you copied from USB flash drive.
Note: In case they did not work, launch the Kext Utility and drag all the Kexts one by one.
Fix Ethernet Problem on macOS 10.15 Catalina on PC- Hackintosh
Inside the post installations directory, an Intel I219-V Ethernet Fix.zip is available which is the software, especially for ethernet problem. However, if that did not work you have to find your motherboard built-in Internet, you can find in the manufacture’s website.
Another method: Multibeast is the most popular and the best app ever made by tonymacx86.com. This App has the ability to install every driver of your computer (if you select the version compatible with your computer). Once you found your Ethernet version, you can find that inside the Multibeast, select it an Install.
For Example, I’m using GA-Z270X-Gaming 7 motherboard and I don’t know what are the LAN specification, I googled for it and found the below information.
- 1 x Intel® GbE LAN chip (10/100/1000 Mbit)(LAN1)
- 1 x Killer E2500 LAN chip (10/100/1000 Mbit) (LAN2) * Teaming is not supported.

And now inside the multibeast, when I check the box, the specification will be written on the bottom window.
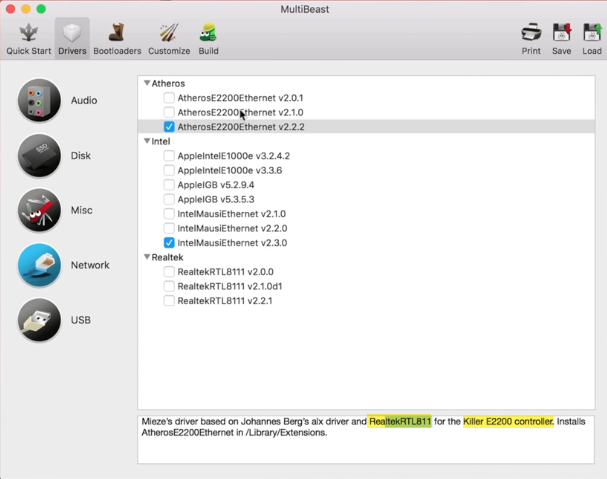
I know the version is E2200 Controller while the GA-Z270X-Gaming 7 ethernet version was E2500, so it’s near, install it.
In any case, if you can not install and configure the Ethernet connection, Wifi-Adapters are the next options which can work easily. However, Here is a list of Supported Wifi-Adapters for PC- Hackintosh. I have not tested other Wifi Adapters if you did let me know so I add them in the list.
- TP-LINK Archer T8E AC1750 Dual Band Wireless PCI Express Adapter
- AC1750 Wireless Dual Band PCI Express Adapter
- Rosewill WiFi Adapter/Wireless Adapter/PCI-E Network Card, 802.11AC Dual Band AC1300 PCI Express Network Adapter
- TP-Link Smart WiFi Router
- Rosewill 802.11N, N900 PCI Express Wireless Adapter/Wi-Fi Adapter/Network Card (RNWD-N9003PCe)
- WiFi + Bluetooth 4.0 Card to PCI-E x1 Adapter Card PC/Hackintosh Without BCM943224PCIEBT2/bcm94360CS2/BCM943602CS (black)
How to Fix Audio Errors on PC- Hackintosh?
Before getting started with AppleALC.Kext, you have to use the VoodooHDA.Kext inside the Post Install Files. Install the VoodooHDA first, then drag and drop the VoodooHDA.Kext inside the Kext Utility. That time if the Audio is not fixed, you may follow the below instructions.
Well, Audio is also an important part of the computer for listening to music, Podcasts, watching movies, or for learning through online training. There are different types of Motherboard for different computers and laptops, also each motherboard has its own audio chipset. If you are having trouble with the audio, first you have to find the motherboard’s audio chipset of your system.
Since the motherboards have different codecs that’s why there are older motherboards with older chipset and the new motherboards with new chipsets. This tutorial covers the below new audio codecs which will work, however, there are other audio codecs too with AppleALC.
- ASUS S1220A
- ALC887 codec
- ALC892 codec
- ALC1150 codec
- ALC1220 codec
AppleALC is an open-source Kernal Extension which enables the audio support for macOS which do not support the codecs officially. The AppleALC supports numerous audio codecs from different Vendors, so you need to find your audio codec first.
Steps to Fix Audio problems…
- Launch the clover configurator and mount the EFI under the tools.
- Go ahead and mount the macOS partition (An EFI Directory will appear on the Desktop)
Audio Kexts: There are two audio Kexts AppleALC.Kext and Lilu.Kext for Hackintosh which works together to get rid of the error. Download the latest versions of the AppleALC and Lilu from the Below GitHub Links.
Install the Audio Kexts: Kext utility can do the job but since I have mentioned the method above, here I will guide you to copy Kexts manually.
- If you remember, the EFI Partition was mounted using the Clover configurator, so you have to copy the AppleALC.Kext and Lilu.Kext into the EFI/Clover/Kexts/Other directories.
Audio Problems on macOS:
- No Audio after selecting Internal Speakers
- Video Playback Freezes
- Boot to Black Screen
The above audio problems occur because on incompatible Kext versions, what I mean incompatible kext. Whenever the AppleALC.Kext and Lilu.Kext are compatible with the motherboard for unknown reasons. To fix these problems Download the AppleALC.Kext 1.1.0 and Lilu.Kext v 1.0.0, and copy the Kexts inside the EFI/Clover/Kexts/Other directories. Once done with copying and pasting, restart your PC- Hackintosh.
That’s with How to Install macOS Catalina on PC- Hackintosh and How to get working the Audio alongside the Ethernet.
Great article it really helped me thanks!