Oracle is the founder of the Virtual box virtualization technology. Developers, penetration testers, IT students and other computer geeks are using Virtualbox widely compare to VMware because it is open source. There is also QEMU, which is also an open source virtualization software but that is not as popular as VirtualBox, why, because that runs with commands. For IT Geeks it is easy but an average windows user won’t use that, because it is complicated and hard compared to the VirtualBox. And why VMware Workstation pro is not used as widely as the Virtualbox, first, it is for the professionals, and second it has a free version known as VMware player, where an average can take it’s advantage. So, let’s get started with How to Install macOS Catalina with ISO on VirtualBox on Windows PC.
Step 1. Download Required Files
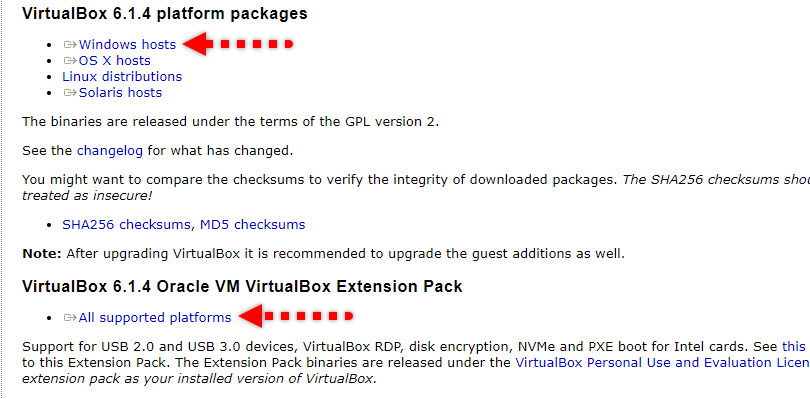
Download VirtualBox and the VirtualBox Extension Pack: Access the VirtualBox.org and download the lastest version of the VirtualBox. The virtualBox extension pack is also listed down their where you can download it with full satisfaction.
Download the macOS Catalina ISO File: It is against apple’s policy to add the download link but for now you can get it. In the future we may have to remove the link, so here is a post which will guide you through the process of How to create a macOS Catalina ISO File. Then You can use that to perform a clean installation.
Steps to Create macOS Catalina ISO File:
Open the app store on your mac and download the macOS 10.15 Catalina. Once it is downloaded Open Terminal using the spotlight and type the following commands line by line.
hdiutil create -o /tmp/Catalina -size 8900m -volname Catalina -layout SPUD -fs HFS+J
hdiutil attach /tmp/Catalina.dmg -noverify -mountpoint /Volumes/Catalina
sudo /Applications/Install\ macOS\ Catalina.app/Contents/Resources/createinstallmedia –volume /Volumes/Catalina –nointeraction
hdiutil detach /volumes/Install\ macOS\ Catalina\
hdiutil convert /tmp/Catalina.dmg -format UDTO -o ~/Desktop/Catalina.cdr
mv ~/Desktop/Catalina.cdr ~/Desktop/Catalina.iso
Step 2. Install VirtualBox and Extension Pack
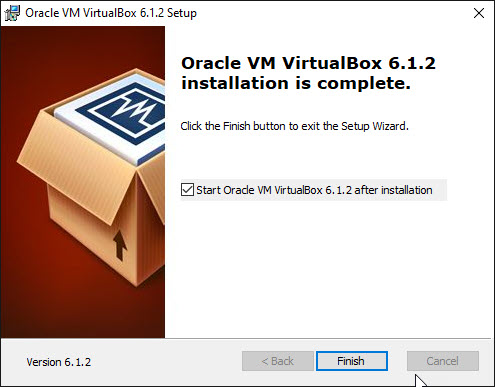
This is about configuring the Installing the VirtualBox and the extension pack to solve before occurring with errors. Installing a Virtualbox is an easy task where is no need for me to guide you through the steps.
The important thing about installing is the VirtualBox extension pack. Users repeatedly reported that cursor is moving during the installing procedures. After investigation we discovered there is a problem with the VirtualBox. So for solving this type of error Oracle offered the VirtualBox Extension Pack.
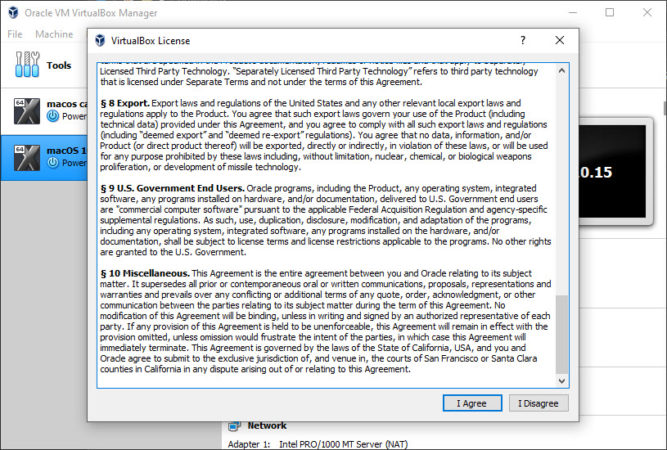
Installing the VirtualBox Extension pack is not a big deal, just double click, it will be launch itself in VirtualBox. Click Install and Agree with the License and Policy and the extension pack installation is completed.
Step 3. Create a New Virtual Machine in VirtualBox
On the Homepage of the VirtualBox, choose New.
Oracle has developed VirtualBox in way where anyone fit themselves there. I am talking about the Easy Mode (Guided Mode) and expert mode, both can do the same steps but the expert mode saves time compared to Easy mode. It means click on expert mode, name the Virtual Machine whatever you want.
As long as you enter the name of the mac, it will detect the type and the version as follows.
- C:\Users\Your Name\VirtualBox VMs
- Mac OS X
- Mac OS X (64 bit)
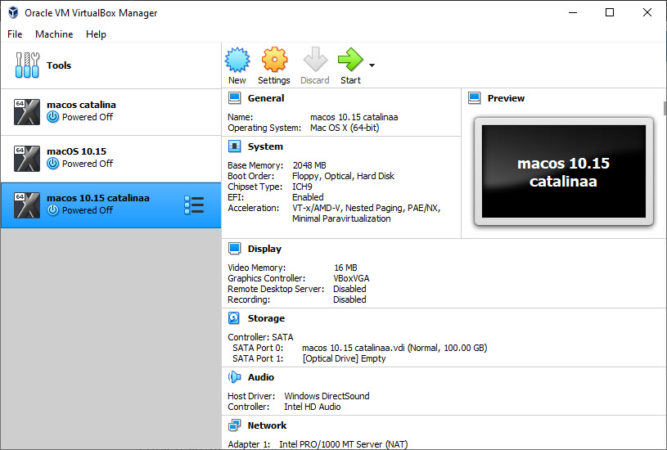
After detection of the operating system and it’s version, in the expert mode, choose the amount of RAM ( I will go with 4 GB of RAM), And finally create a new Virtual Hard drive by choosing the “Create a Virtual Hard Drive Now”.
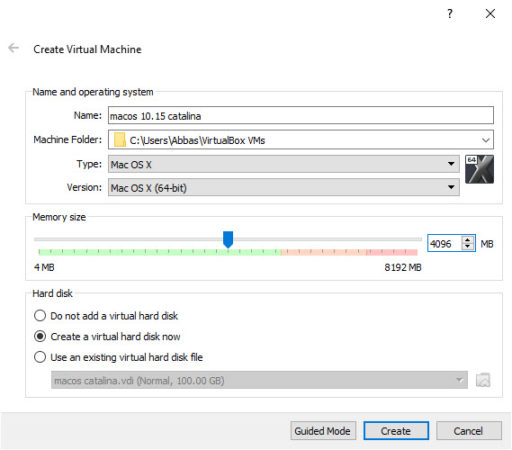
Verify the location where you want to save the Virtual Hard Drive. Make sure at least 40 GB of storage your computer have for macOS 10.15.4 Catalina.
I will choose the default location known as follow.
C:/Users/Your User Name/VirtualBox VMs/macos 10.15 catalinaa/macos 10.15 catalinaa.vdi
But I am increasing the amount of storage to 100 GB.
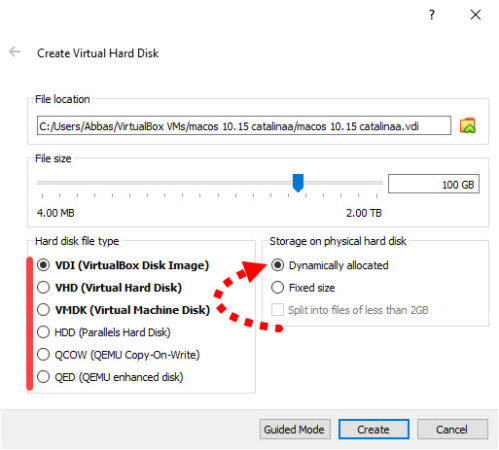
For the Hard Disk type you can go with the default VirtualBox Hard Drive which is VDI (VirtualBox Disk Image). But if you want to open one virtual machine inside other virtual machine software like Vmware, Hyper-V, Qemu, and Parallels, choose their hard disk type.
- VMDK (Virtual Machine Disk): It is the Vmware Hard Disk type.
- VHD (Virtual Hard Disk): Microsoft is using this type of Hard Disk for hyper-V.
- HDD (Parallels Hard Drive): It is a Virtual Machine software in macOS.
- QEMU: It is more advanced compare to other Virtualization software, choose any of the hard disk type for your purpose.
Physical Hard Drive Type:
It is the storage of your computer, There is two options Dynamically and Fixed size in Virtualbox. What is Dynamical and Fixed type which they included here.
- Dynamically: The specified amount of the storage will be filled slowly , it means it won’t take exactly 100 GB that I have specified. Suppose I have used 40 storage inside the Virtual Machine it will take 40 GB on the physical hard drive.
- Fixed Sized: The moment the amount of storage is added it will that much amount of storage on the physical hard drive.
I recommend you to use the Dynamically on the physical hard disk type.
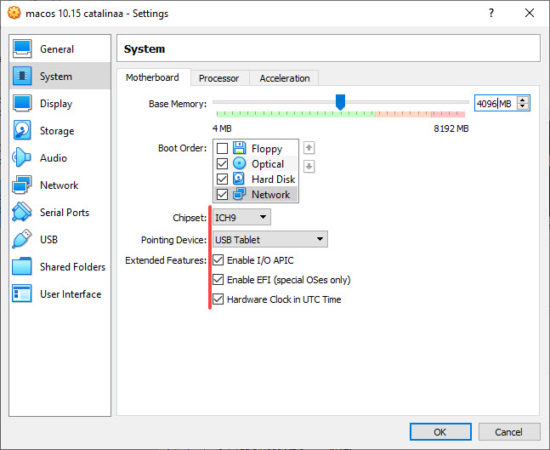
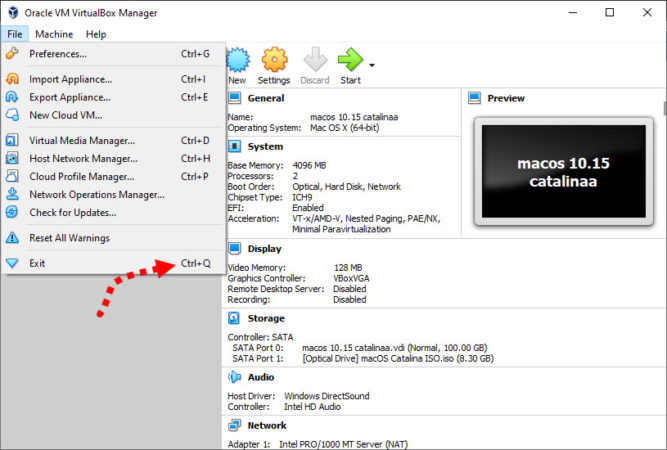
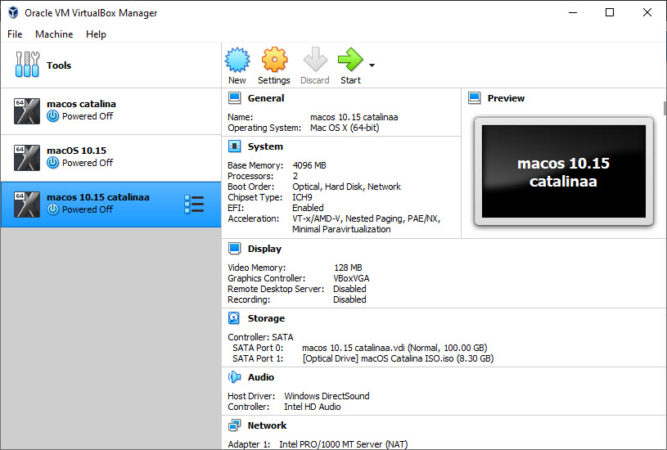
Step 4. Configure Virtual Machine Settings For macOS Catalina
A set of specific settings have to configured in order to Install macOS Catalina with ISO on VirtualBox on Windows PC. Those setting are known as Boot order, Amount of Processor, Graphics (Display Memory), adding the macOS 10.15 Catalina ISO File, and finally USB.
Let’s start configuring the settings from the boot order. Open settings of the VM and go to the system tab and comply the below settings.
- Uncheck the Floppy Disk.
- Check the boxes of the Optical, Hard Disk and Network.
- Chipset: ICH9
- Pointing devices: USB Tablet
- Enable the I/O Apic: Check it’s box.
- Also the Enable EFI (Special OSes Only) box.
- And finally enable Hardware Clock in UTC Time.
Go to the processor tab. To speed the installation process, increase the amount of the processor. I will increase it’s number from one to two processors.
- Execution Cap: 100%
- Check the box of the enable PAE/NX

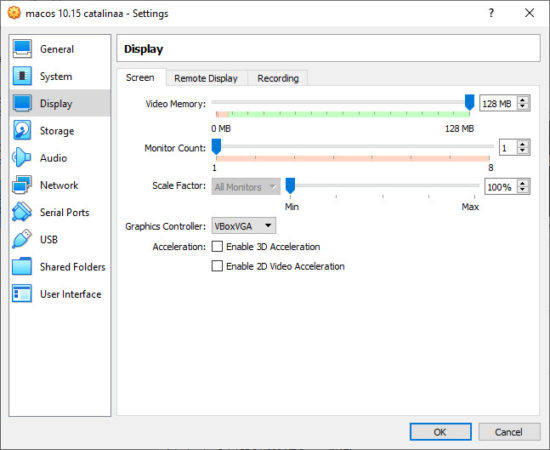
Let’s dig in and configure the Display graphics of the macOS 10.15 Catalina. Go to the Display Tab and increase the amount of Display to 128 MB.
Apply the other settings as follows:
- Monitor Count: 1
- Scale Factor: 100%
- Graphic Controller: VBOXVGA
It depends on you to enable the 2D and 3D Acceleration, but for better performance enable them.
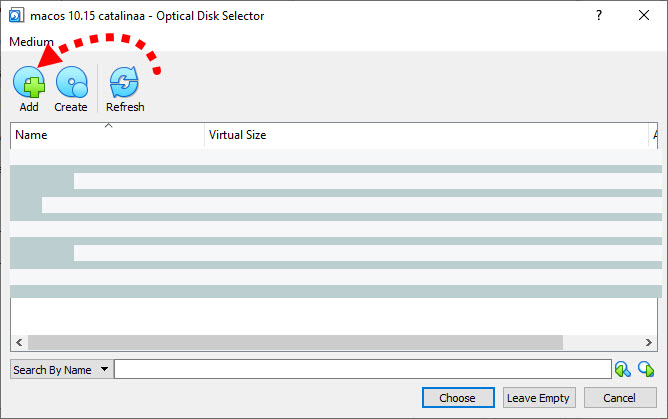
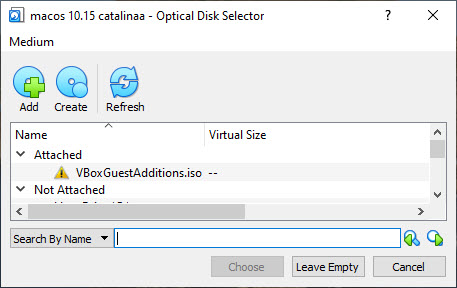
Let’s add the macOS 10.15.3 Cataina ISO file to the Virtual machine. Go to the storage tab and click on the Empty box, then click on the CD icon, and Now Choose/Create a Virtual Optical Disk.
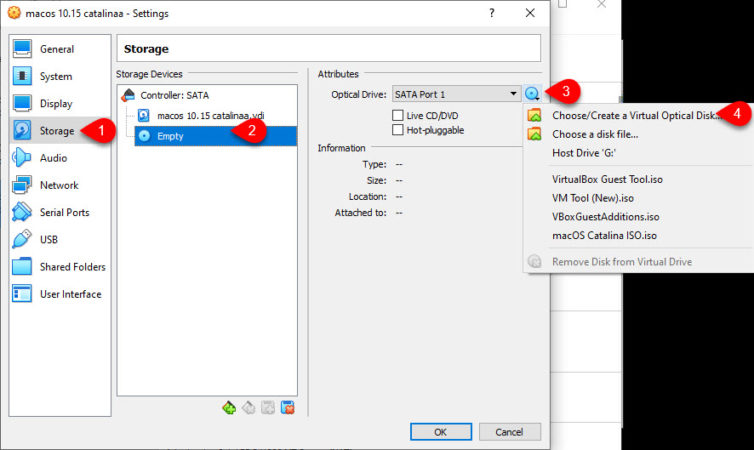
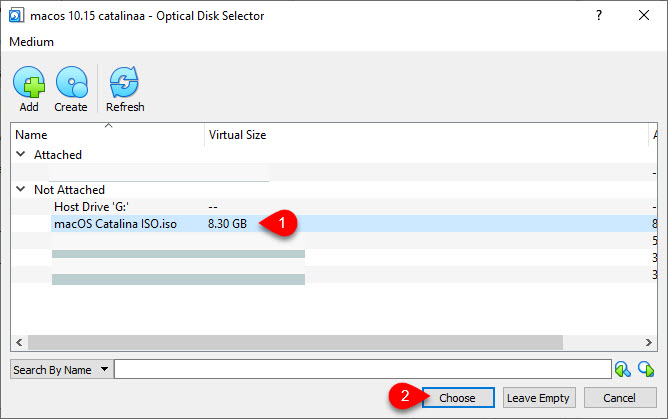
Once the optical disk selector is opened, click on add and locate the macOS 10.15 Catalina.
Once the macOS 10.15 Catalina is loaded, select it and choose.
The final configuration is to set up the USB, so go to the USB Tab, go their and choose the USB 3.0.
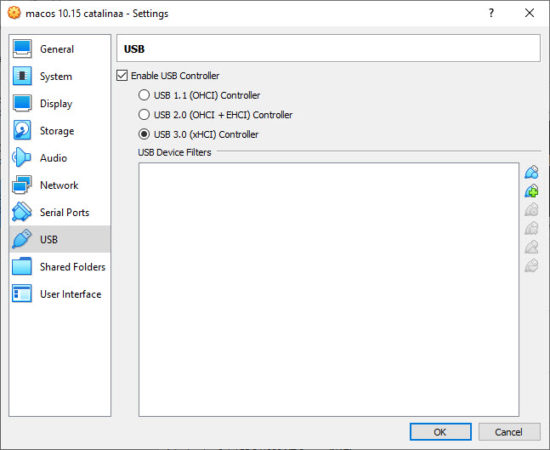
Once the Virtual Machine Settings are configured, choose OK to Apply Changes.
Next Step is configuring the Codes for the Virtual Machine, to apply them exit the VirtualBox from File menu.
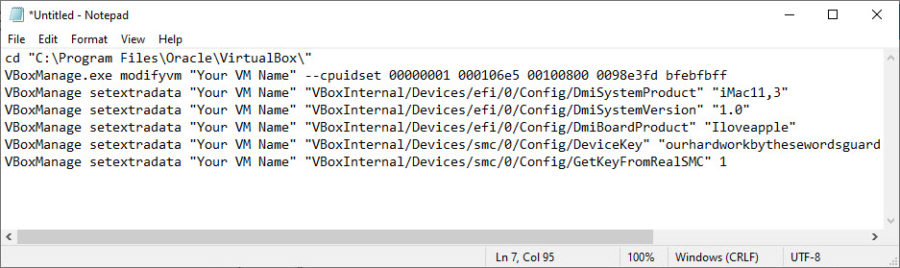
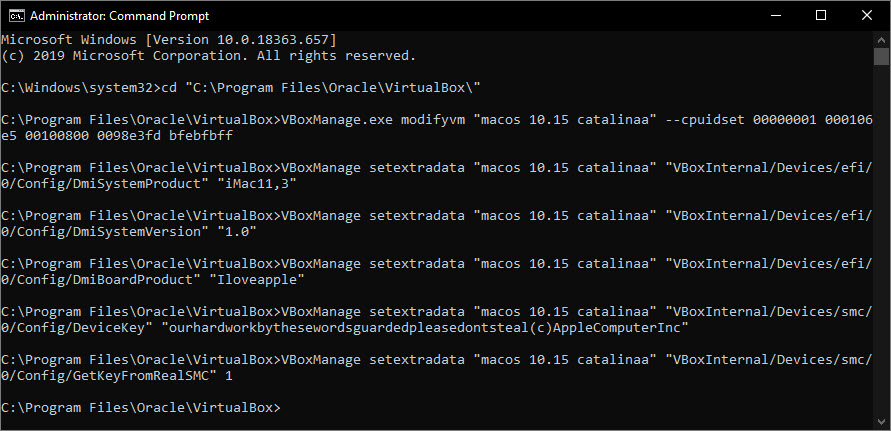
Step 5. Configuring the Codes and Apply them
Some specific settings are mentioned in the VirtualBox, in other words they do not have those settings. That’s where the code comes, Basically you are defining the type of macOS to avoid errors.
There are two types of codes, one is made for Intel Processors and other one is for AMD processors.
- Download VirtualBox Codes
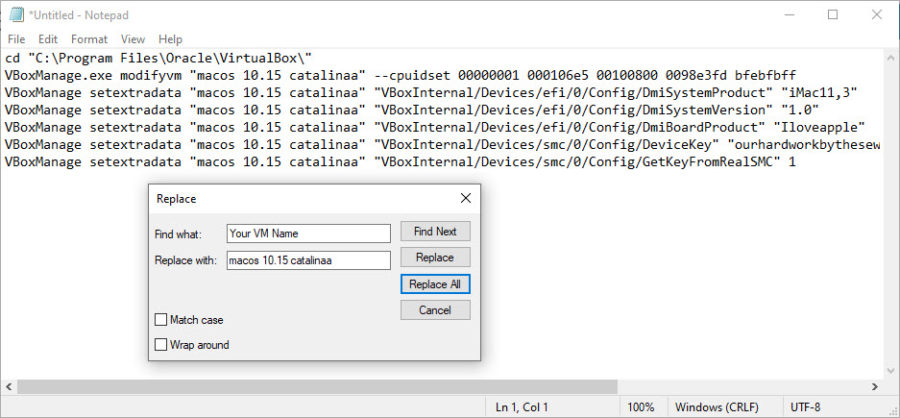
Copy the code related to your Virtual machine versions and system, and paste that inside Notepad.
Go to edit menu and choose Replace.
In the Box known as Find type “Your VM Name” and in the next box type name of your VM, then replace all of them.
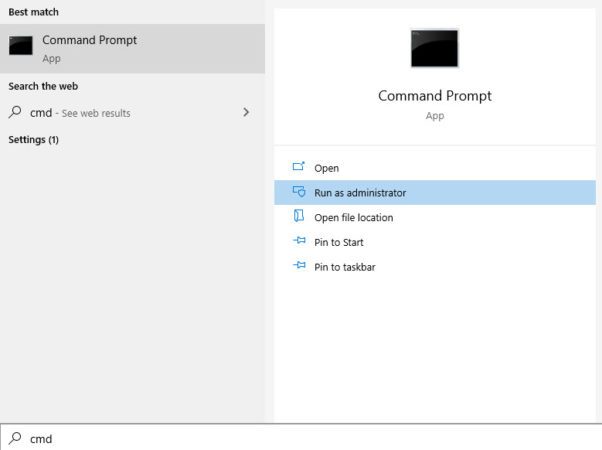
Now Run CMD as Administrator and Apply the codes one by one.
For better understanding look at the below screenshot, that all the codes are applied one by one.
Step 6. Install macOS Catalina on VirtualBox on Windows PC
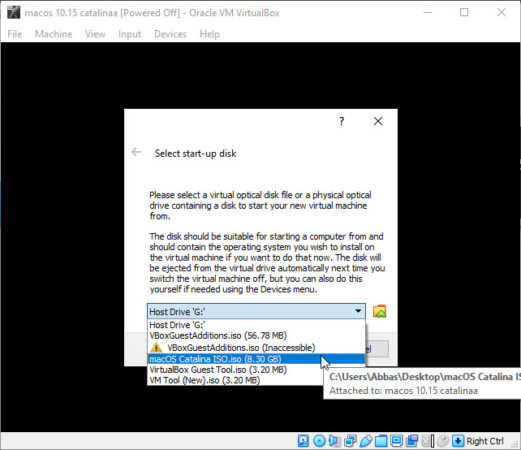
Launch the VirtualBox, choose the Virtual Machine where you want to install macOS 10.15.3 Catalina. After choosing the Virtual Machine start the VM.
In the startup of the VM, it is asking you to choose once again the macOS 10.15 Catalina ISO, so, choose once again.
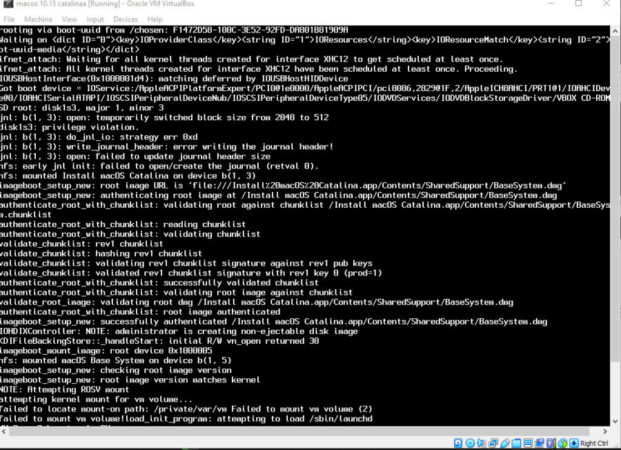
Don’t Panic, because a set of will go arond for 1 one minunte or may be more. The code looks like the screenshot.
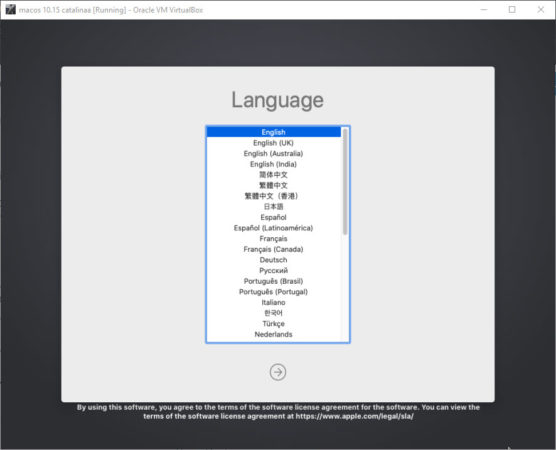
After the moving code, the apple will be their. The next step, macOS Will ask you to choose a language to install macOS 10.15 Catalina.
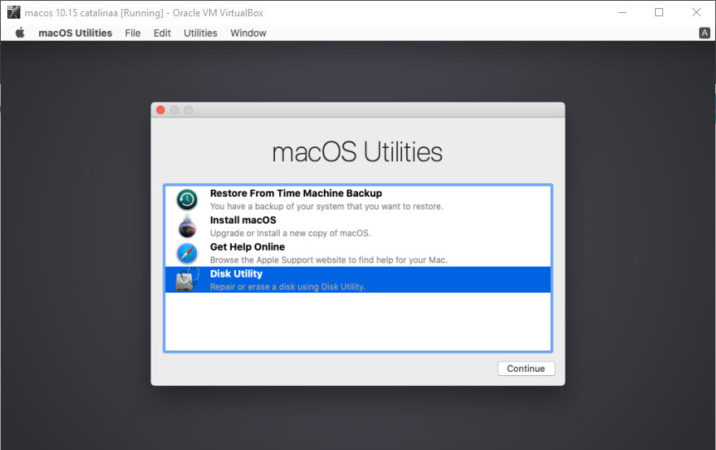
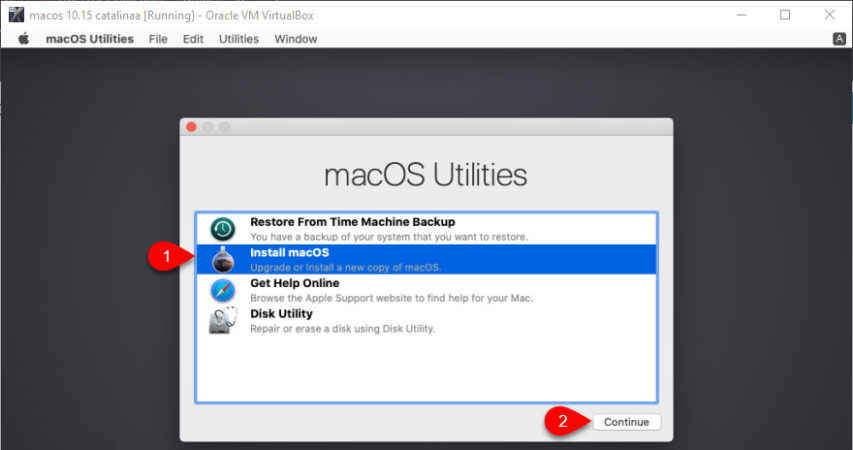
Now you are in the macOS utilities window. The macOS utilities is the window where you can restore your pc using the time machine, perform a new installation and finally partition your hard disk.
Along that with the macOS Utilities you can open Terminal, Network Settings and startup apps.
But since we are performing a clean installation, so choose Disk Utility. The Hard Disk which was created by the VirtualBox is not compatible with the macOS version. So, we have to format the hard disk so it should be compatible.
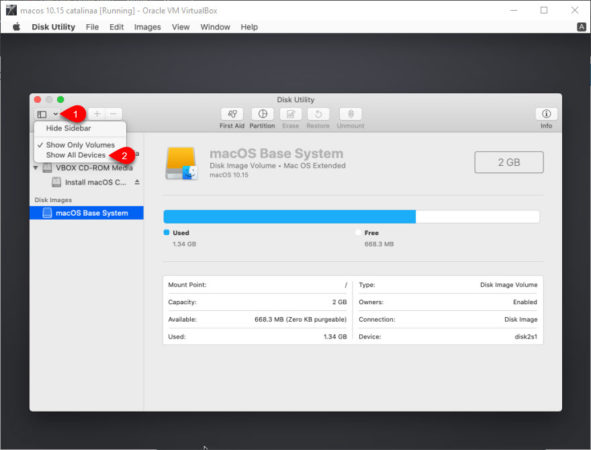
How to Check if the HDD is not comptiable with the macOS 10.15 Catalina file system. It’s easy, in the macOS utilities choose install macOS, agree with the terms and conditions, and when it says to choose hard disk, the hard disk won’t appear.
View all the Hard devices on the cuttent system, to do that, click on the more options and choose show all devices.
Choose the Virtual Box hard drive, then click on erase and format the hard disk with below settings.
- Name: macOS Catalina
- Format: Mac OS Extended (Journaled)
- Scheme: GUID Partition Map
You can change the Format from the Mac OS Extended (Journaled) to other file systems like APFS, ex-fat, MS-DOS (Fat) and more. And the same goes with the partition scheme, you can change it to Master Boot drive and Apple partition map.

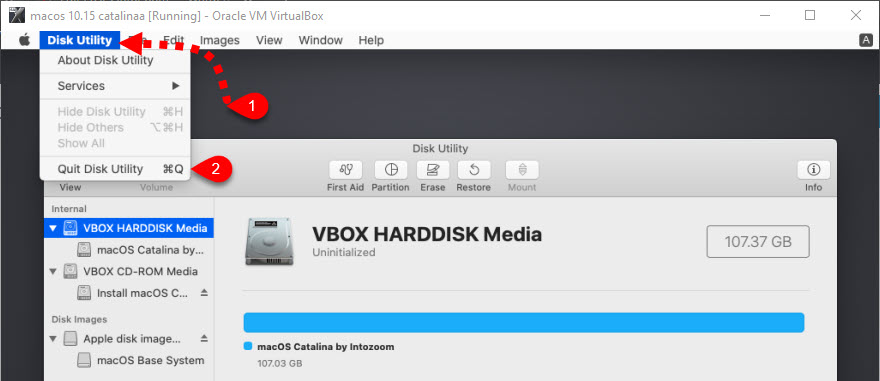
We have forfilled our job here, now let’s quit the Disk Utility and install macOS 10.15 Catalina on VitualBox.
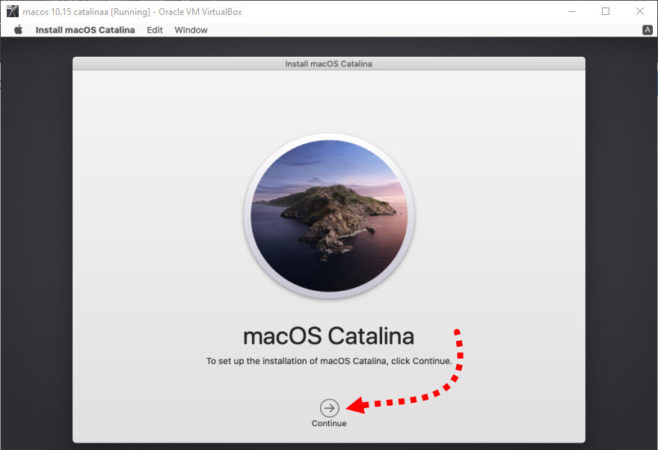
In the macOS Utilities choose Install macOS and continue.
In order to Continue to Set up the Installation choose continue.
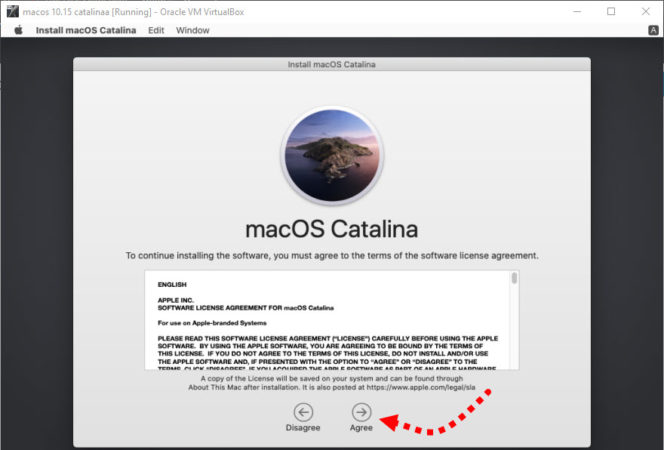
Continue to agree with terms and conditions and of Apple about using their product.
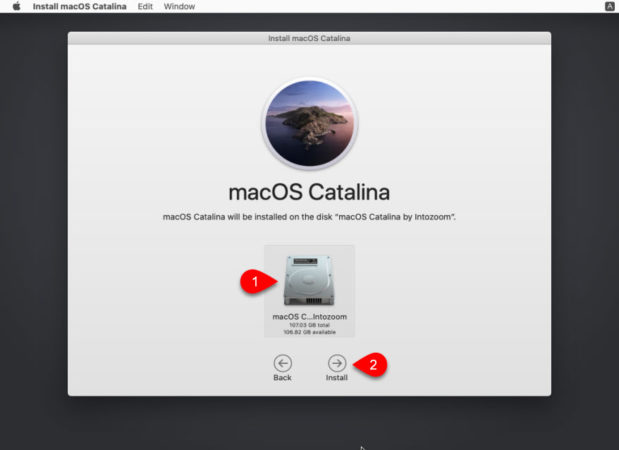
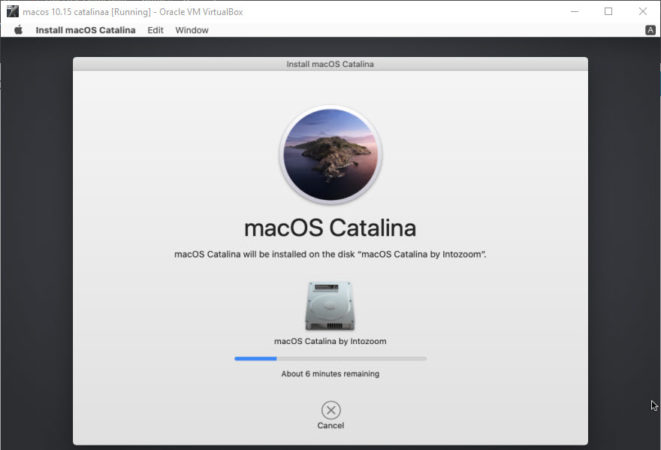
Go ahead choose the hard disk which is erased a moment ago, then click on Install to Install macOS Catalina.
Wait until the files are being copied to hard disk, this step takes ten to twenty minutes.
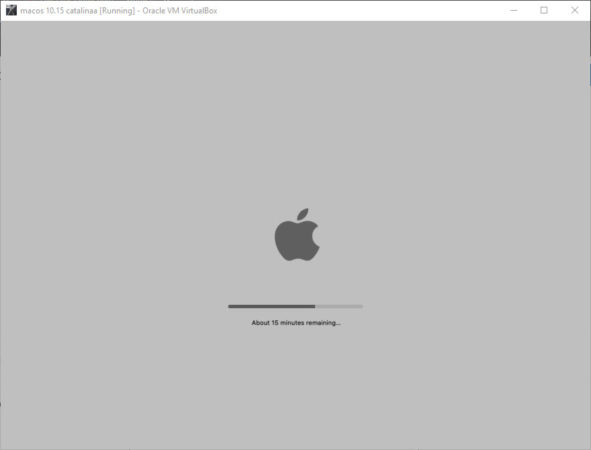
After copying the files, the virtual machine will reboot and it will be on the apple logo for couple of minutes.
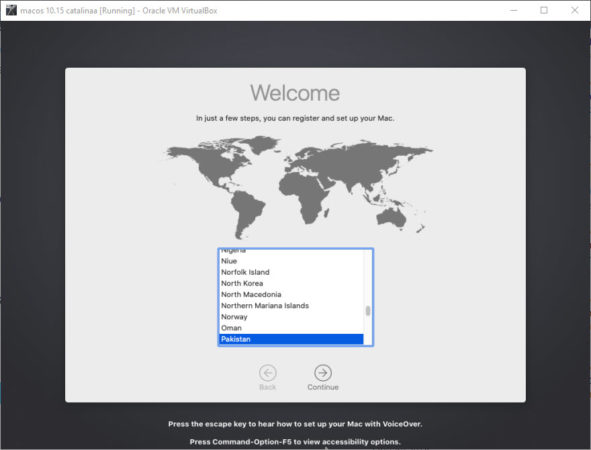
macOS 10.15 Catalina is asking you to select your country, so choose it. It’s better to choose your country because it will also add the keyboard features too.
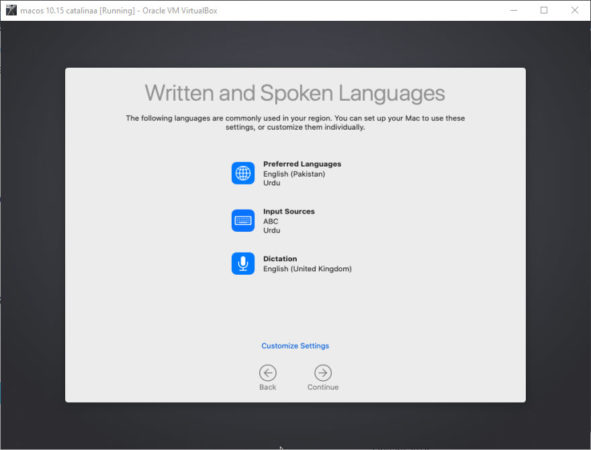
Based on the selected region, the macOS offers that this language are common their, It is asking from you to set up right now or customize it here.
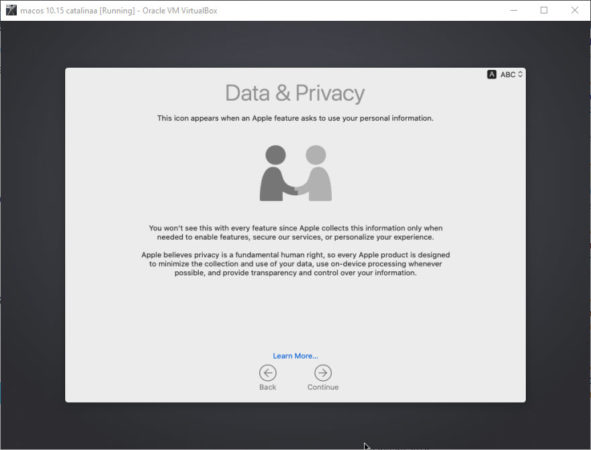
Here is the Data & privacy of apple about when they are collecting data your data. Choose continue.
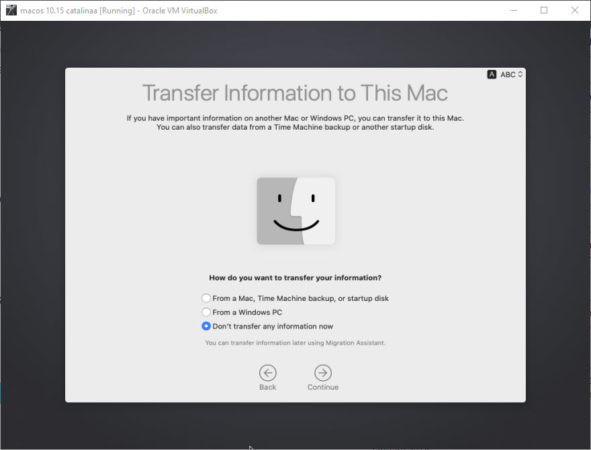
If you have important data on any other computer select any of the option to import them here. If you are performing a clean installation choose “Don’t Transfer any information to this PC.”
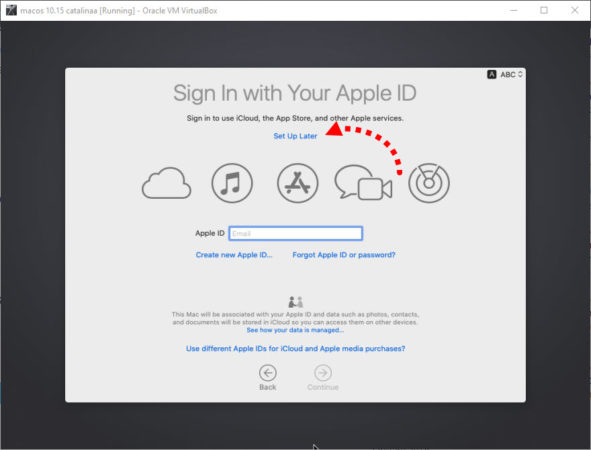
You are in the sign up window. There are several types of login but mostly Apple offers here two types of account, An apple ID or a local user. If an apple ID is set up you can use the iCloud, FaceTime and other apps. If a local account is used say good bye to them however later after installation you can configure them too.If you are deciding to log in to the macOS Catalina without an Apple ID, choose Set up later and choose Skip.
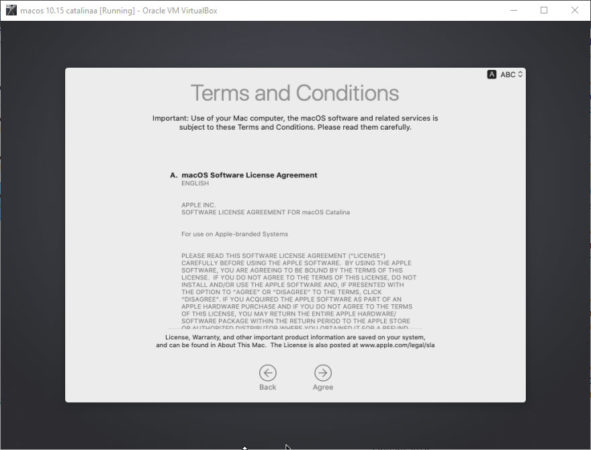
Apple has explained terms and services of their operating system in the Terms and condition window, choose continue to agree with them.
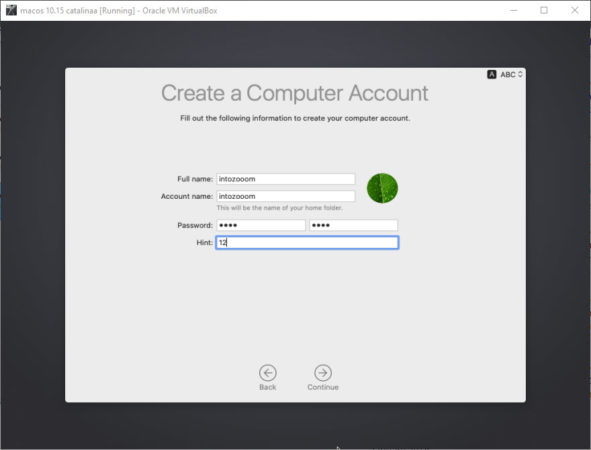
Since it is a local account you have to add a user name and a password with a hint if your ever forgot your password. The minimum characters of password is four letter, however a strong password is recommended.
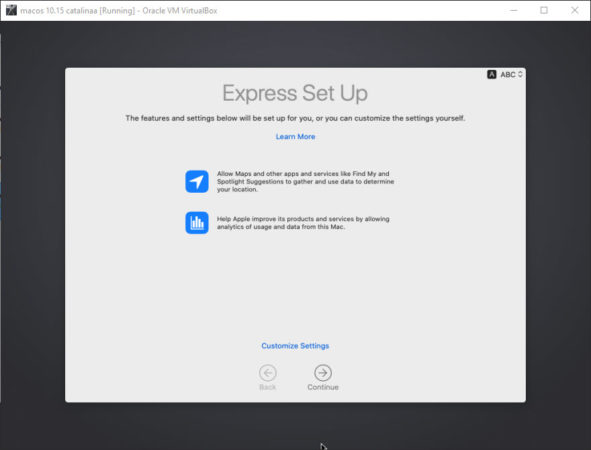
Express set up is about the the apps which uses location, if you want to allow them to track your location choose continue, if not customize them right here.
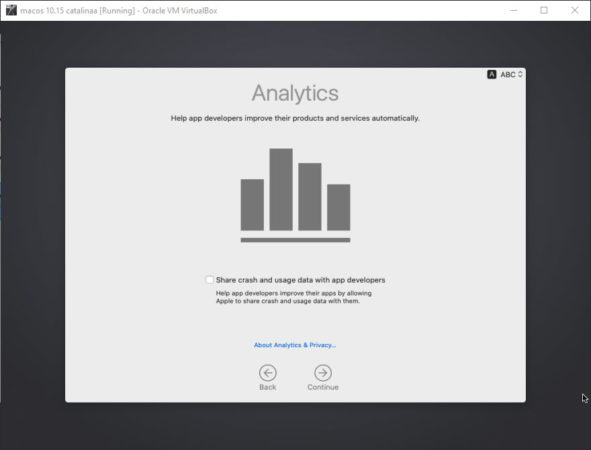
Choose continue with the analytics (It is basically gathering report for apple.).
Screen Time is an app arrived from iOS to macOS Catalina. This app is monitoring the apps which you are using and not using. If those apps or games expanding your time, you can manage your time by seeing the report. With screen time you can set up the following things.
- Weekly Report
- Downtime and App limits
- Content and privacy restrictions.
- Screen Time Passcode for your children.

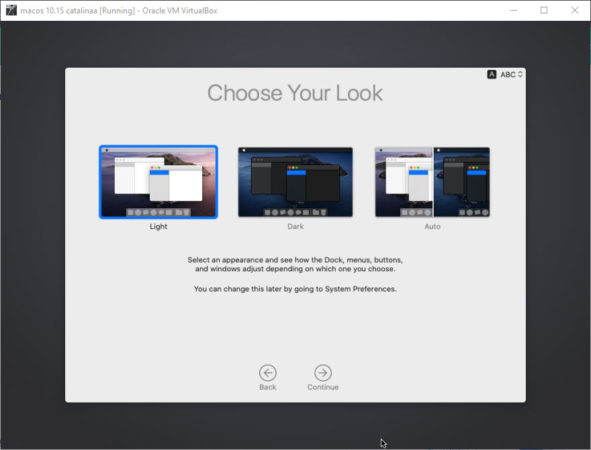
Choose a look for the macOS Catalina, there are three looks available light, dark and auto.
The Final step is to setup your mac.
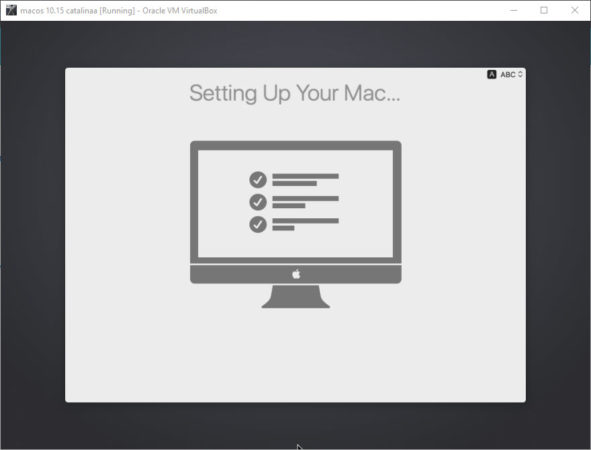
Congraulations; You have performed a clean Installation of macOS 10.15 Catalina on VirtualBox on Windows PC with an ISO File.

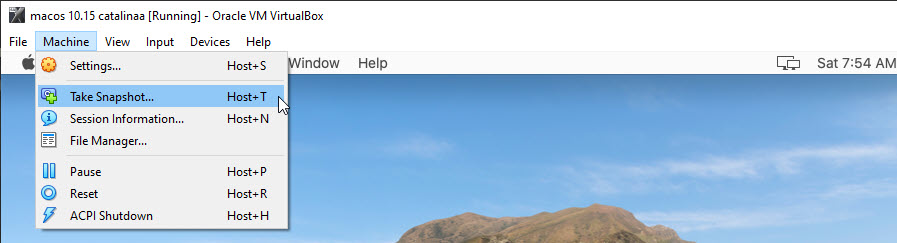
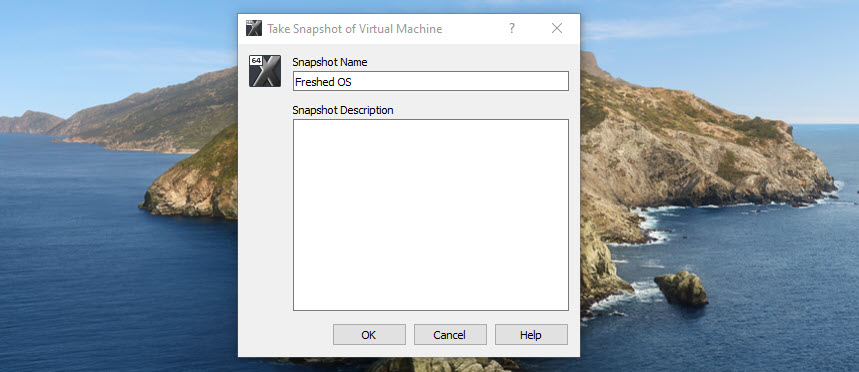
Let’s Take a Snapshot;
Snapshot is like a recvoery, if your files are deletd, you may have messed with settings, overall you have screwed everything. That is the time to use the snapshot and restore the settings and configuration back to the real state. On your own free will you can take as many snapshot as you want. Since it is new, I am going to take a snapshot because I am testing many software in this virtual machine.
To take the snapshot go to the machine menu and choose take a snapshot.
Provide a name to the snapshot, I will type fresh OS.
Install macOS Catalina with ISO on Vmware on Windows
Fix macOS 10.15 Catalina Screen Resoluation on VirtualBox on Windows PC
Using macOS 10.15 Catalina as a Full is not working, it will show the default view of 1024 * 768 pixels. There are no other aspect ratios inside the macOS 10.15 Catalina, so, it is terrible.
The good news is, there is a method which can fix the Full screen problem of macOS 10.15 Catalina on VirtualBox. This method is working inside the macOS 10.12 Sierra up to the latest version of the apple’s operating system.
Follow the below steps to fix the Full screen Problem:
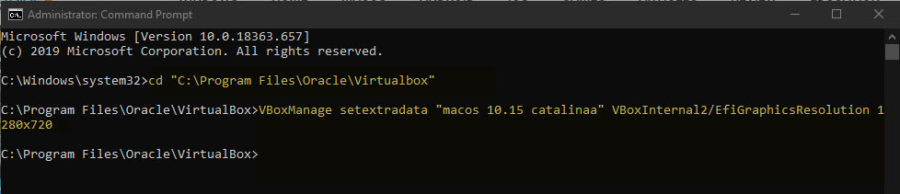
Copy the screen resolution code from below snap-it, then paste them inside Notepad.
cd "C:\Program Files\Oracle\Virtualbox"
VBoxManage setextradata “Your Virtual Machine Name” VBoxInternal2/EfiGraphicsResolution X
Open settings of the Virtual Machine which you want to change it’s screen resolution. From the general tab copy it’s name and paste that inside the code instead of the “your Virtual Machine Name”
Instead of X type one of the following aspect ratios.
1280×720, 1920×1080, 2048×1080, 2560×1440, 3840×2160, 1280×800, 1280×1024, 1440×900, 1600×900

Now run cmd as Administrator and apple code line by line.
And here have a look at the screenshot that it’s resolution is changed to mentioned aspect ratio.

How to Transfer files from windows to macOS Catalina on VirtualBox?
VirtualBox Guest Additional Tools is supposed to fix the drag and drop, in other words the copying. But it is not working at all, even for screen resolution we used codes on CMD to fix the problem. The same problem is with the copying and moving files from windows to macOS Catalina and copying from mac to windows.
Here is alternative method to copy files from any of the operating system to another. It is known as file sharing, so, here I will guide you how to Transfer files among them.
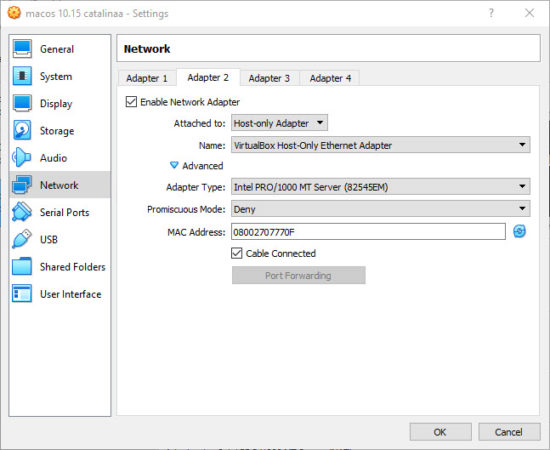
Step 1. Turn off VirtualBox & configure Network Adapter
If your virtualbox is running, specifically the macOS 10.15 Catalina, Power Off that. Open settings of the VM> go the Network and Enable Network Adapter 2. Then Apply the following preferences.
- Attached to: Host-only Adapter
- Name: VirtualBox Host-Only Ethernet Adapter
Make sure the advanced settings are configured as the below screenshot, however I don’t think it will be required because they are configured by default.
Step 2. Share a folder on macOS Catalina
Power on your Virtual Machine and head over to the system preferences of macOS. In the Preferences open the sharing.

Check the File sharing box> then from the plus icon you can add the a directory to share with the your host> and then from next panel set their permissions. I will give read and write permissions.

Add account for file sharing, to accomplish that click on the options, then check the user box and insert the login password.

In order to access the shared directory on windows, you have to find the macOS 10.15 Catalina IP Address. To find your system IP go to the system prefernces and choose network.

Choose the Network Adapter 2 and their you will see your IP Address.

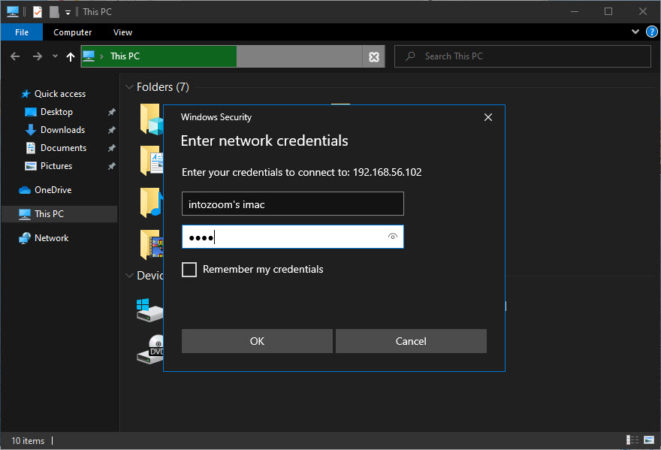
Keep that IP Address in your mind, because you are accessing the shared directories using the same IP Address. Now Open This PC and type in the search box the IP address as below.
\\192.168.56.102

If your IP Address is successful, you will on the credential window, type their your macOS 10.15 Catalina login and password.
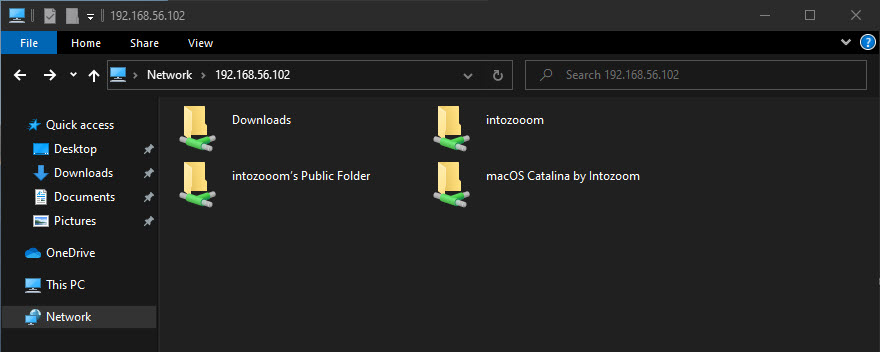
Here are the directories which are shared from the macOS 10.15 Catalina.
I am going to map the downloads folder for quick access, first I will copy the path. Then open this PC and click on View and choose map network drive.
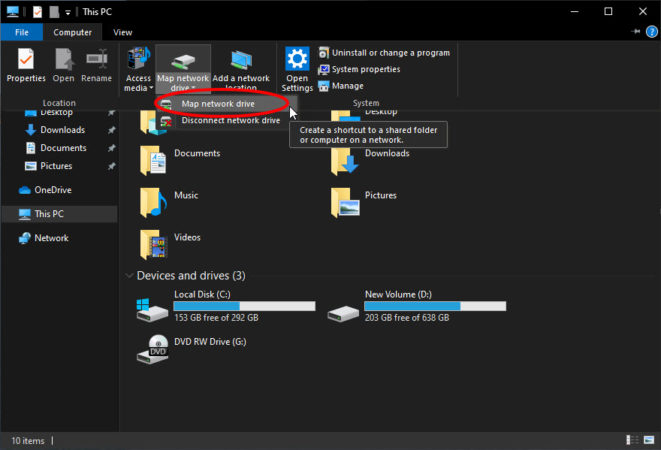
In the Map network drive window, choose the drive letter, and then paste the path which you copied before.

Now open this pc and the mapped network will look their.

Enable File sharing on Windows 10
While adding typing the credentials of the macOS 10.15 Catalina account on the Network credential window, you will face authentication error. It has several reasons but one of the is the file sharing settings. You have to enable the file sharing settings on windows 10.
Follow the below steps to enable file sharing on windows 10.
Step 1. Access the file sharing
Open run dialog box and type their control and hit enter to open the control panel. In the control panel window choose view network status and task.
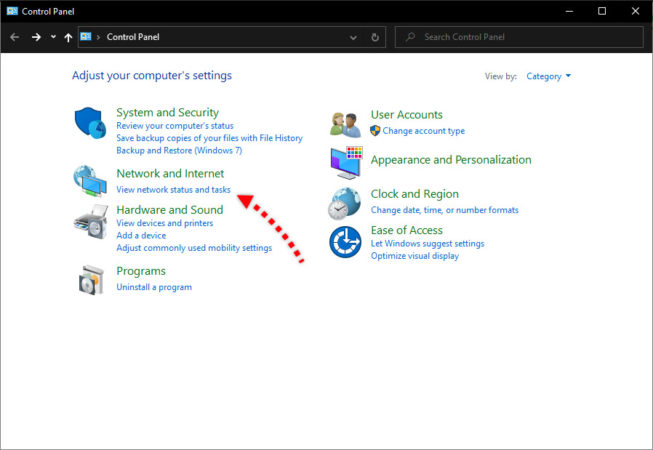
In the left panel choose Advanced sharing settings.
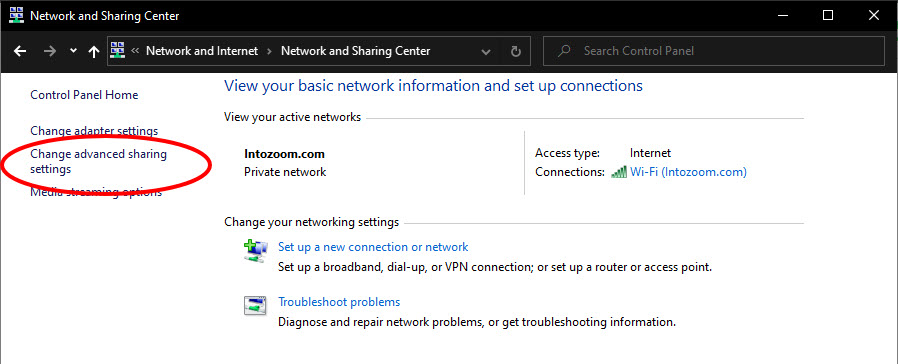
My network connection is a private network connection, that’s why I am going to expand the private settings. Their turn the file sharing and network discovery.

Now exapaned the All networks and apply the following settings.

How to fix macOS 10.15 Catalina Display on VirtualBox on Windows PC?
Video Memory or in other words the Display for graphics is 128 MB but in the macOS 10.15 Catalina the video memory is 3 MB.

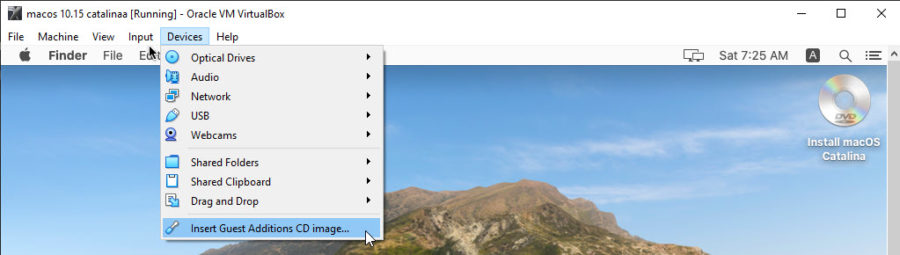
To fix this problem, install the Virtualbox additional Tools and then restart the operating system in VirtualBox.
Right click on the macOS 10.15 Catalina ISO file on the Desktop and choose the eject.

Go the devices menu> and choose Insert Guest Additions CD imaga.
If you faced the Could not mount the VBox Guest Additional Tools error, click on the details. Then their you can find the location where the Vbox Guest Additional Tools are located, simply go their and copy that in you desktop. Then easily load that inside Virtual machine.
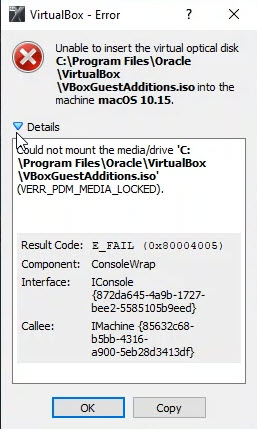
It is the path which is mentioned in the error box. “C:\Program Files\Oracle\VirtualBox” Here you have to the VBOXGuestAdditionalTools.iso.
In case if the VirtualBox said there is not the VBox Guest Additional Tools, Click here and download the latest version of the VBox guest additional Tools.
After downloading load it in the VirtualBox and start the installation. If you don’t know How to load the VirtualBox Guest additional Tools follow the below instructions.
Click on the devices menu> optical drivers> Choose or Create a disk image.

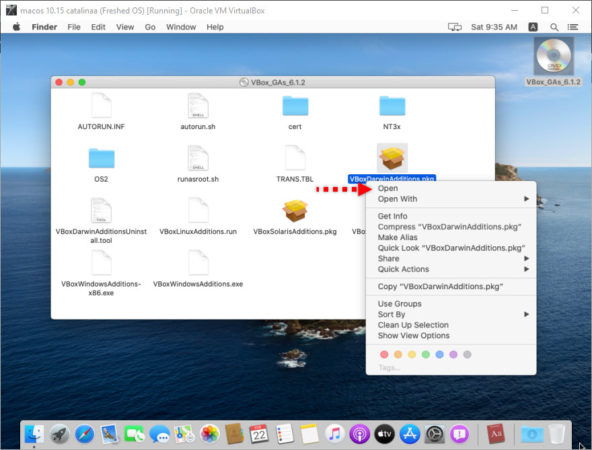
Click on the add and then locate the Vbox Guest additional tools, after locating click choose.
Right click on the Vbox Guest Additional tools and choose open. Then inside the directory open Open VBOX Darwin.pkg.
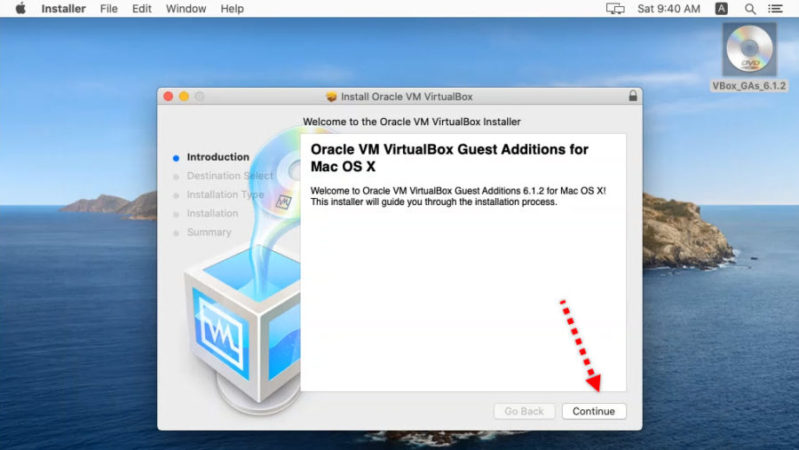
Welcome to the Oracle VM VirtualBox installer is welcoming you for using their product, choose continue to move to the next.
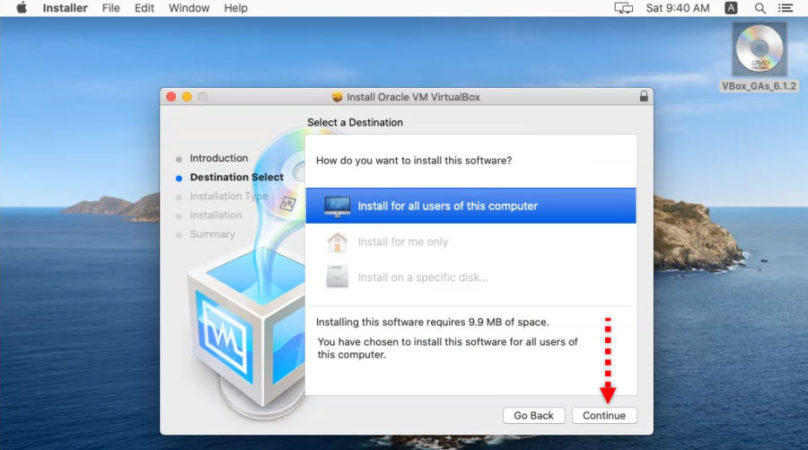
Choose the detination to install the VirtualBox Guest Tools, I will go with the default location and settings which is for all users.
Now you are ready to install the VirtualBox Guest Tools> choose install.

Enter your password to apply changes.
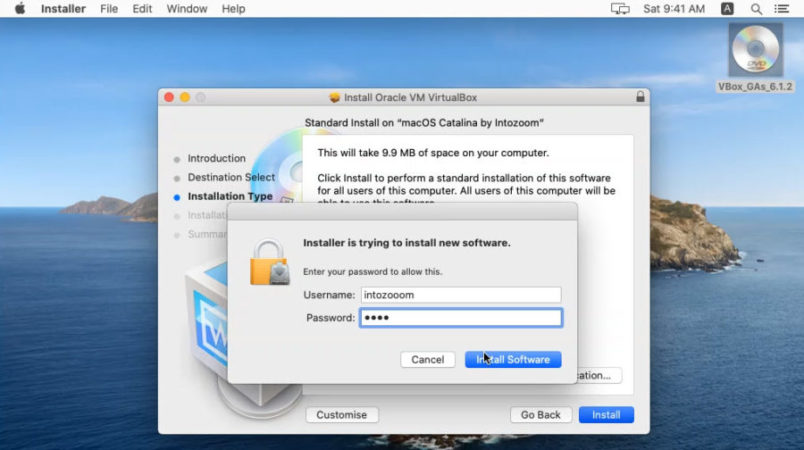
wait until the installation is done.

During the Installation a pop up will appear which saying system extension blocked. Click on the “Open security preferences.”

Click on the lock icon, enter your password and then allow the changes.

Once the installation is complete, restart your system Display will be 128 MB.
If you faced the “The Installation Failed” Error, it means it is not working, follow next guide to fix this problem.
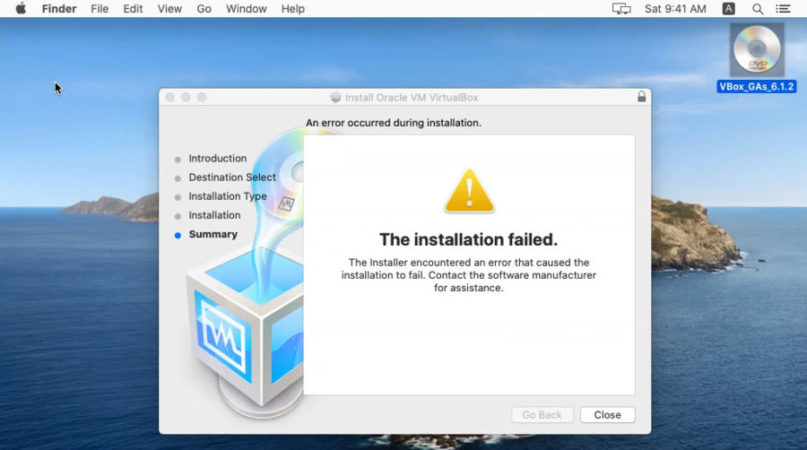
Fix Display Graphics with VMware Tools on VirtualBox
Shutdown the macOS 10.15 Catalina.
Download the VMware Tools from here.
Open Settings of the Virtual Machine with macOS 10.15 Catalina, visit the Display tab and change the graphics to VMSVGA.
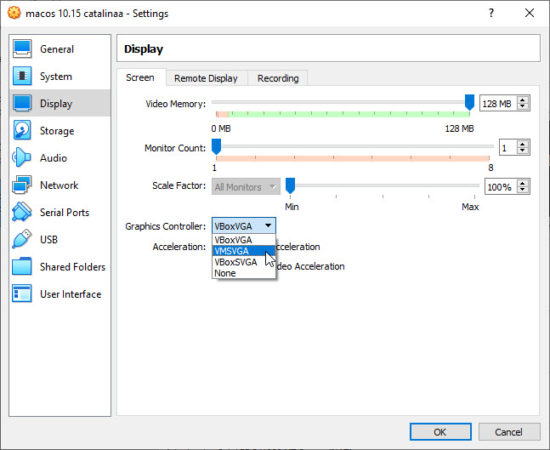
Power on the Virtual Machine and add the VMware tools from devices menu.

Double click on the VMware tools to start the installation process. Pass the Welcome window by choosing Continue.

Choose the location and click install.

Continue installation if the VMware tools says, after installation it will reboot the system.

Enter your password to allow changes.

During the installation the system blocked extension will appear, choose “Open Security Preferences”

Once it is opened, click on the lock icon and enter your log in password. Now click allow to allow this extension in macOS Catalina.

After allowing the extension, macOS will alert you that the legacy extension won’t be supported here. Just ignore it by choosing OK.

Quit the System preferences and click restart on the VMware Tools to apply changes.

After the operating system reboots again the system blocked extension will appear, again open it and again allow it.Once Again ignore the legacy extension notice.
To check if this Diskplay has increased to 128 MB or not, click on the apple logo and choose about this mac.

That’s all with How to Install macOS Catalina with ISO on VirtualBox on Windows PC. I hope it was helpful.
Related Searches:
- macos catalina virtualbox image
- virtualbox catalina install failed
- how to install macos catalina on virtualbox for windows 10
- macos catalina iso
- virtualbox catalina crash
- mac os catalina virtualbox
- macos catalina iso download
- mac os catalina iso download for virtualbox
- install virtualbox on macos catalina
- install virtualbox on catalina
- macos catalina iso
- macos catalina virtualbox image
- virtualbox catalina install failed
- catalina iso download
- macos catalina iso download
- virtualbox for catalina
I am using VirtualBox 6.1.4. and using your macOS 10.15.3 iso file, it allowed me to select language, and then it reboot the VM.
Please create a New Virtual machine and try again. Then let me know.
I think there maybe a compatibility issue with VB 6.1.4 with macOS 10.15.3. I did finally get it to work a VM running after downgrading from using Virtualbox 6.1.4, to 6.1.2 and running your macOS 10.15.0 file.
I tried your 10.15.3 ISO with VB 6.1.2 and it stays at the VirtualBox image saying starting boot0001 “UEFI Vbox CD-ROM…” and doesn’t go anyfurther.
So luckily I did get something to finally work.
I cannot get the GuestAdditions to work worth a shit either. I have tried several different versions…used VM Tools instead to get my display ram up from 8mb and it screwed up my screen resolution and I cannot fix it.
Hi, I think I have mentioned in the post before getting started, you have to take a snapshot. Most of the Time the VMware Tools and VirtualBox Additional tools are not stable with the current version of macOS. As soon as I found a method, I will tell you about it.
Though I also recommend, it your current Virtual Machine is ruined you have to create a new virtual machine and this time take snapshots.
Ok sorry, same person from earlier…disregard my question on the other post.
I have followed everything to a T and dotted all my i’s but I am having a problem with my screen resolution. I have a 4k monitor, but was only trying to run at about 2k (2560×1440). I was running at 2048×1080 just fine until I did this last part about getting my display ram from 8mb to 128mb…I was having problems with the Guest tools so I had to use the VM Tools. My display is now at 128mb (so sad considering Im using an Nvidia 1080 8GB and cant get more than 128) buuuut my resolution is locked at 1024×768. I tried redoing the VM codes in CMD (as administrator) and it will not change. Stuck, help, please?
Hi, Did you apply the below codes on CMD to fix the screen resolution?
cd “C:\Program Files\Oracle\Virtualbox”
VBoxManage setextradata “Your Virtual Machine Name” VBoxInternal2/EfiGraphicsResolution X
or
cd “C:\Program Files\Oracle\Virtualbox”
VBoxManage.exe setextradata “Your Virtual Machine Name” CustomVideoMode1 XxXx32
Hey, could you help me?
After typing “install.nsh” VM just going to this step again and again.
If i change my chipset setting to “PIIX3” it loads to the step where i must type ‘install.nsh’ and then the error “SerialATAPI device reconfiguration did not complete successfully” appears.
What should I do?
PC: Intel i7 8700k, ASUS Prime z370-P, GeForce GTX 1060 6GB
Hey, When I select the language, the VM turns off accusing heating. What do I do?
What are your system details?
hi , i’ve done all , but at the installation i, it freeze at ” 14 minutes remaining ”
i’ve done the AMD installation but it freeze , i tried twice and it do it again
Hello, I have repeated this tutorial many times and every single time I have gotten stuck on ” booting0001 “.I have entered the codes perfectly for AMD systems and still get this resault. Is there anyway that you could possibly help me. Thank you very much for all the work you do. Below I have included all the info I could give you.
I would also like to add that I am using the latest installation of Virtual box (6.1.6) with the corresponding extension pack. I used the ISO file that you supplied with your download link.
Your PC is not compatible with the macOS Catalina.
Can I ask how come? Could it be compatible with an older version?
Also, sorry that I didn’t give you my specs, the program deleted my link, I will paste them here.
Processer :AMD A10-5745M APU with Radeon(tm) HD Graphics 2.10 GHz
RAM: 6 GB (5.19 GB usable)
x64 bit processor and a 64 bit operating system.
Thanks for all your help.
THANK YOU SOOOOOO MUCH. IT ALL WORKED EXCELLENTLY WELL, you are a very GOOD teacher
Hi I’d like to ask is there a fix to get imessage, app store working? I can’t seem to login and reading around I think it has something to do with not having a serial number? I’m not very sure
The user guide also states that macOS as a guest supports one CPU only, but you show using 2 CPUs. Do you know if 2 CPUs are being recognized by macOS?
Hello there.I’ve been trying to install macos on virtualbox for a long time.And all of the ones i installed had no sound at all.I wanted to ask if this tutorial is fixed.
try installing Voodoohda
Hi, I managed to format disk as per the above guide. After accepting the SLA installation wizard got stuck on disk selection meaning disk is grey out. Any tips on how to proceed further?
Many thanks,
Piotr
i follow steps but after it restarts after copying files it shows an error a mount point is required for installation. i check it out and i see that the hard disk is un mounted every time i restart it. please help me.thanks in advance