During the pandemic, I was scanning everything with my smartphone and then send it to the teacher for assignment. Now the question is how to scan documents with Samsung Galaxy S9, S10, Note 9, Samsung Galaxy S20, Samsung Galaxy S21 ultra, or any other Galaxy version. During the pandemic, I used this method and the result was awesome, so there is no need for you to use the heavily loaded giant printer or scanner to scan the paper and then convert it to a digital photo. In this post, I am going to guide you on how to scan documents with Samsung Galaxy smartphones and other smartphones, however, I’m also going to introduce some applications at the end that you can use to scan your documents even if your phone is not a Samsung.
Unfortunately not every Samsung smartphone has the built-in scan ability, instead, they can use the CamSanner, Adobe Scan, or Google Drive. Samsung SmartPhones with the Android 9 and 10 (Samsung One UI 2.0, One UI 2.1, and One UI 2.5) and higher have this built-in feature. Maybe you are not so observant, because you may have not noticed the built-in scan functionality in your phone. You can scan documents such as school cards, business cards, School or college notes and Assignments, your paper photos, and more.
1. Enable Built-in Scanner Feature within the Camera App on Samsung
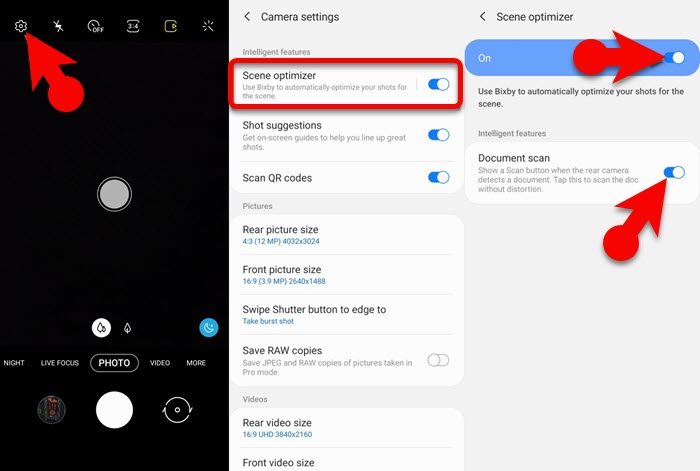
Since you are trying to scan a document a photo it is seen then basically the feature must be available in the camera app on your Samsung device. If you are running Android 10 or higher then the feature must be enabled by default, however, if you cannot still see the option then you better follow the below steps to enable it.
- Open camera app on your Samsung device, and then tap on the settings icon at the left side on the top corner.
- Enable the scene optimizer by tapping on it.
- Also enable the Scan Document too.

2. Scan Documents with Samsung Galaxy
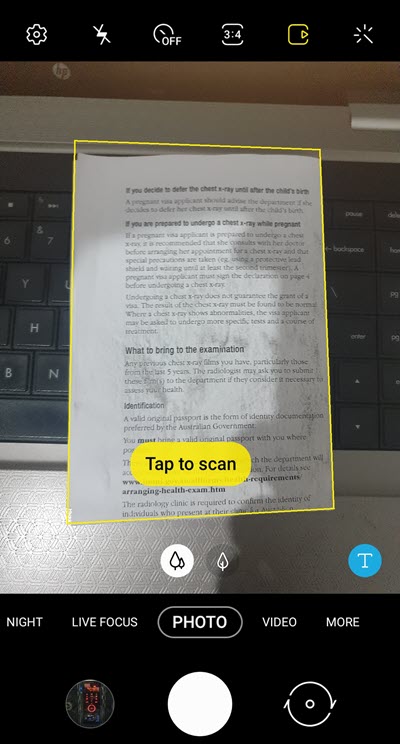
The moment the Samsung scan option is turned on, you can scan any type of document that you want. Just make sure to point them towards the document, and wait for the borders of the document to be highlighted, after that you will see the tap on it option there, tap on it and your document will be scanned.

Once the document is scanned, you’ll find it in the gallery.
Suppose if you have done your assignment and then you have scanned your document, you need to send it as a PDF file to your teacher. Now to create a PDF file using this Samsung Galaxy smartphone, open the scanned document, then tap on the three dots, and choose the print. Choose PDF and save it somewhere on your smartphone.
Best Document Scanner Apps for Android and iOS
1. Cam Scanner
Cam scanner is one of the best document scanner apps that you can find on the Google Play store. With the help of the Cam scanner, you can scan documents, ID cards question books, books, greetings Card, QR codes, and finally, you can also convert a photo into a Word document. If you have created a table on the paper you can just convert it into an excel form directly from the Cam scanner app.
The moment you take the photo using the Cam scanner, it has a variety of options such as adjusting the angle for the photo, lighting correction, copying text directly from the document, The option to translate, and more. Cam scanner comes in two editions of the free and pro versions. For the pro version, you have to purchase it but the free version can fulfill your job. The only thing that I have noticed during the free version when you’re creating a PDF file you will see the cam scanner logo at the bottom of the scanned document.
So if your Samsung smartphone or if you are using another smartphone from another company then you should basically use the Cam scanner to scan documents.
2. Adobe Scan
In the world of graphics, Adobe has a name of its own, it is on the next level, so, why I should not include their Adobe Scan App in this list.
The first thing is about the Adobe scan is that you have to sign in, or else you cannot use the application to scan your documents. With the help of the Adobe scan, you can scan business cards, ID cards, documents, forms, and finally whiteboards. After you scan the photo you have the option to adjust the sidebar of the photo, and then at the same time, you can copy text from the whiteboard or the document that you have scanned. A variety of editing options are available to edit the scanned document such as the crop, rotate, filters, clean up, resize, and finally the delete option.
One thing that I like about Adobe scan is continuous scanning documents. Suppose if you have done your assignment that is around 10 pages you have to just take 10 photos off your assignment and then edit them all together and save them as a PDF file.
Also Read:

