In this tutorial you will learn how to Install macOS on Windows 10 on a virtual machine and create a virtual Hackintosh.
Windows 10 is a great operating system, but it has its drawbacks. Even if you are interested in Microsoft Windows 10, you can still try and get other versions of the operating system from different companies. But what is a safer and cheaper way to use your favorite operating system than a virtual machine? This way you can run macOS inside Windows 10.
What files do we need to Install macOS on Windows 10?
You will need to download and install the necessary tools before proceeding.
This is a tutorial on how to create macOS virtual machines using both VirtualBox and VMware player.
To get started, download the VirtualBox and VMware Player from the links mentioned above.
You also need a version of macOS. In this tutorial we have used the macOS 10.14 Mojave. Note that this tutorial is currently only available on computers running Intel and AMD processors. So this tutorial will focus on installing macOS on a virtual machine on Intel and AMD hardware.
Download MacOS Mojave Image file for VMware & VirtualBox
Download macOS 10.14 Mojave APFS Virtual Images:
- IntoGuide
- SundryFile Password applehint.com
- Mediafire Password Geekrar.com
- Techgofast
Download macOS 10.14 Mojave HFS Virtual Image:
Download VirtualBox Codes:
VMware Player Patch Tool:
(HFS and APFS are different file systems. APFS is the newest file system introduced in 2017)
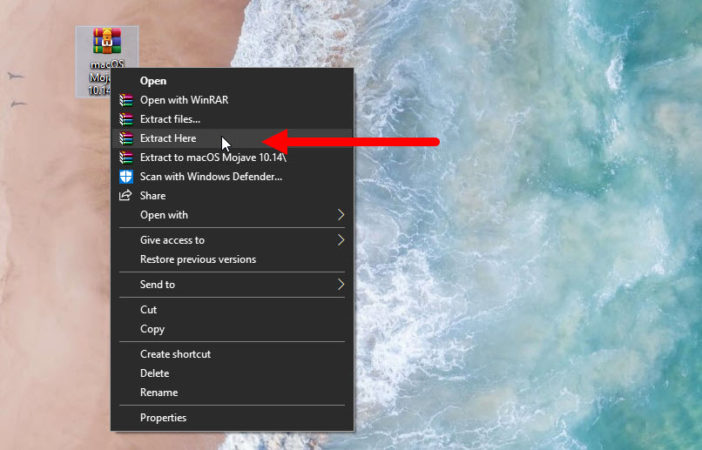
After downloading the files, right-click and unzip them. For example, you can unzip the files using the 7zip (open-source compressing software). After unzipping you will see a file with the VMDK extension. The main file we use to build the virtual machine.
How to create a macOS virtual machine with VirtualBox?
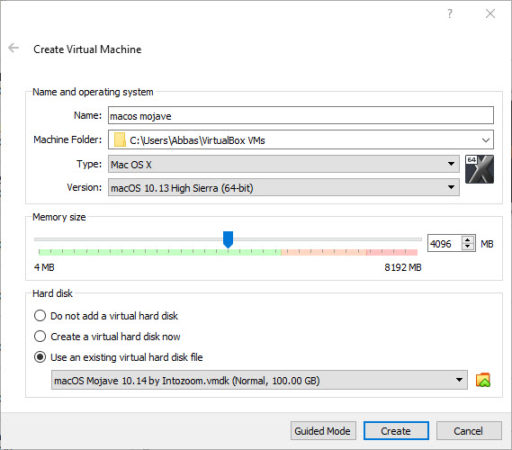
After opening VirtualBox, select New then select expert mode. Type macos mojave in the Name field to automatically identify VirtualBox from other properties. Just note in the version section, select the 10.14 version of Apple’s operating system.
Next, specify the amount of macOS virtual machine RAM. A minimum of 4GB of RAM is offered, but you can specify as much RAM as possible. Remember, you can’t allocate more RAM to your virtual machine than your main system does.
Finally, from the hard disk section, select the Use an existing virtual hard disk file option, and then import the folder where you extracted the VMDK file in the extracted.
Virtual machine settings for running macOS Mojave on VirtualBox
Before starting your virtual machine you need to make a few different adjustments to it.
To start the settings, right-click on the virtual machine and then select Settings.
Enter System, then disable Floppy from the boot order section. Then check that the Chipset section is set to ICH9.

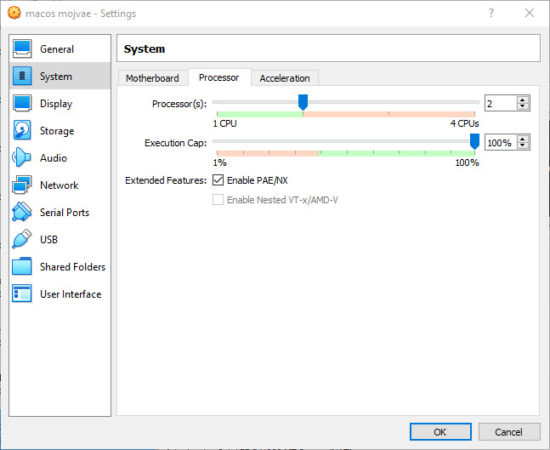
Now go into the Processor section and assign the two cores to the virtual machine as in the image below. If you use a powerful processor like the Core i7, you can allocate more cores to the virtual machine. Finally, remember to enable Enable PAE / NX.
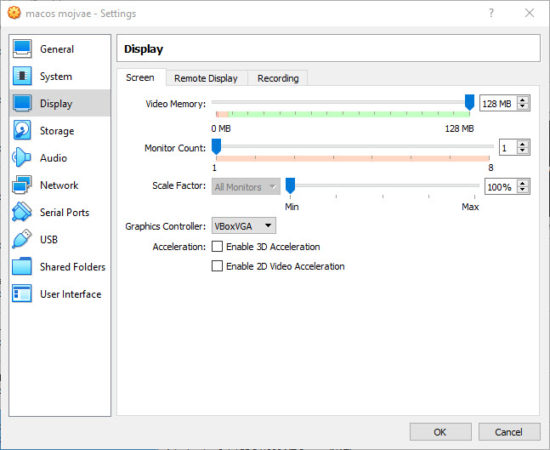
In the Display section, set the Video Memory settings to 128 MB, and finally in the Storage section, be sure to enable the Use Host I/O Cache option.
Command for running macos on a virtual machine
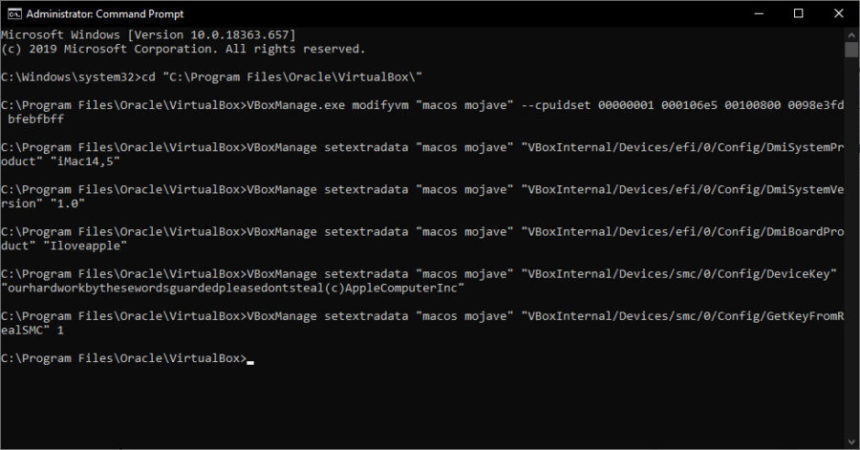
Unfortunately, VirtualBox cannot execute macOS image files in the current configuration. There is, of course, no room for concern as this can be solved with a few lines of code. Close VirtualBox first to get started. Then search for cmd in the Search section and run it as Run as Administrator.
The first code to enter after the cmd is launched is as follows.
cd "C:\Program Files\Oracle\VirtualBox\"Then enter the following commands line by line.
VBoxManage.exe modifyvm "macos mojave" --cpuidset 00000001 000106e5 00100800 0098e3fd bfebfbff

VBoxManage setextradata "macos mojave" "VBoxInternal/Devices/efi/0/Config/DmiSystemProduct" "iMac14,5"

VBoxManage setextradata "macos mojave" "VBoxInternal/Devices/efi/0/Config/DmiSystemVersion" "1.0"

VBoxManage setextradata "macos mojave" "VBoxInternal/Devices/efi/0/Config/DmiBoardProduct" "Iloveapple"

VBoxManage setextradata "macos mojave" "VBoxInternal/Devices/smc/0/Config/DeviceKey" "ourhardworkbythesewordsguardedpleasedontsteal(c)AppleComputerInc"

VBoxManage setextradata "macos mojave" "VBoxInternal/Devices/smc/0/Config/GetKeyFromRealSMC" 1
Boot macOS Mojave in virtual machine
Now run VirtualBox again and start your the created virtual machine.
After the start, a set of codes will appear on the screen, and then for a minute or two, a gray screen appears. Then you will see the macOS welcome page.
You can now adjust your settings to get the operating system up.
Important Note: After you reach the Welcome screen, it is best to take a snapshot of this page to return to the gray screen if you have problems with the operating system or the wrong settings. And after installing and upgrading the OS, take another snapshot and go straight to the same section using it. To take a snapshot on the virtual machine, enter the following route:
machine> Take Snapshot
Mouse and keyboard not working?
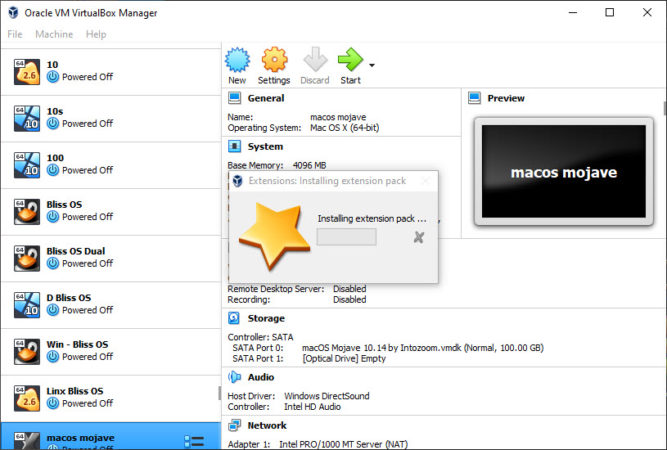
If the mouse and keyboard do not work for you after the steps above, you should download the Virtualbox Extension Pack, then install it.
After installing the extension pack, open the virtual machine. From the Settings section, select USB and then select USB 3.0 (xHCI) Controller and hit OK. Now use the mouse and keyboard without problems.
Create a macOS Mojave machine on VMware Workstation Player
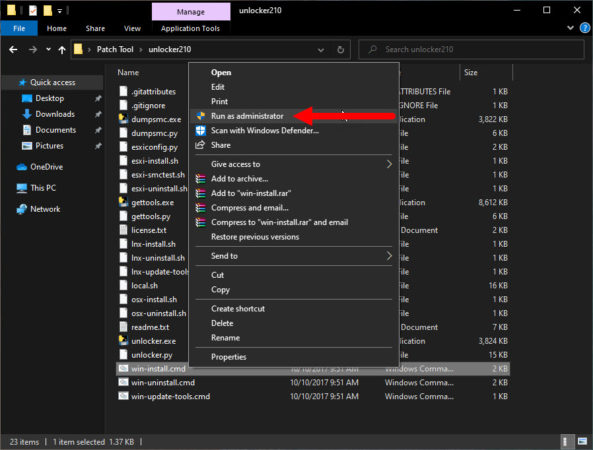
If you prefer VMware to VirtualBox, you can run the VMware with a few changes to VMware. First download and install VMware Workstation Player. Before we create the virtual machine we need to run the patch files first.
Download the VMware Player Patch Tool from the provided link above. To After downloading the Patch Tool Extract it from zip. Open the unblocker , find their win-install.cmd, right click on it and run as Administrator. Then a window will open and the patch operation will start. When the patch is complete, open VMware.
Note: that if you encounter a File not Found message, it is because the folder in which you copied the patch file has nothing to do with the original VMware folder. (VMware is installed by default on C drive)
Create macOS Mojave Virtual Machine in VMware
After you open VMware, select the Create a New Virtual Machine option and then select I will install the operating system later. Now select the Apple Mac OS X option from the version section. After selecting this option, you will be presented with Version to macOS 10.14.
You must now select a name for the virtual machine. We recommend macOS mojave. After selecting the name, save a copy of the virtual machine installation path somewhere, as we’ll need to do some editing later.
In the next step after setting up the virtual hard disk drive, be sure to enable the Store virtual disk option as a single file. Note that after setting this step, do not run the virtual machine yet.
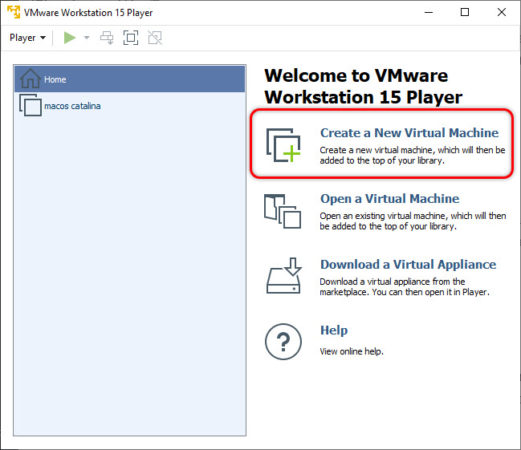
Create a New Virtual Machine on VMware Player 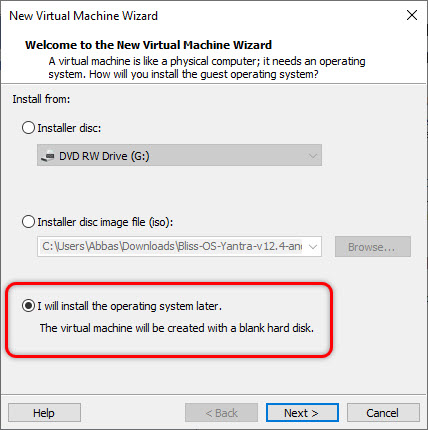
Install Operating system Later 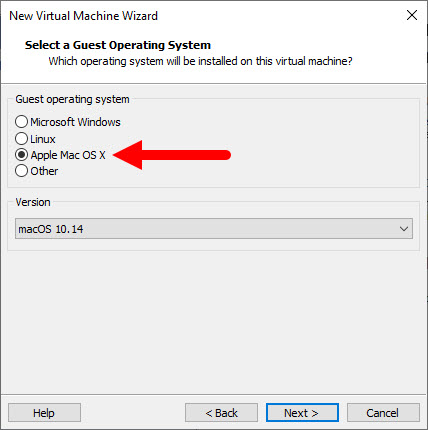
Choose Guest Operating system 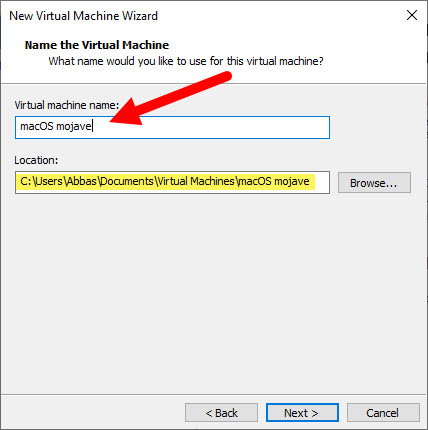
Name the Virtual Machine 
Disk Size 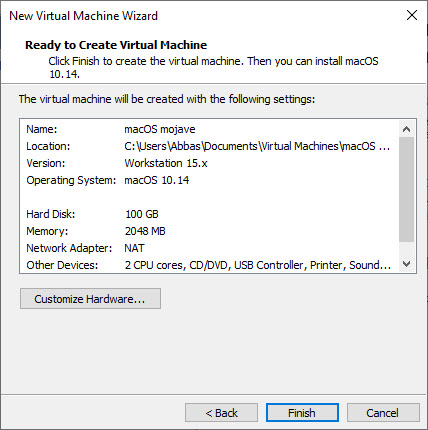
Ready tp Create Virtual machine
Edit macOS settings on virtual machine
Before setting up the virtual machine you need to specify the hardware specifications as well as the macOS VMDK file path.
On the VMware homepage, right-click on the name of the virtual machine and adjust the hardware settings like the settings we learned in VirtualBox. It is best to have at least 4GB of RAM to get the best results. In the Processors section, adjust the settings of the processing cores to two. Now go to the Hard Disk (SATA) section and clear the hard drive that the virtual machine created, then select Add> Hard Disk> SATA (Recommended)> Use an existing disk virtual mac OS file specified with the VMDK extension.
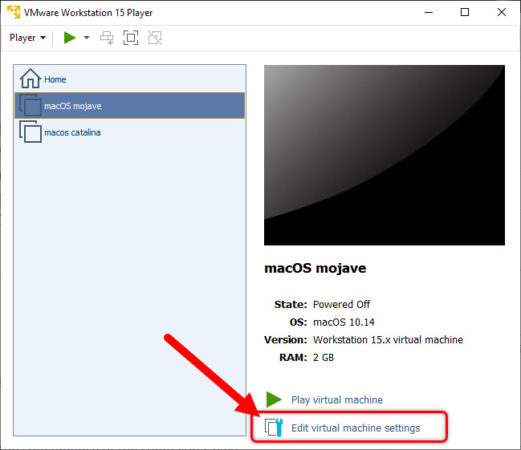
Edit Virtual Machine Settings 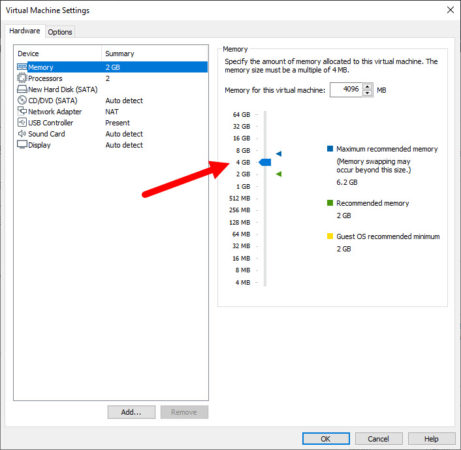
Increase amount of RAM 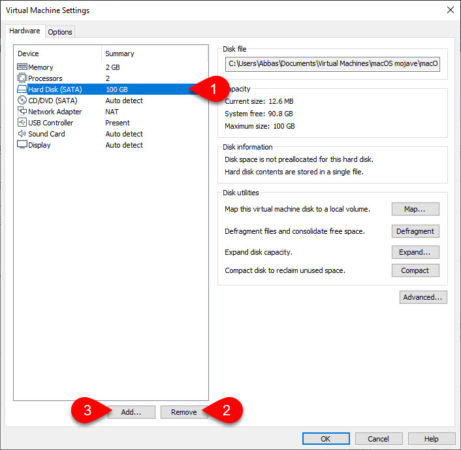
Remove the old HDD and Add a New HDD 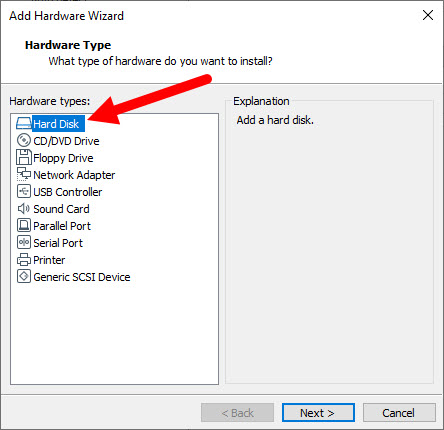
Add a New HDD 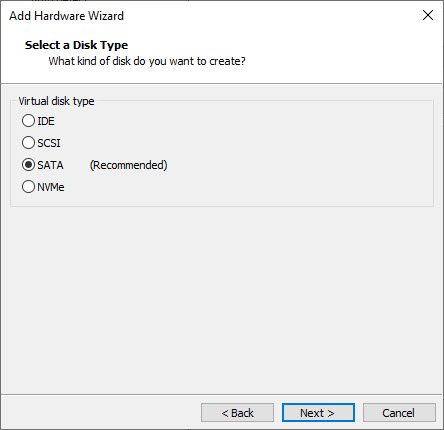
Disk Type 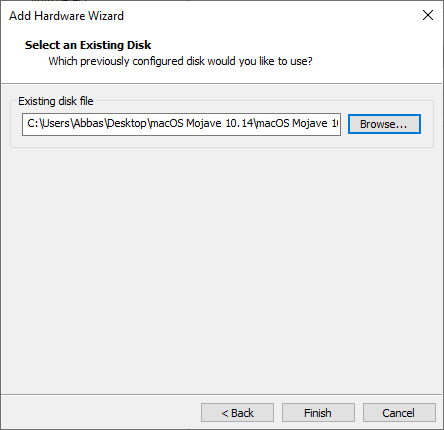
Browse for macOS Mojave Virtual Image 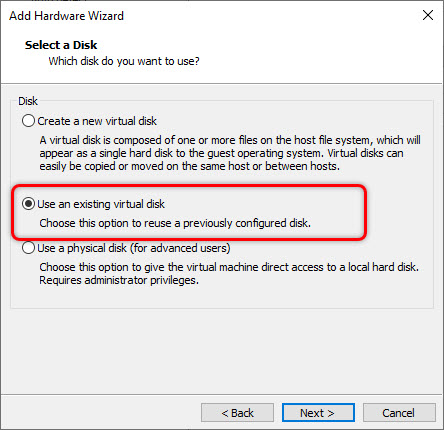
Use an Existing Virtual Disk 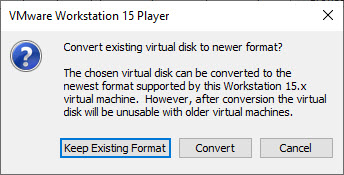
Keep Existing Format
Edit VMX file
Before running the last step, you need to open the path you already saved and make changes to it.
The default route is as follows (for the convenience of the route you saved in the previous step)
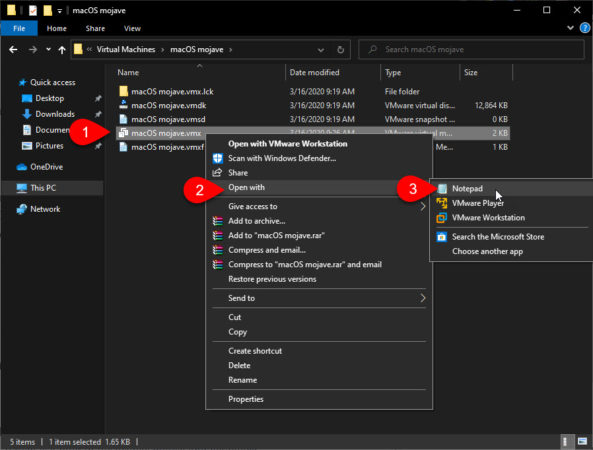
C:\Users\YOURNAME\Documents\Virtual Machines\YOUR MAC OS X FOLDERWhen you enter the folder you need to find the macOS.vmx file and open it with Notepad.
Scroll to the bottom of the file and type the following command at the bottom of the page and then save the file.
smc.version = "0"
or
smc.version = 0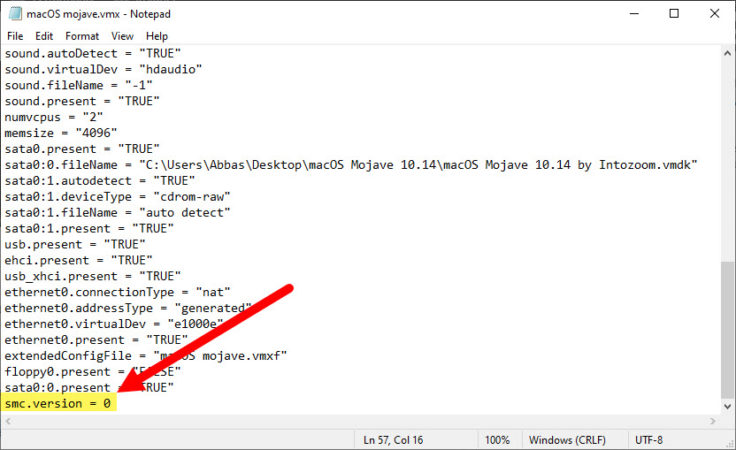
Start the VMware Workstation Player, then power on the Virtual machine. The Installation is process is easy, so you are good to go, if you faced some kind of problem, play the video.
Install VMware Tools on Virtual Machine
If you remember, there was a list of files needed to download a file called VMware patch tool, which is a plug-in for proper mouse and keyboard performance and graphics settings. Follow these steps to enable this plug-in:
Player> Removable Devices> CD / DVD (SATA)> Settings
Now from the Use ISO image file section, select the VM Tool New.ISO file you previously downloaded, and then click OK.
Now on your desktop an icon called VMware Tools drive is added. Double-click it and then select Install VMware Tools. You will probably receive several security messages when you install them, which should go to:
Open Security Preferences> Allow
Now save all the changes and run the virtual machine.
Probable Problems Install macOS on Windows 10
You will probably have problems installing and running MacOS on the virtual machine.
- If the virtual machine fails, you may need to double-check the settings and patch files again.
- If you have the message “Mac OS X is not supported with binary translation”. You need to enable the virtualization option from the BIOS / UEFI settings section.
- If you encounter a “(VMware Player unrecoverable error: (vcpu-0)” warning during runtime, you should check whether the macOS.vmx file has been edited properly.
Finally, it is important to note that the use of any operating system in a virtual machine cannot, under any circumstances, convey to the user the actual experience of working with that operating system on real hardware.
That’s all with How to Install macOS on Windows 10, let me know if you have any question.
Also Read:
- 6 Steps – Install MacOS Catalina With ISO On VirtualBox On Windows
- How To Create MacOS Catalina ISO DMG File?
- Dual Boot Windows 10 And MacOS Catalina On PC- Hackintosh
Download Link Courtesies:
- VMware.com
- VirtualBox.org
- IntoGuide.com
- Techgofast.com
- Applehint.com
- Wikigain.com
- Geekrar.com
Related Searches:
- mac virtual machine on windows
- mac os virtual machine download
- mac os virtualbox image download
- macos virtual machine
- install mojave on virtualbox on mac
- how to install mac os dmg file on virtualbox
- virtualbox mac os download
- macos mojave virtualbox
- Install macOS on Windows 10
How do you enable sound