Today I am going to guide How to create macOS Monterey Bootable USB using Terminal in the simplest way possible. Provide me with your support by commenting on your thoughts at the end of this post.
For a mac, all you need is the operating system, a USB, and a line of command which is yet to come in this post. These are all the requirements to perform a clean installation on a mac computer. But To be exactly sure you need to have to guts to perform a clean installation on a computer rather than a mac. Because it is hard and requires a lot of attention and patience, here you can follow how.
- Download macOS Monterey ISO Image
- How to Install macOS Monterey on VirtualBox on Windows – PC?
- How to Install macOS Monterey on VMware on Windows- PC?
Steps to Create macOS Monterey Bootable USB using Terminal
There are three steps need to create a macOS Monterey Bootable USB and they listed below.
- Download macOS Monterey Installer
- Attach the USB and format it as Partition GUID Map
- Use the terminal to create a bootable USB.
Step 1. Download macOS Monterey Installer
First thing’s first, you have to download the macOS Monterey Installer on the Applications directory, otherwise, you can not process it. Once the macOS Monterey is fully released on the Market you can download it from the app store. Since it is in the beta version, you may use your developer account, if you don’t have it, use the Install Assistant.pkg.
What is InstallAssistant.pkg?
Install Assistant is not a very big deal since its only purpose is to contain the macOS’s data in a cage inside itself. And when you install the Install assistant.pkg it will combine them and extract them on the Applications directory.
The good thing about the Install Assistant is that it is provided by Apple for the developers. You can also get it from the Apple servers as long as you have a developer account. But among the developers, there are users who are willing to provide the link to the others users. So, I am providing the download link to the Install Assistant package from Apple servers. You may download it, and create a Create macOS Monterey Bootable USB using Terminal.
Download macOS Monterey Beta Assistant.pkg
| macOS 12 Beta Version Download | Ver | Build | App | Avail? | Date |
| InstallAssistant.pkg | 12 | 21A5248p | 17.0.7 | YES | 6/7/21 |
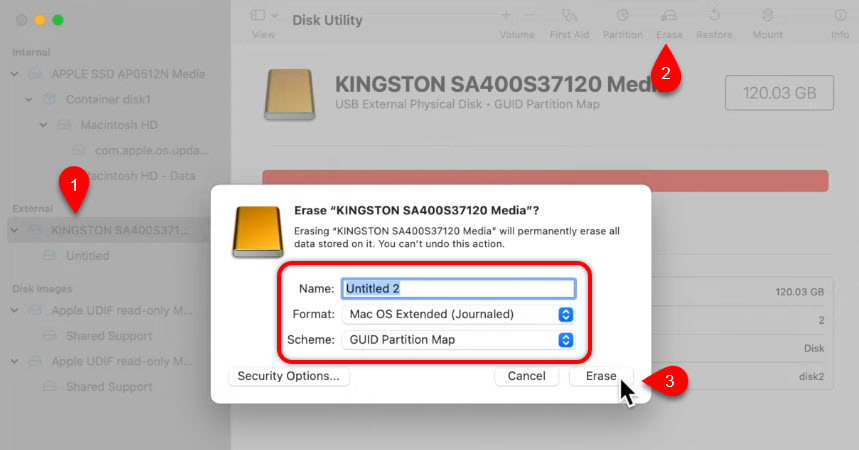
Step 2. Erase the USB Flash Drive
We need to format the USB flash drive as a macOS Extended (Journaled) with the scheme of the GUID Partition Map. APFS is not working as its format so, make sure you have to format as mentioned before.
Hold command + space, search the disk utility.
Under the external drivers select the USB flash drive, choose to erase, and format the USB with the as a format of the mac OS Extended (Journaled) with the scheme of GUID Partition Map.
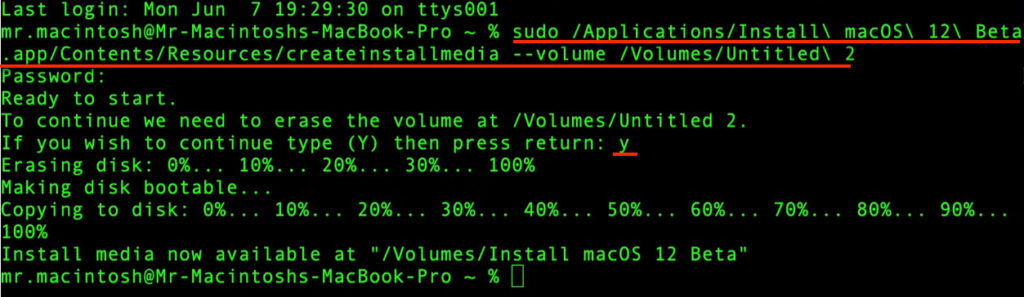
Step 3. Use the Terminal to create a bootable USB
Launch the Terminal by holding Command + space or open it using the applications> Utilities.
In the Terminal you have to type the following command.
sudo /Applications/Install\ macOS\ 12\ Beta.app/Contents/Resources/createinstallmedia --volume /Volumes/Untitled\ 2
Based on the version of macOS, this command will not work, I want you to learn a permanent solution for it. For starters, right-click on the macOS Installer and show content package> Contents> Resources and find createinstallmedia.
Now open Terminal type sudo and then drag the createinstallmedia on the Terminal, at the end type –volume /Volumes/ VolumeName
Summary
I think till now you know How to create a macOS Monterey Bootable USB using Terminal. Even though word advice is good for health. If you are determined to perform a clean installation, buy a USB 3.0 for creating a bootable USB, then follow the below steps.
- Simply format the USB as Mac OS Extended (Journaled)
- Download the operating system known as macOS 12
- Use the Terminal to create a bootable USB
Source: Mr. Macintosh on YouTube