File sharing is an important factor, so it is good to know file sharing between Kali Linux and Windows 10. In order to Easily Share Files Between Kali Linux and Windows 10 you need to check the network connectivity, shared folder, access it in Kali Linux. In this post you will learn the below scenarios.
- How to check Network Connectivity both on Kali Linux and Windows 10?
- Enable Windows File sharing
- Create a folder and share it over Network
- Access windows shared folder on Kali Linux
Just to let you know, For these scenario I am using the VMware Workstation Pro. I have already Installed Windows 10 and I have downloaded the Kali Linux Virtual machine For VMware from Kali Linux Website.
Before Getting started with How to Share Files Between Kali Linux and Windows 10, there are some things you need to do.
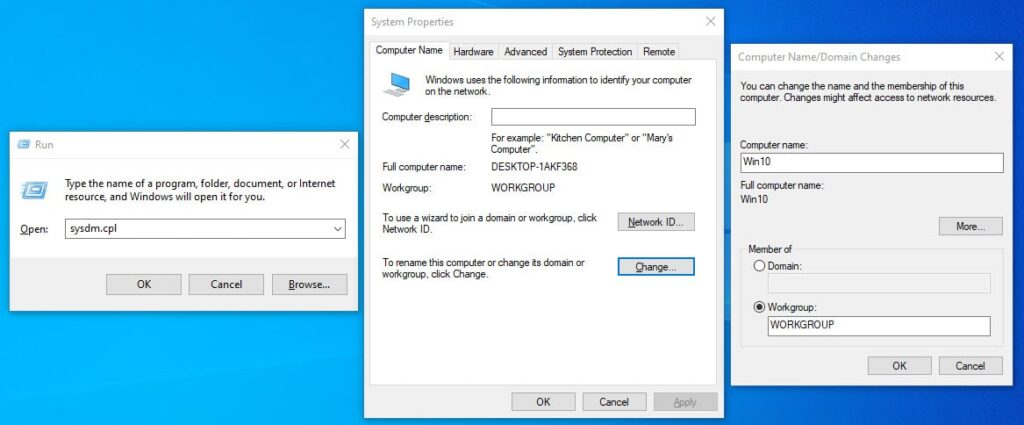
#1: You have to change the Computer Name on Windows 10.
In order to change the computer name, Open the Run dialog box and type sysdm.cpl, this will open system properties. Click change and type Win10 and click ok to restart the system.
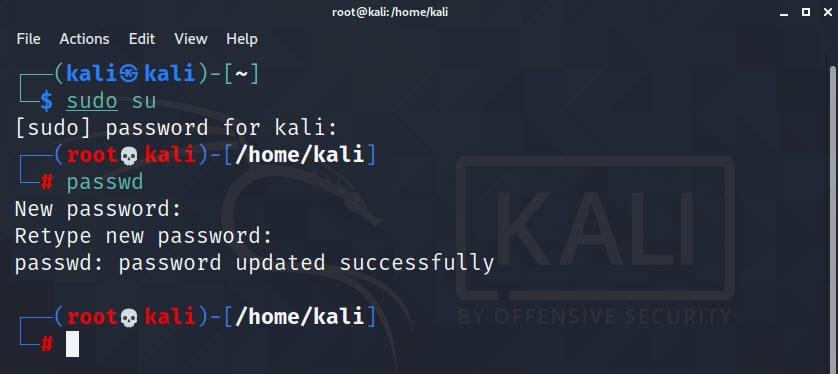
#2: Login Inside Kali Linux as a root user
If you have downloaded Kali Linux For Virtual machine from Kali Linux Website, then the password is not mentioned. You need to create a new password for Kali Linux as a Root user. To do you log in as kali user and open Terminal, type sudo su, then type your password.
Now you have the root privileges, to change the password type passwd and press enter. type a new password and reenter the password.
(kali㉿kali)-[~]
└─$ sudo su
[sudo] password for kali:
┌──(root💀kali)-[/home/kali]
└─# passwd
New password:
Retype new password:
passwd: password updated successfully

┌──(root💀kali)-[/home/kali]
└─#
Share Files Between Kali Linux and Windows 10
Now it is time for file sharing between Kali Linux and Windows 10 but before performing a successful file sharing we need to prepare both operating system. Like both operating system have to be on the same network otherwise it will go wrong.
#1. Check IP address
To check if both are on the same network, you must have some knowledge about the IP address classes.
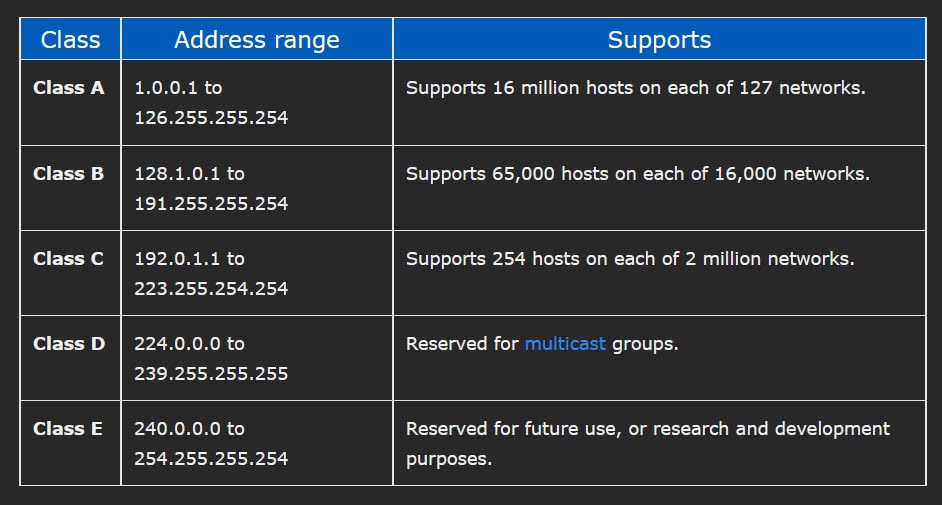
As long as they are on the same class, it means they are on the same network, if they are not you have to make them.
To check IP address on Windows 10, type ipconfig on cmd.
Microsoft Windows [Version 10.0.19042.508]
(c) 2020 Microsoft Corporation. All rights reserved.

C:\Users\Abbas>ipconfig

Windows IP Configuration


Ethernet adapter Ethernet0:

   Connection-specific DNS Suffix  . : localdomain
   Link-local IPv6 Address . . . . . : fe80::fcc2:4c63:92f6:bff6%6
   IPv4 Address. . . . . . . . . . . : 192.168.137.128
   Subnet Mask . . . . . . . . . . . : 255.255.255.0
   Default Gateway . . . . . . . . . : 192.168.137.2

C:\Users\Abbas>
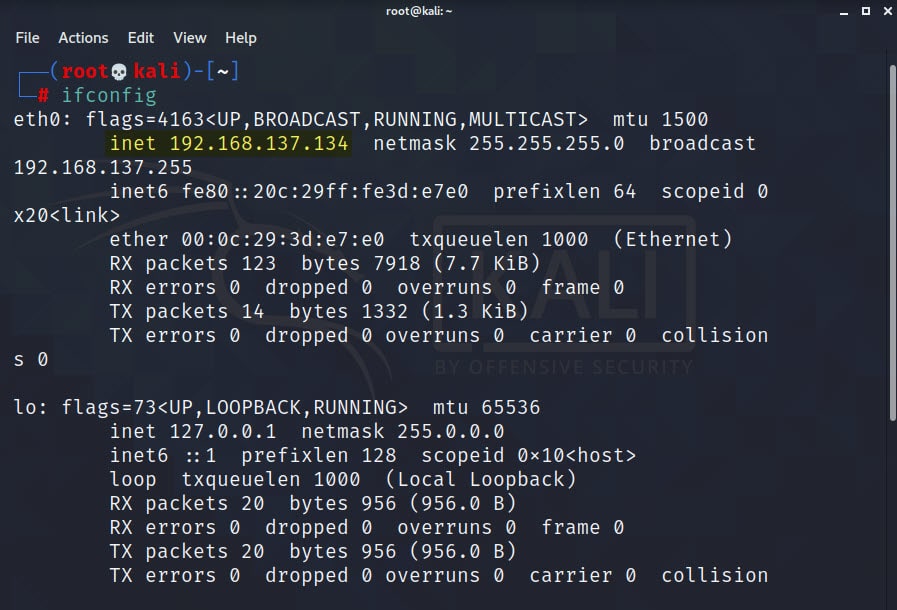
To check IP address on Kali Linux type ifconfig on terminal.
┌──(root💀kali)-[~]
└─# ifconfig
eth0: flags=4163<UP,BROADCAST,RUNNING,MULTICAST>  mtu 1500
        inet 192.168.137.134  netmask 255.255.255.0  broadcast 192.168.
        inet6 fe80::20c:29ff:fe3d:e7e0  prefixlen 64  scopeid 0x20<link
        ether 00:0c:29:3d:e7:e0  txqueuelen 1000  (Ethernet)
        RX packets 478  bytes 68869 (67.2 KiB)
        RX errors 0  dropped 0  overruns 0  frame 0
        TX packets 188  bytes 35005 (34.1 KiB)
        TX errors 0  dropped 0 overruns 0  carrier 0  collisions 0

lo: flags=73<UP,LOOPBACK,RUNNING>  mtu 65536
        inet 127.0.0.1  netmask 255.0.0.0
        inet6 ::1  prefixlen 128  scopeid 0x10<host>
        loop  txqueuelen 1000  (Local Loopback)
        RX packets 20  bytes 956 (956.0 B)
        RX errors 0  dropped 0  overruns 0  frame 0
        TX packets 20  bytes 956 (956.0 B)
        TX errors 0  dropped 0 overruns 0  carrier 0  collisions 0


┌──(root💀kali)-[~]
└─#
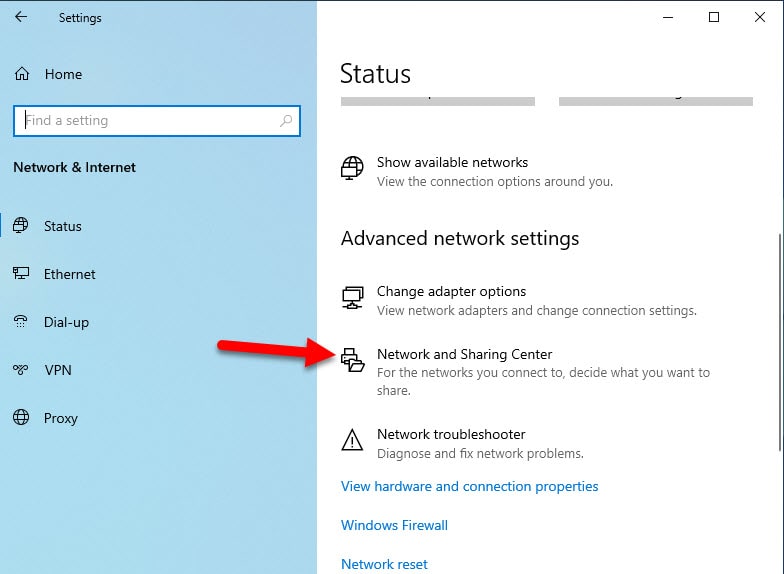
#2. Enable Network Discovery and Share a Folder in Windows 10
To enable network Discovery, open settings> Network & Internet> scroll down and choose Network and sharing center.
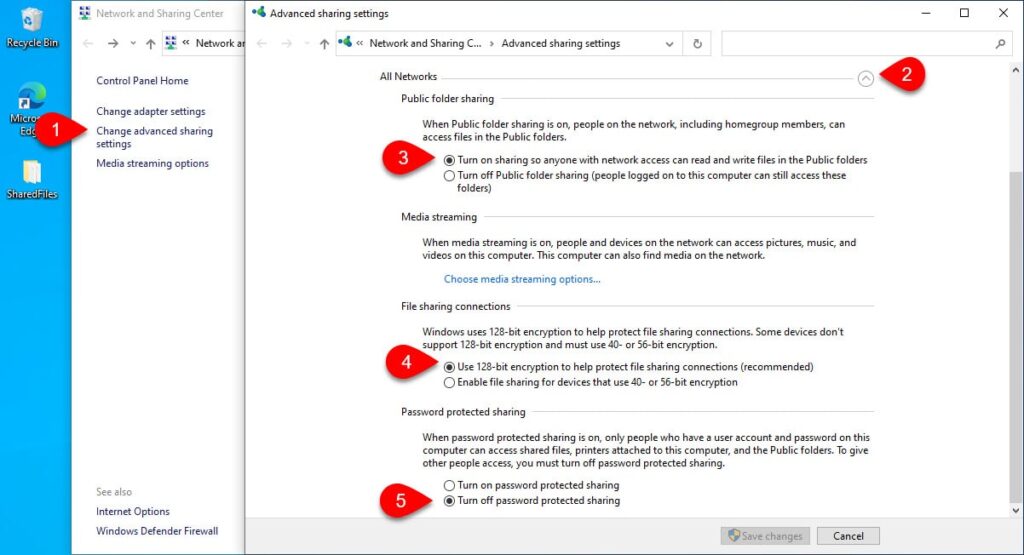
From the left pane menu choose advanced sharing center and choose all networks. Enable the following features:
- Turn on Sharing
- Use 128-bit encryption
- Turn off password protection
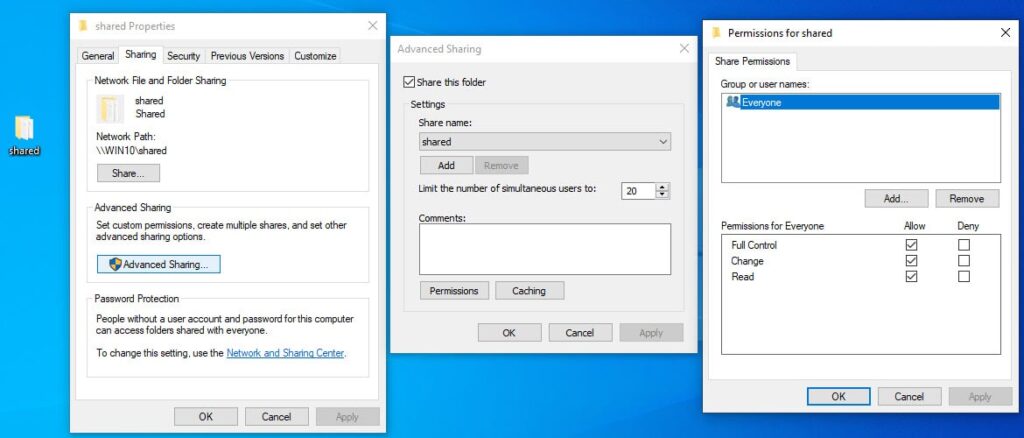
Create a Folder that want to share from Windows 10 to Kali Linux, right click and choose properties. Go to sharing tab and then advanced sharing, enable it for everyone.
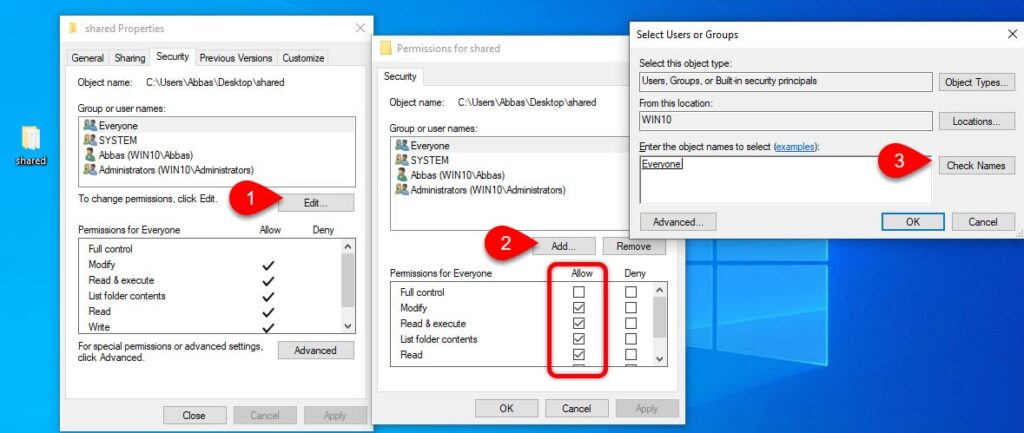
Now go to security tab and everyone group (If you are in a company specify name of the group you want to share the directory with).
#3. Access Shared Folder on Kali Linux
To access the shared folder on Kali Linux, create a folder and name it Filesharing. Open Terminal and type the following command to mount the shared folder.
mount.cifs //Win10/shared /root/Desktop/Filesharing -o user=kali ┌──(root💀kali)-[~]
└─# mount.cifs //Win10/shared /root/Desktop/Filesharings -o user=kali
🔐 Password for kali@//Win10/shared: *********
┌──(root💀kali)-[~]
Command Explained:
- mount.cifs: Well it is cifs-utils which is a package which is used to mount SMB/CIFS on Linux.
- //Wind10/shared: it is the folder which is shared over the network.
- /root/Desktop/Filesharing: It is location of the folder where the shared folder files will be available.
- -o user=kali: it is the user ID and user name on linux.

Watch the video if the post was confusing