September 24, 2018, WWDC was the initially released day of the macOS 10.14 Mojave. it is the fifteen major new operating systems introduced by apple after the macOS 10.13 High Sierra a Year later. Since the file system already replaced with new a name and new technology before in the macOS 10.13 High Sierra, the Mojave also contains APFS file system. However according to the coming intel and rumors the macOS 10.14 Mojave comes with x86-64. macOS 10.13 High Sierra can easily download and install the macOS 10.14 Mojave on their using the App store. However, the macOS 10.12 Sierra users must directly upgrade or first install the high sierra, then install macOS 10.14 Mojave, either way, you have to choose to do change your OS. the macOS 10.14 Mojave has tons new features and abilities, also the long-awaited feature known as the Dark Mode has finally arrived. A Dynamic background, infect one the best background I have ever imagined has been added by engineers of the Apple. The dynamic background changes according to the time and brings new looks at a different period. For example, in the night the background will turn automatically black and in the day, it will take the light version of the background. Stacks, the newly added feature of the macOS 10.14 Mojave, is so cool compared to the window stock feature.
The deserted named operating system is a revolution in terms of new features. However you can determine yourself whether it is awesome or not, but in the meantime compare the macOS 10.14 Mojave with the newest released macOS 10.15 Catalina in 2019. So, which one do you think is awesome?
It is the question which must be answered after installing macOS 10.15 Mojave on any platform you wish for. So, follow the below instructions to install the macOS 10.15 Catalina on VirtualBox, VMware or even perform a clean installation on PC.
- Install macOS 10.15 Catalina on VirtualBox on Windows PC
- Install macOS 10.15 Catalina on VMware on Windows PC
- How to Install macOS 10.15 Catalina on PC-Hackintosh?
Installing any of the above software on any platform certainly requires a huge amount of time. The hardly time is downloading the software, and it requires a fast and reliable internet connection. So, whatever, to install macOS Mojave on VirtualBox on Windows PC, follow the below instructions.
Install macOS Mojave on VirtualBox on Windows PC
A set of specific software is required for installing and testing the macOS 10.14 Mojave on VirtualBox on Windows PC. The required software starts with VirtualBox setup itself, then the VirtualBox Extension pack, WinRAR and finally the macOS 10.14 Mojave VMDK file.
Prepare the required files:
- WinRAR: What is WinRAR?
WinRAR is a Windows version of the RAR archiver – a powerful tool which allows you to create, manage and control archive files. There are several versions of RAR, for many operating environments: Windows, Linux, FreeBSD, Mac OS X.
There are two versions of RAR for Windows:
- Version with the graphical user interface – WinRAR.exe;
- Command-line console (text mode) version – Rar.exe.
WinRAR and WinRAR self-extracting modules require Windows XP SP3 or later.
WinRAR features:
- Complete support of RAR and ZIP 2.0 archives;
- Highly sophisticated, original compression algorithm;
- Shell interface including drag-and-drop facility and wizard;
- Command-line interface;
- Non RAR archives (7Z, ACE, ARJ, BZ2, CAB, GZ, ISO, JAR, LZ, LZH, TAR, UUE, XZ, Z, 001 and several ZIPX types) management;
- Solid archiving, which can raise compression ratio by 10% – 50% over more common methods, particularly when packing a large number of small, similar files;
- Multivolume archives;
- Creation of self-extracting archives (also multivolume) using the default or optional SFX modules;
- Recovering physically damaged archives;
- Recovery volumes allowing to reconstruct missing parts of multivolume archives.
- Unicode support in file names;
- Other service functions, such as encryption, archive comments, error logging, etc.
- VirtualBox: Oracle VM VirtualBox is a cross-platform virtualization open-source application. What does that mean? For one thing, it installs on your existing Intel or AMD-based computers, whether they are running Windows, Mac OS X, Linux, or Oracle Solaris operating systems (OSes). Secondly, it extends the capabilities of your existing computer so that it can run multiple OSes, inside multiple virtual machines, at the same time. As an example, you can run Windows and Linux on your Mac, run Windows Server 2016 on your Linux server, run Linux on your Windows PC, and so on, all alongside your existing applications. You can install and run as many virtual machines as you like. The only practical limits are disk space and memory.
Oracle VM VirtualBox is deceptively simple yet also very powerful. It can run everywhere from small embedded systems or desktop-class machines up to datacenter deployments and even Cloud environments.
- VirtualBox Extension Pack: Most of the time, mouse and keyboard stuck while installing macOS 10.14 Mojave. The Oracle has provided a guide to fix the problem and that is the Virtualbox extension pack when the extension pack is installed, enable the USB 3.0 from settings.
- macOS 10.14 Mojave VMDK File: In Most scenarios, the macOS 10.14 Mojave comes with two types of the OS, the popular one known as macOS 10.14 Mojave DMG file, which can easily be downloaded from the App store? And then there is another type known as the macOS 10.14 Mojave VMDK file, it is built by the developers for installing and testing macOS on VirtualBox machines. Doesn’t matter if it is on Windows, Linux, Ubuntu Debian, Zorin OS, or any other version of the OS. The truth to be told, for virtual testing you need to download the macOS 10.14 Mojave Virtual Image otherwise with dmg file you can’t perform your experiments on the OS. On a mac, you can install and test macOS 10.14 Mojave with dmg file on VirtualBox and VMware fusion but not on Parallel App.
- Codes for macOS Mojave configuration: The VirtualBox can support and install mac by default but there is a problem with installing. Those problems and errors can be fixed with the specific codes provided by the developers. The codes can solve the cpuidset error, EFI installation error, and the device guard errors, so these piece of codes are required. Every version of the VirtualBox requires a special codes for themselves.
Why is Virtualization Useful?
The techniques and features that Oracle VM VirtualBox provides are useful in the following scenarios:
- Running multiple operating systems simultaneously. Oracle VM VirtualBox enables you to run more than one OS at a time. This way, you can run software written for one OS on another, such as Windows software on Linux or a Mac, without having to reboot to use it. Since you can configure what kinds of virtual hardware should be presented to each such OS, you can install an old OS such as DOS or OS/2 even if your real computer’s hardware is no longer supported by that OS.
- Easier software installations. Software vendors can use virtual machines to ship entire software configurations. For example, installing a complete mail server solution on a real machine can be a tedious task. With Oracle VM VirtualBox, such a complex setup, often called an appliance, can be packed into a virtual machine. Installing and running a mail server becomes as easy as importing such an appliance into Oracle VM VirtualBox.
- Testing and disaster recovery. Once installed, a virtual machine and its virtual hard disks can be considered a container that can be arbitrarily frozen, woken up, copied, backed up, and transported between hosts.
On top of that, with the use of another Oracle VM VirtualBox feature called snapshots, one can save a particular state of a virtual machine and revert to that state, if necessary. This way, one can freely experiment with a computing environment. If something goes wrong, such as problems after installing software or infecting the guest with a virus, you can easily switch back to a previous snapshot and avoid the need for frequent backups and restores.
Any number of snapshots can be created, allowing you to travel back and forward in virtual machine time. You can delete snapshots while a VM is running to reclaim disk space.
- Infrastructure consolidation. Virtualization can significantly reduce hardware and electricity costs. Most of the time, computers today only use a fraction of their potential power and run with low average system loads. A lot of hardware resources, as well as electricity, is thereby wasted. So, instead of running many such physical computers that are only partially used, one can pack many virtual machines onto a few powerful hosts and balance the loads between them.
Install macOS 10.14 Mojave on VirtualBox on Windows
The installation procedures are so simple, but somehow most of the users are facing issues while installing macOS 10.14 Mojave. There are several reasons why they can’t the installation process, but the most common is not quitting the Virtualbox. When you create the VM, done with the settings, you have to quit the VirtualBox in a way that it should be closed from the background too. But unfortunately users are simply hitting the ‘X’ key to close it but it won’t close the background process. Once the Virtualbox is closed from the background process, Open CMD and Apple the codes one by one. If Hyper-V, Windows SandBox is already Enable, turn them off before testing the macOS 10.14 Mojave. Otherwise, Hyper-V and Windows SandBox won’t let you open the installation process. Keep them in mind and follow the procedures one by one.
Step 1. Install Required the files also extract the macOS Mojave
The downloaded files must be installed except for the macOS 10.14 Mojave VMDK file because it required extraction. Start the installation with WinRAR, then Virtualbox and Finally the Virtualization Pack. The installation steps are so easy and it does not require any guidance and screenshot.
Step 2. Create a Virtual Machine and add the macOS 10.14 Mojave
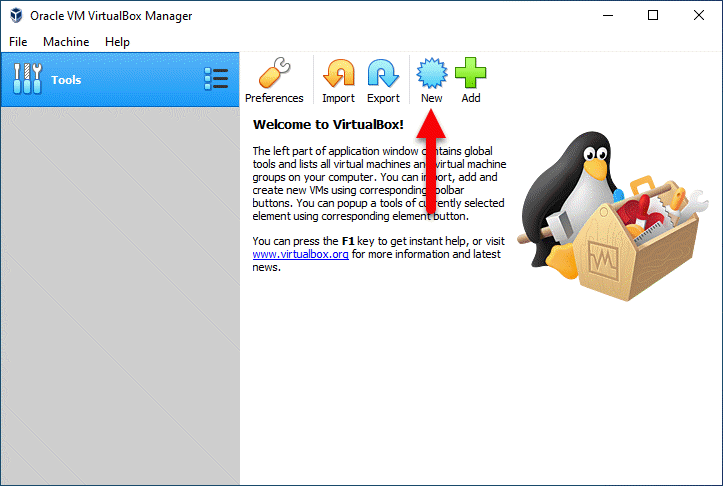
The second step is about to create a new Virtual machine for the macOS 10.14 Mojave on Windows PC. Launch the Virtualbox on then select the New in front of the Tools in VirtualBox.
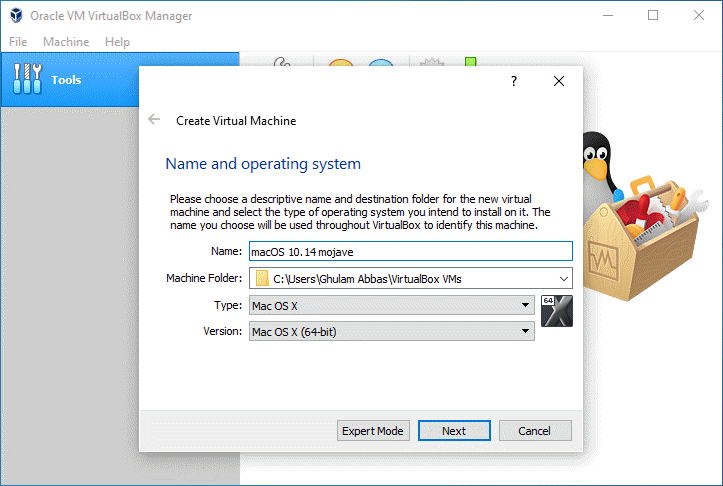
Please choose a name, location, guest operating system and finally the version of the guest operating system. However, I will go with the settings below.
- Name: macOS 10.14 Mojave
- Type: mac OS X
- Version: Mac OS X (64-bit)
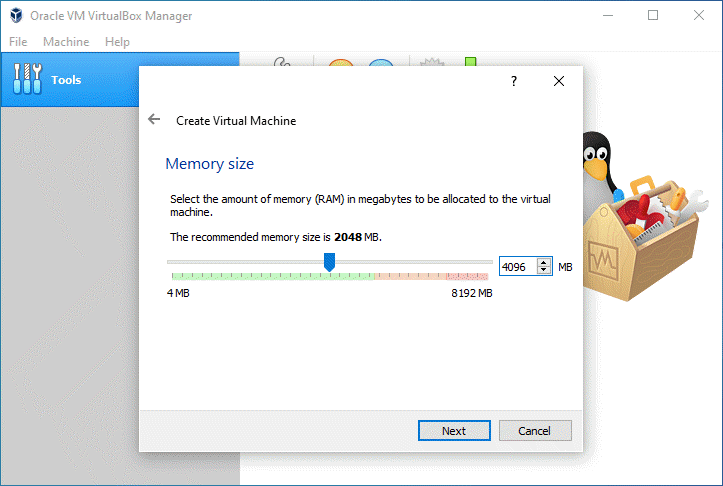
Please specify the amount of the memory for the created Virtual Machine, the limited RAM required for the macOS 10.14 Mojave is 4 GB. So, I will go with 8 GB RAM for the macOS 10.14 Mojave Virtual testing.
Once the amount of RAM is set up, you need to attach the macOS 10.14 Mojave to the created Virtual machine. Select use an existing Virtual Disk> then locate the macOS 10.14 Mojave, once it is located click create, so the Virtual machine should be ready.

Step 3. Configure the Virtual Machine settings
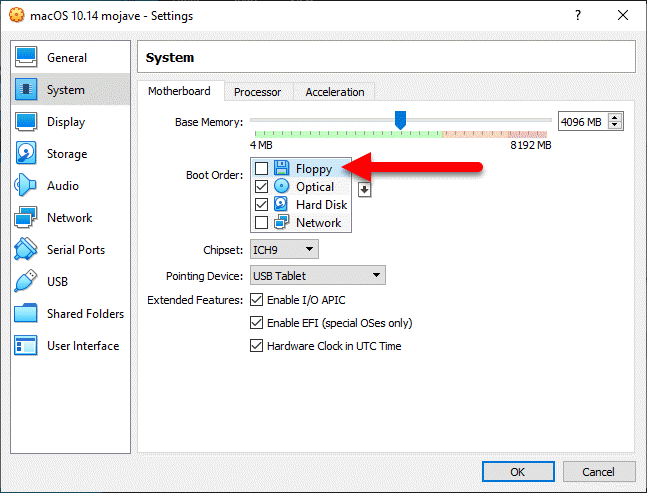
We will customize the settings of the system, processors, video memory and the graphic, in order to work with the Virtual machine. The truth is harsh since the VirtualBox has the support functionalities of mac but it can not install without output configuration. So, open the settings of the created VM> then visit the system tab> motherboard and uncheck the floppy disk, also apply the other settings.
- Uncheck Floppy disk.
- Enable Optical
- Enable Hard Disk
- Enable Network
- Chipset: ICH9
- Point device: USB Tablet
- Enable I/O APIC
- Enable EFI
- Enable Hardware Clock in UTC Time
The processor always plays a key role, doesn’t matter if that is the real processor or the virtual processor for the Virtual Machine. The limited amount of processors for the macOS 10.14 Mojave Virtual machine is 2, but you can increase it more, so I will go with 2 processors and other settings listed below.
- Processors: 2
- Execution Cap: 100%
- Enable features of the PAE/NX
If you don’t know where to find the processor, it is located on the system tab> processor tab.

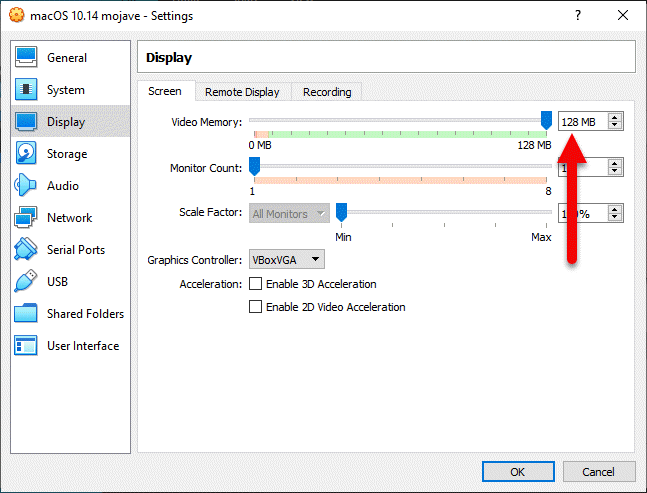
The video memory video must be 128 MB and since the default settings of the VirtualBox for mac is 16 MB. Also, apply the below settings.
- Video Memory: 128 MB
- Monitor count: 1
- Scale factor: 100%
- Graphic Controller: VBoxVGA
if you are playing games and wants more graphic, enable the 2D and 3D support for the Virtual Machine. To increase the video memory visit the display tab> video memory and increase the video memory.
Step 4. Configuring codes on CMD
Copy one of the below codes compatible with VirtualBox version and the Processor. Paste that inside the Notepad, then go to the Edit menu> Replace, type “Your VM Name” and replace it with the name of the Virtual Machine you created for the VM.
Codes for VirtualBox V6.x
cd "C:\Program Files\Oracle\VirtualBox\"
VBoxManage.exe modifyvm "Your VM Name" --cpuidset 00000001 000106e5 00100800 0098e3fd bfebfbff
VBoxManage setextradata "Your VM Name" "VBoxInternal/Devices/efi/0/Config/DmiSystemProduct" "iMac11,3"
VBoxManage setextradata "Your VM Name" "VBoxInternal/Devices/efi/0/Config/DmiSystemVersion" "1.0"
VBoxManage setextradata "Your VM Name" "VBoxInternal/Devices/efi/0/Config/DmiBoardProduct" "Iloveapple"
VBoxManage setextradata "Your VM Name" "VBoxInternal/Devices/smc/0/Config/DeviceKey" "ourhardworkbythesewordsguardedpleasedontsteal(c)AppleComputerInc"
VBoxManage setextradata "Your VM Name" "VBoxInternal/Devices/smc/0/Config/GetKeyFromRealSMC" 1
Codes for VirtualBox v5.x
cd "C:\Program Files\Oracle\VirtualBox\"
VBoxManage.exe modifyvm "Your Virtual Machine Name" --cpuidset 00000001 000106e5 00100800 0098e3fd bfebfbff
VBoxManage setextradata "Your Virtual Machine Name" "VBoxInternal/Devices/efi/0/Config/DmiSystemProduct" "iMac11,3"
VBoxManage setextradata "Your Virtual Machine Name" "VBoxInternal/Devices/efi/0/Config/DmiSystemVersion" "1.0"
VBoxManage setextradata "Your Virtual Machine Name" "VBoxInternal/Devices/efi/0/Config/DmiBoardProduct" "Iloveapple"
VBoxManage setextradata "Your Virtual Machine Name" "VBoxInternal/Devices/smc/0/Config/DeviceKey" "ourhardworkbythesewordsguardedpleasedontsteal(c)AppleComputerInc"
VBoxManage setextradata "Your Virtual Machine Name" "VBoxInternal/Devices/smc/0/Config/GetKeyFromRealSMC" 1
Codes for VirtualBox v4.x
cd "C:\Program Files\Oracle\VirtualBox\"
VBoxManage.exe modifyvm "Your Virtual Machine Name" --cpuidset 00000001 000306a9 04100800 7fbae3ff bfebfbff
VBoxManage setextradata "Your Virtual Machine Name" "VBoxInternal/Devices/efi/0/Config/DmiSystemProduct" "MacBookPro11,3"
VBoxManage setextradata "Your Virtual Machine Name" "VBoxInternal/Devices/efi/0/Config/DmiSystemVersion" "1.0"
VBoxManage setextradata "Your Virtual Machine Name" "VBoxInternal/Devices/efi/0/Config/DmiBoardProduct" "Iloveapple"
VBoxManage setextradata "Your Virtual Machine Name" "VBoxInternal/Devices/smc/0/Config/DeviceKey" "ourhardworkbythesewordsguardedpleasedontsteal(c)AppleComputerInc"
VBoxManage setextradata "Your Virtual Machine Name" "VBoxInternal/Devices/smc/0/Config/GetKeyFromRealSMC" 1
Codes for AMD Systems
cd "C:\Program Files\Oracle\VirtualBox\"
VBoxManage.exe modifyvm "Your Virtual Machine Name" --cpuidset 00000001 000106e5 00100800 0098e3fd bfebfbff
VBoxManage setextradata "Your Virtual Machine Name" "VBoxInternal/Devices/efi/0/Config/DmiSystemProduct" "iMac11,3"
VBoxManage setextradata "Your Virtual Machine Name" "VBoxInternal/Devices/efi/0/Config/DmiSystemVersion" "1.0"
VBoxManage setextradata "Your Virtual Machine Name" "VBoxInternal/Devices/efi/0/Config/DmiBoardProduct" "Iloveapple"
VBoxManage setextradata "Your Virtual Machine Name" "VBoxInternal/Devices/smc/0/Config/DeviceKey" "ourhardworkbythesewordsguardedpleasedontsteal(c)AppleComputerInc"
VBoxManage setextradata "Your Virtual Machine Name" "VBoxInternal/Devices/smc/0/Config/GetKeyFromRealSMC" 1
VBoxManage modifyvm "Your Virtual Machine Name" --cpu-profile "Intel Core i7-6700K"
Once you brought the required changes over the codes in the Notepad, it is time to apply them. Run CMD as Administrator and apply the codes line by line and hit enter.
Step 5. Install macOS 10.14 Mojave on VirtualBox on Windows
The difficult parts of configuring and setting the macOS 10.14 Mojave certainly done but the installation of macOS Mojave remains. The installation is not hard and it is easy, just the below procedures to install macOS 10.14 Mojave.
- Turn on the Virtual machine inside the Virtualbox.
- Then you have to choose the country where you live.
- Specify another keyboard layout if you are using.
- Choose do not don’t transfer any information.
- Decide to sign in with Apple ID or Not.
- Agree to the terms and conditions.
- Create a user account by providing the details to the computer.
- Choose a white or a dark theme for the operating system on VirtualBox.
- Continue with express settings.
Comments are closed.