It does not matter which operating system you are using, macOS, Windows 10, Windows 11, Chrome OS, Or Linux. Your computer may fail to start, there could be any reason such as file corruption, hardware failure, buggy software, and unexpected error. It is clear you have to create a bootable USB in order to repair your computer.
The time when your macOS was working properly, you considered creating a bootable USB of MacOS for repair purposes, go ahead and repair your PC. However, if you had not created a bootable USB for your device (MacBook, MacBook Air, Mac book pro, iMac, Mac Pro, or Mac mini) Now that it has failed what are your options.
- You should consider creating a bootable USB for MacOS inside a Windows operating system. Windows 10 or Windows 11, anyone will work.
- Or you can create a macOS Ventura Bootable Installer in someone else’s mac.
If you truly wish to create a macOS Ventura bootable USB on Windows (Windows 10, Windows 11, Windows 8.1, Windows 7, and Windows Server) to reinstall macOS (macOS Ventura, macOS Monterey, macOS Big Sur, macOS Catalina, macOS big Sur and etc), follow the below guides.
In this guide, I will cover the steps to create macOS Ventura to bootable USB USB on Windows 11 which you can use to reinstall, upgrade or repair your apple Operating System.
Prerequisites:
- A Working Windows Computer (Windows 11, 10, 8.1, 7, or Windows Server)
- Fast 16 GB USB Flash drive
- Trial Version of TransMac
- macOS Ventura DMG Image File
Create macOS Ventura Bootable USB Installer
It is time to create macOS Ventura Bootable USB Installer on Windows 11 PC. So use the below methods.
Please take a backup of the files inside the USB flash drive because it will be erased.
1. Download and install TransMac on your Windows PC.
2. Attached USB flash drive to the computer.
3. After the installation of the Transmac, launch it as administrator.
4. Click on Run. (in the Trial version, you have to wait 15 seconds).
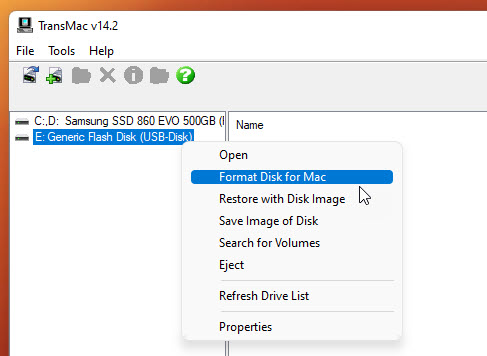
5. Right-click on the USB flash drive and choose Format Disk For Mac.
6. On the Warning Page, click yes.
7. Type a Name for the USB and click ok.
8. On the Last Warning Page, again click yes.
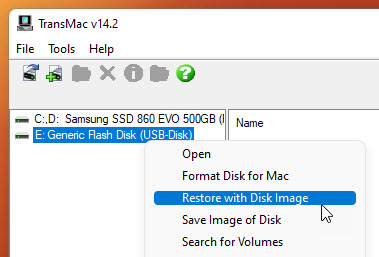
9. Once the Disk is formatted for macOS, it is time to copy the macOS Ventura to the USB. Right-click on the USB Flash drive inside the TransMac and choose to Restore with the Disk image.
10. Once Again on the warning page, click yes.
11. Click on the three dots and locate the macOS Ventura Dmg file.
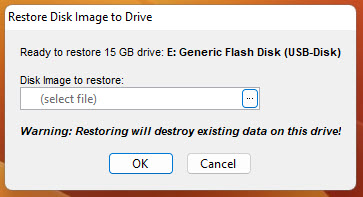
12. Once the macOS is selected, click OK.
13. Once again on the last warning page, click yes.
14. Wait for the OS to be copied into the USB.
Make Partition of USB GPT
You have to remember if the USB flash drive has been formatted with the MBR partition style then TransMac is not going to work. It will give you an error. This is the place where you have to manually format the USB flash drive, and change the partition style from MBR to GPT. Because macOS requires the GPT partition style.
1. Hold Windows+ R and type Diskpart.
2. Type List Disk
3. Select the USB Flash Drive by typing Select Disk 1
4. Type Clean
5. Type Convert GPT
6. Create Partition Primary
7. Format fs =NTFS Quick
Also Read:
- How to Create macOS Ventura ISO Image File?
- Fixing macOS Problems Efficiently: 14 Issues & Solutions
- How to Fix network connection on macOS Monterey on VMware & VMWare Fusion?