I have prepared a guide to install macOS Catalina on VirtualBox on Windows PC simple and easy steps for Intel processors and AMD. It starts with downloading the required files and ending up installing macOS 10.15 Catalina on VirtualBox. But before starting How to Install macOS Catalina on VirtualBox on Windows PC, have brief news of the WWDC 2019 about mac in third July.

On third June Apple commenced its 2019 WWDC for the upcoming year with the new stuff Apple worked for a year. The keynote was essentially energizing for the most part for software, yet a little of new equipment for Hardware. The WWDC was covered with huge occasions and the greatest update to Appel TV, WatchOS, iPad, Mac Pro, iPhone, and Mac. The update for the next version of the macOS is named macOS 10.15 Catalina, which is named from a beautiful island in California.
The changes on macOS 10.15 Catalina starts with iTunes which is killed by Apple and now there are 3 standalone apps known as Apple Music, Apple TV, and Apple Podcast. The tvOS currently supports 4K HDR playback which is added with HDR display and Dolby audio support.
The new macOS Catalina comes with a new feature called sidecar which is cool for having more workspace while working. Sidecar allows the macOS Catalina to use the iPad as a second monitor for a wider working space. Mirrored Desktop can display the same content on two displaces, so simply make it perfect for sharing with others.
Apple pencil has been introduced in Catalina where you can sketch, edit, Graphic design with multiple apps including the Adobe products, Maya, and more. A new interesting thing which is included in the wireless charging of iPad with macOS 10.15 Catalina.
As far as a safari to be working head to head to google Chrome, yet again Apple added some updates to it. The start page contains favorites, frequently visited sites, and Siri suggestions using the search history. For creating an account inside any site Safari warns you if your password is weak. The new cool features which are added switch tab search, it means if you are on website readying, suddenly you need to search for Something when you start typing it will directly open a new tab on the page.
Screen Time is imported from the iOS App store to the App store on mac, and now this app is monitoring the usages, downtime, app limits, Combined Limits of sites and apps, Communication Limits, and more. Parents can configure Screen Time form any Apple devices which include iPhone, iPad, iPod for kids. They can manage contact lists, apps timer usage, game time websites locks, and more.
With the mail app, you can block a sender, mute the thread, unsubscribe from commercial emails, and finally arrange the mail viewer with the classic view. Reminders have now new designs, new edit buttons with Enhanced Siri intelligence so you no longer type. Create smart lists, attach attachments, customize the lists with the new Reminder on macOS 10.15 Catalina.
Apple has tightened the security ever more as ever, the gatekeeper can enhance the app installation from the App Store and downloaded apps. Apple T2 Security chip supports the activation lock, it means whenever your mac is lost the only person who can access it only you. The only person reactivate is you, so it is so good for securing your files from thieves. The DriverKit and user space system extensions are finally added to mac, it is so re-leaved for developers who are creating apps. Now they can directly test those apps in mac without using a text, or any other extensions package. The data protection is also on alert, so don’t worry about anything because it checks the apps before accessing your files.
I think it is worth testing even on mac or in windows. The good news is that all the users even windows users can test this amazing operating system both virtually and locally on there with a clean installation. However, the Virtual requirements are more than performing a clean installation of macOS 10.15 Catalina on PC.
Install macOS Catalina on VirtualBox on Windows PC
The summary to install macOS Catalina on VirtualBox on Windows PC is the required files which are Virtualbox, WinRAR, and macOS Virtual Image itself. Finally a small piece of code both for Intel and AMD processors.
Step 1. Download Required Files
- VirtualBox: VirtualBox is the best open-source virtualization software designed for penetration testing and testing, that’s all. However, some of the OS’s Installation on VirtualBox required some special code or tools such as the macOS 10.15 Catalina. If you have tested windows, Kali Linux, Zorin OS, or others they do not require a specific piece of code to launch the installation. But macOS 10.15 Catalina requires another code alongside the required files. Those users who have AMD processors requires another piece of code to accomplish the installation.
- VirtualBox Extension Pack: VirtualBox Extention Pack is specially designed to fix the errors of USB 2.0, USB 3.0, disk encryption, PXE boot, and Intel Cards. if you are using the macOS 10.14 Mojave on VirtualBox it does not require any extension pack of VirtualBox but if you are testing the macOS 10.15 Catalina it is a certainty to install.
- WinRAR: WinRAR is another required software for the extraction of macOS 10.15 Catalina. The 7-Zip is the open-source software against the WinRAR which can perform the task of extractions.
Steps to Create macOS Catalina ISO File:
Open the app store on your mac and download the macOS 10.15 Catalina. Once it is downloaded Open Terminal using the spotlight and type the following commands line by line.
hdiutil create -o /tmp/Catalina -size 8900m -volname Catalina -layout SPUD -fs HFS+J
hdiutil attach /tmp/Catalina.dmg -noverify -mountpoint /Volumes/Catalina
sudo /Applications/Install\ macOS\ Catalina.app/Contents/Resources/createinstallmedia –volume /Volumes/Catalina –nointeraction
hdiutil detach /volumes/Install\ macOS\ Catalina\
hdiutil convert /tmp/Catalina.dmg -format UDTO -o ~/Desktop/Catalina.cdr
mv ~/Desktop/Catalina.cdr ~/Desktop/Catalina.iso
Step 2. Install the downloaded files
WinRAR is an important tool for extracting macOS 10.15 Catalina, however, the open-source software 7-zip can do the job too. So, start the installation with the WinRAR or 7-zip and end it with VirtualBox Extension Pack.
I have provided the download link for VirtualBox Extension above but incase the download failed to load. Head over to the Virtualbox Official site, there you will find VirtualBox 6.0.10 Oracle VM VirtualBox Extension Pack.
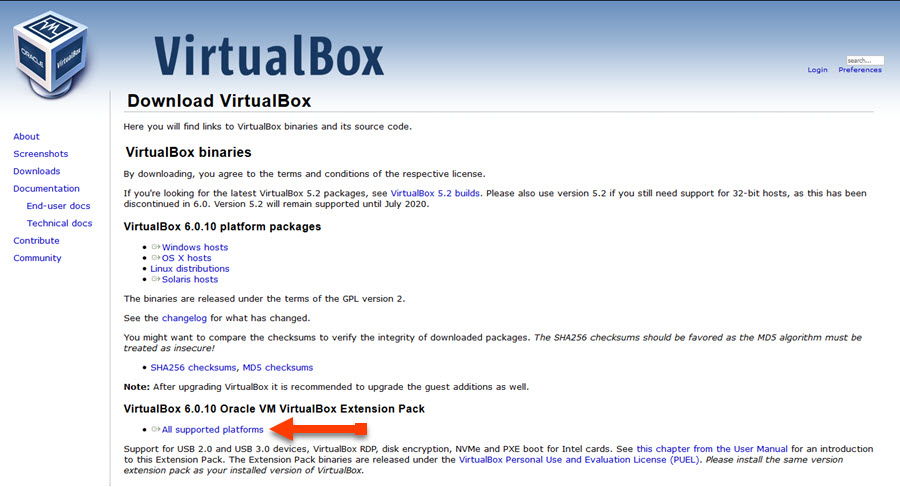
When the installation of VirtualBox is completed, simply double-click on the Virtualbox Extension Pack. It will launch the installation of the VirtualBox Extension pack, so do not fear it is easy.
Step 3. Extract the macOS 10.15 Catalina VMDK File
Step 4. Create a New VM, then attach the macOS 10.15 Catalina VMDK File
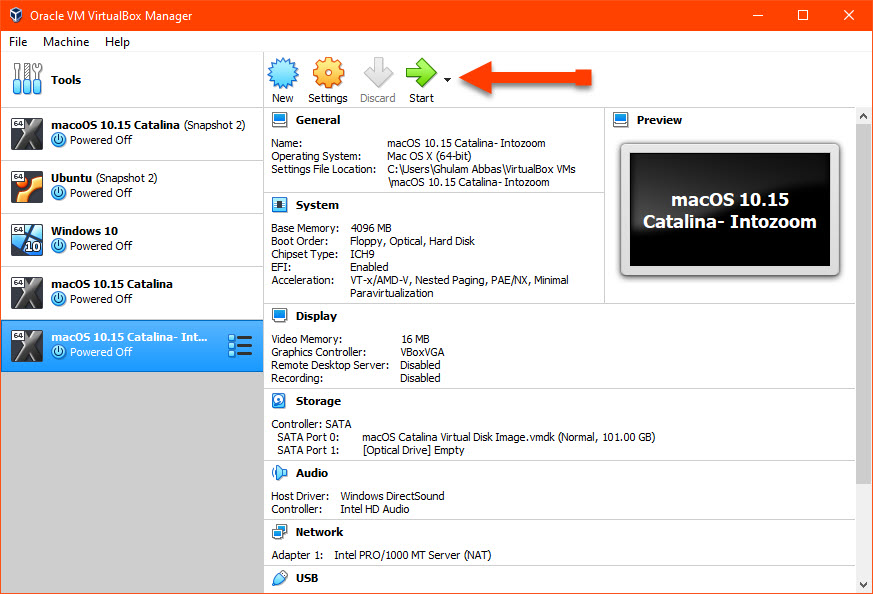
Launch the VirtualBox, click on the New button under the main menu, then click on the expert mode.
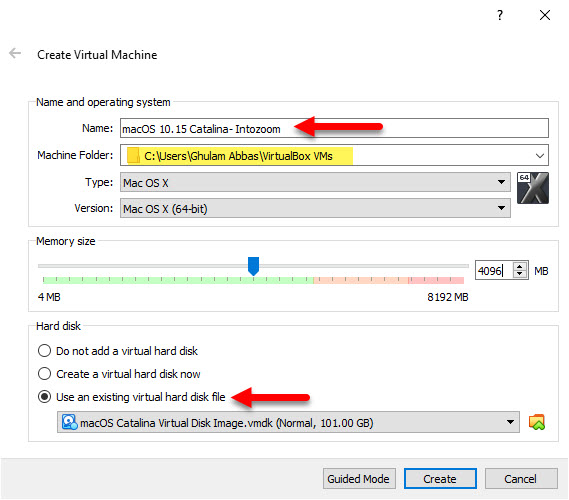
Give a name for the VM> Specify Location for the VM, others will be set by default if you type macOS with below settings.
RAM is always is important as ever, so, you do have to increase the amount of RAM as much as possible for better performance. However, Four gigs are enough for macOS 10.15 Catalina to work with. In total, if your computer has 8 gigs of RAM, you should go with 50-50, don’t make it 50-60 otherwise the main operating system won’t work smoothly.
Import the Extracted macOS 10.15 Catalina using the third option known as Use an existing Virtual Hard Drive file.
The moment the macOS 10.15 Catalina VMDK File is imported, create the VM.
Since the VM is created you have to exit the VirtualBox to move forward, (Remember it is so important!). In case it is not closed from the background, certainly, you would face the EFI Internal Shell Error.
Step 5. Configure macOS Catalina Virtual Machine Settings
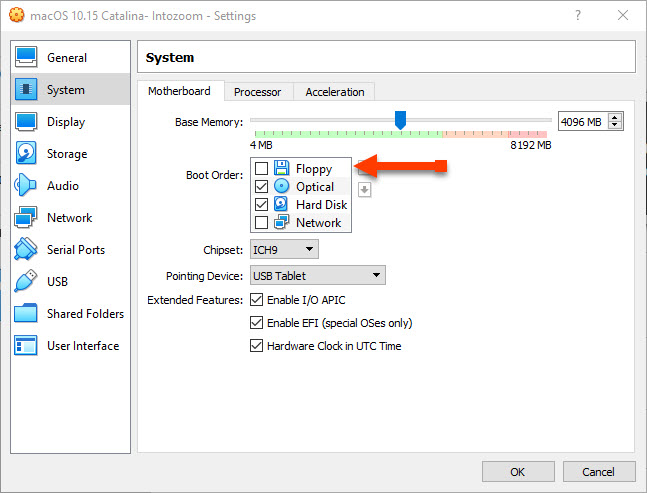
Open the settings of the created VM, head over to the System tab, uncheck the floppy disk.
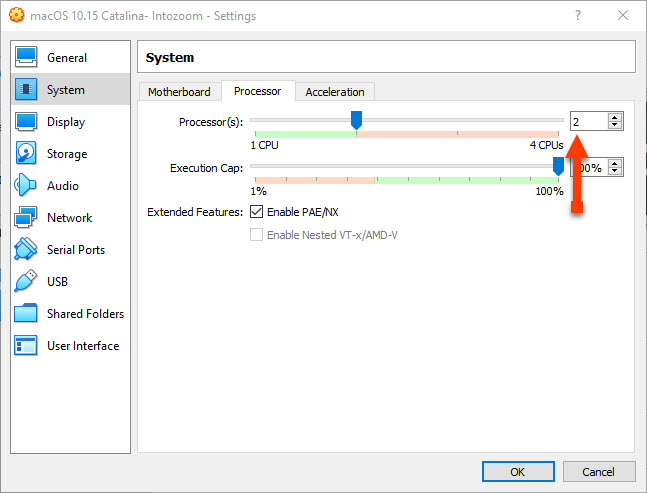
Then move to the processor tab, and make it 2 processors.
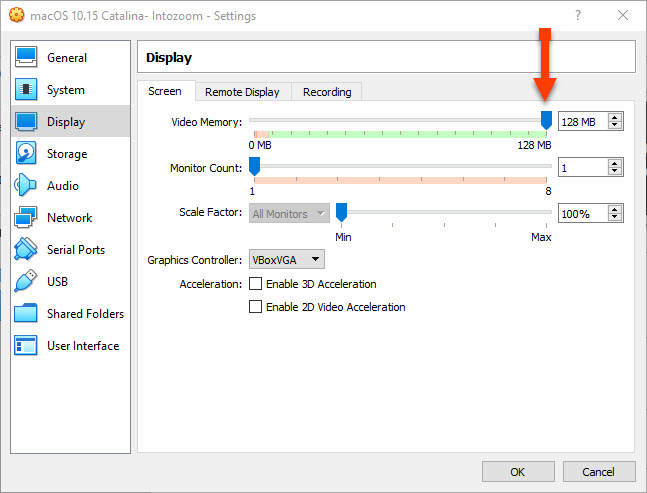
Move to the Display tab. increase the amount of Video memory to 128 MB.
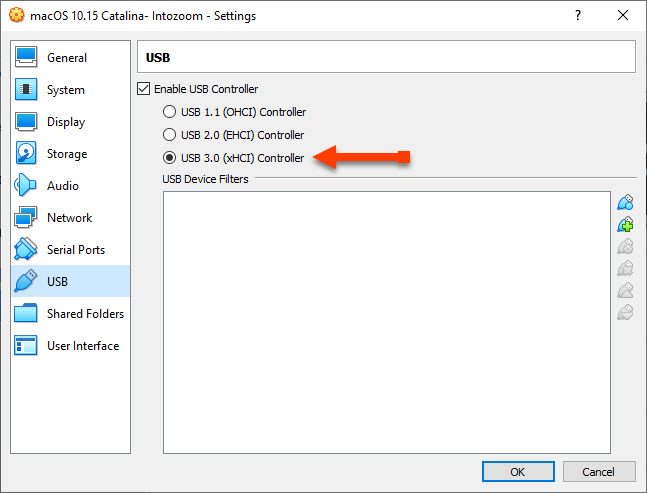
And finally, go to the USB Tab and enable the USB 3.0 support.
Step 6. Apply Commands for VirtualBox
Download the VirtualBox Codes specifically built for VirtualBox to run macOS Operating systems. These codes solve so many errors if occurred, so use them perfectly as I say.
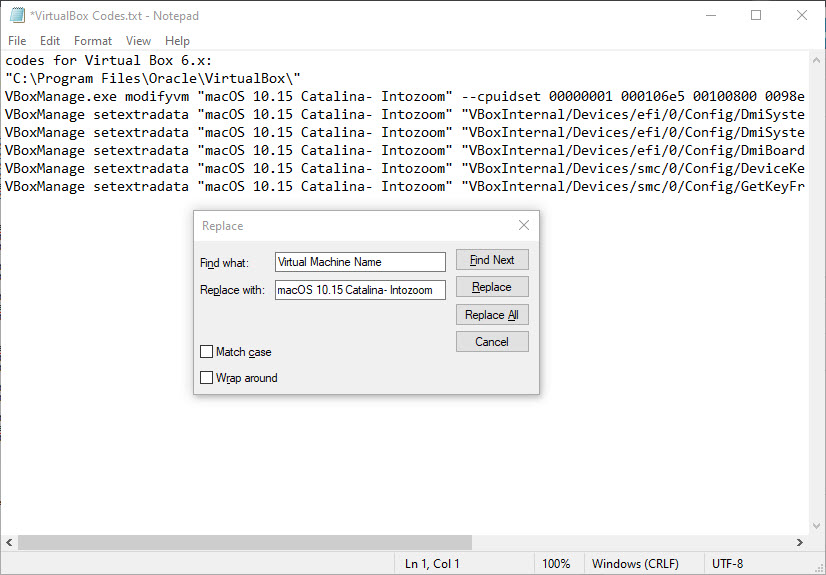
Depending on the version of the VirtualBox you are using, copy the code and paste it inside the Notepad.
codes for Virtual Box 6.x:
CD "C:\Program Files\Oracle\VirtualBox\"
VBoxManage.exe modifyvm "Virtual Machine Name" --cpuidset 00000001 000106e5 00100800 0098e3fd bfebfbff
VBoxManage setextradata "Virtual Machine Name" "VBoxInternal/Devices/efi/0/Config/DmiSystemProduct" "iMac11,3"
VBoxManage setextradata "Virtual Machine Name" "VBoxInternal/Devices/efi/0/Config/DmiSystemVersion" "1.0"
VBoxManage setextradata "Virtual Machine Name" "VBoxInternal/Devices/efi/0/Config/DmiBoardProduct" "Iloveapple"
VBoxManage setextradata "Virtual Machine Name" "VBoxInternal/Devices/smc/0/Config/DeviceKey" "ourhardworkbythesewordsguardedpleasedontsteal(c)AppleComputerInc"
VBoxManage setextradata "Virtual Machine Name" "VBoxInternal/Devices/smc/0/Config/GetKeyFromRealSMC" 1

Code for Virtualbox 5.x:
cd "C:\Program Files\Oracle\VirtualBox\"
VBoxManage.exe modifyvm "Virtual Machine Name" --cpuidset 00000001 000106e5 00100800 0098e3fd bfebfbff
VBoxManage setextradata "Virtual Machine Name" "VBoxInternal/Devices/efi/0/Config/DmiSystemProduct" "iMac11,3"
VBoxManage setextradata "Virtual Machine Name" "VBoxInternal/Devices/efi/0/Config/DmiSystemVersion" "1.0"
VBoxManage setextradata "Virtual Machine Name" "VBoxInternal/Devices/efi/0/Config/DmiBoardProduct" "Iloveapple"
VBoxManage setextradata "Virtual Machine Name" "VBoxInternal/Devices/smc/0/Config/DeviceKey" "ourhardworkbythesewordsguardedpleasedontsteal(c)AppleComputerInc"
VBoxManage setextradata "Virtual Machine Name" "VBoxInternal/Devices/smc/0/Config/GetKeyFromRealSMC" 1

Code for Virtualbox 4.x:
cd "C:\Program Files\Oracle\VirtualBox\"
VBoxManage.exe modifyvm "Virtual Machine Name" --cpuidset 00000001 000306a9 04100800 7fbae3ff bfebfbff
VBoxManage setextradata "Virtual Machine Name" "VBoxInternal/Devices/efi/0/Config/DmiSystemProduct" "MacBookPro11,3"
VBoxManage setextradata "Virtual Machine Name" "VBoxInternal/Devices/efi/0/Config/DmiSystemVersion" "1.0"
VBoxManage setextradata "Virtual Machine Name" "VBoxInternal/Devices/efi/0/Config/DmiBoardProduct" "Iloveapple"
VBoxManage setextradata "Virtual Machine Name" "VBoxInternal/Devices/smc/0/Config/DeviceKey" "ourhardworkbythesewordsguardedpleasedontsteal(c)AppleComputerInc"
VBoxManage setextradata "Virtual Machine Name" "VBoxInternal/Devices/smc/0/Config/GetKeyFromRealSMC" 1
If you have an AMD Ryzen or AMD Radeon, use the below codes.
Codes for AMD Systems

cd "C:\Program Files\Oracle\VirtualBox\"
VBoxManage.exe modifyvm "Your Virtual Machine Name" --cpuidset 00000001 000106e5 00100800 0098e3fd bfebfbff
VBoxManage setextradata "Your Virtual Machine Name" "VBoxInternal/Devices/efi/0/Config/DmiSystemProduct" "iMac11,3"
VBoxManage setextradata "Your Virtual Machine Name" "VBoxInternal/Devices/efi/0/Config/DmiSystemVersion" "1.0"
VBoxManage setextradata "Your Virtual Machine Name" "VBoxInternal/Devices/efi/0/Config/DmiBoardProduct" "Iloveapple"
VBoxManage setextradata "Your Virtual Machine Name" "VBoxInternal/Devices/smc/0/Config/DeviceKey" "ourhardworkbythesewordsguardedpleasedontsteal(c)AppleComputerInc"
VBoxManage setextradata "Your Virtual Machine Name" "VBoxInternal/Devices/smc/0/Config/GetKeyFromRealSMC" 1
VBoxManage modifyvm "Your Virtual Machine Name" --cpu-profile "Intel Core i7-6700K"
Now Hold Ctrl + H to open Replace, replace of the Virtual Machine with the name of your VM you created.
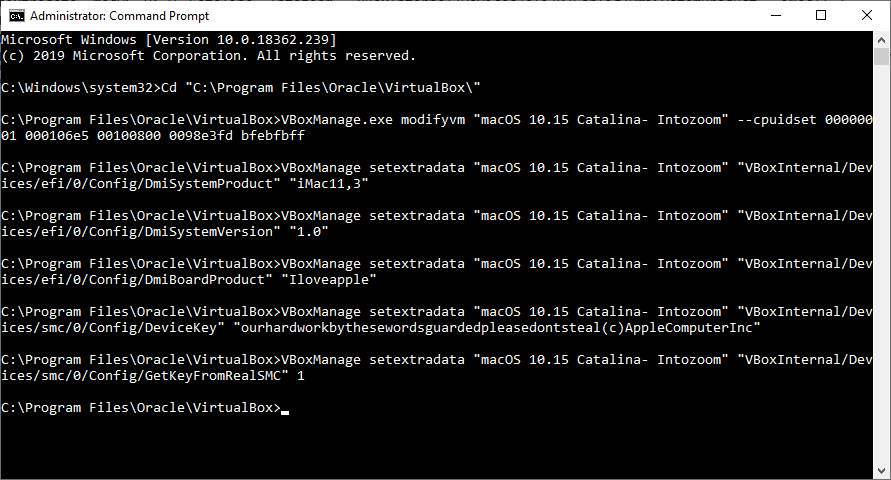
Search for CMD in the start menu, then launched it as Administrator, after that apply the codes line by line on CMD.
Step 7. Install macOS 10.15 Catalina on VirtualBox on Windows PC
Yet, I accomplished success with all the steps, if you have followed the same then you are clear enough too. Now it is time to rap up other things and get started with the installation process.
Click on the start button under the main menu inside the VirtualBox.
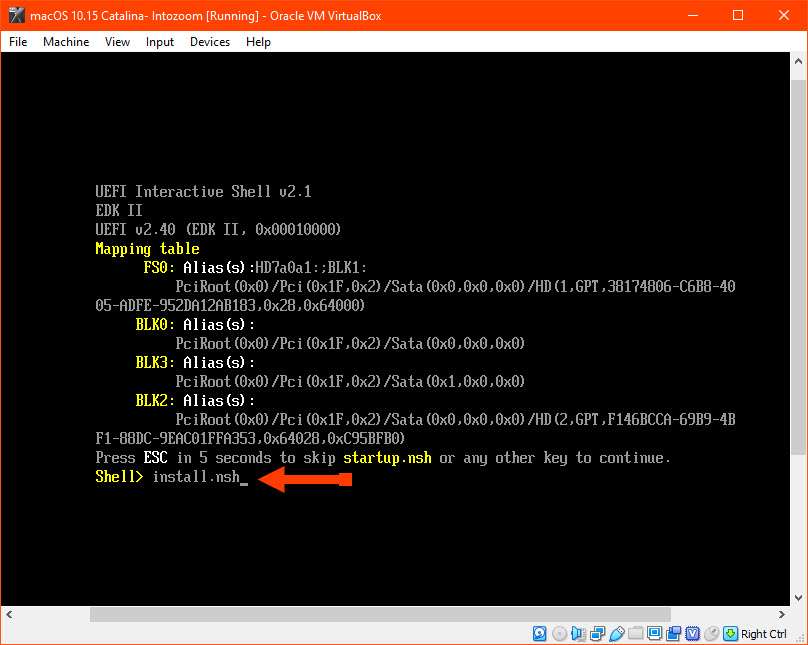
While booting the macOS 10.15 Catalina, if it stuck, press ESC, then type install.nsh
The moment the booting starts a piece of codes will appears which will take some time depending on your system functionalities. Once that is passed, the installation will begin automatically in no time. Once that is completed, the guest OS will restart again where you have to Configure your language and other stuff. For those Steps, I will guide you through the process one by one, so I won’t be providing any screenshots.
- Choose the country where you are from.
- Data & privacy is the window where apple will collect some data from you, so agree with it and move on.
- Don’t import any information to this PC is the next option which you have to select.
- Log in with or without an Apple ID, however without Apple ID you can not download Apps from App Store.
- Agree to the Terms and conditions of Apple for using macOS 10.15 Catalina.
- Create a user account for your computer.
- continue with express set up.
- Also, continue with Analytics.
- Now screen Time is the new app introduced in macOS 10.15 Catalina, so continue with it.
- You can choose a white, dark, or dynamic personalized theme for your mac, choose any of them.
- And Finally, wait a moment until the screen should be ready for the first time use.
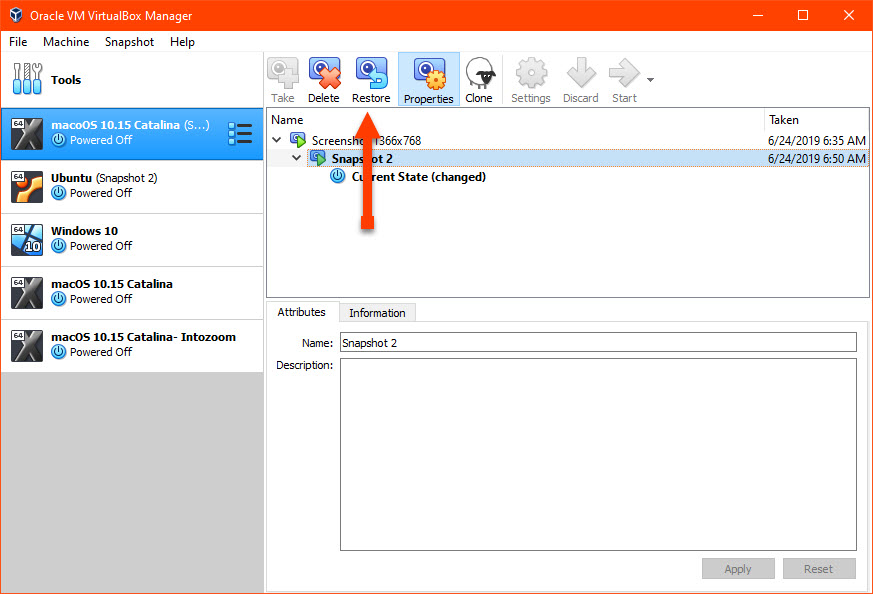
Create a Snapshot
Taking a backup of the Virtual machine is good whenever something bad happened while testing on the mac. To take the snapshot to go the menus> machine> take a snapshot, then provide a name for the snapshot. If you want to restore the snapshot which was taken, visit the properties of the created VM and restore it.
That’s all for How to Install macOS Catalina on VirtualBox on Windows, so if you have any question please let me know.
‘install.nsh’ is not recognized as an internal or extenal command . operable program or script file. Help!
Hi, When I pressed the start button to begin installation, the code appears to be in a continuous loop and never stops. It has been running now for over 30 minutes and will not start. Any suggestions would be greatly appreciated. Thanks
Seems like you have not configured the codes on CMD, create a new VM, then, in the step of Applying the codes go to file and select exit. Then Apply the codes one by one.
The catalina file is locked password pls
The pass is intoguide.com
Amaaazing …
It Help me to run Ryzen
I am stuck at “boot.efi”. After i type “install.nsh”
Is there a way to change the screen resolution or add other entries to make the VM Auto resize like a Windows VM does?
Hi, the Auto option is not working on VirtualBox but there is a method where you can change the screen resolution, just follow the below article.
how to change macos catalina screen resolution on virtualbox?
So i got it installed with very little problems…however, I tried to install XCode, the only reason for doing this in the first place and it says I cannot install because 10.15.2 or later is need. in “About this mac” it says this image is only 10.15 Beta (19a47t)…how do I upgrade, or where do I find an upgrade?
Sorry, Im new to this.
Hi, You can directly download the update of the macOS 10.15.4 Catalina from Apple store. If that is not working, you can download the macOS 10.15 Catalina from here and run it directly on the macOS, but keep in mind it will remove all the files in side the macOS.
Perfect, really it helps me a lot. Thanks.
fs2:\system\library\coreservices\’ was not found. ‘boot.efi’ is not recognized as an internal or external command, operable program or script file
do you have a solution
please help
Stuck right at the beginning
BdsDxe: starting Boot0002 “UEFI VBOX VBOX HARDDISK VB9cFDA0DB-B110D08da0 ” from PciRoot (0x0) /Pci 0x0, 0xFFFF,0x0)
Same
Hi guys,
I’m getting below error message while booting Catalina on Virtual Box.
http://www.mediafire.com/view/totsvu52ui9c6r3/macos_error.PNG/file
Have you encountered this issue before?
Many thanks in advance!
Piotr
I get an error when running install.nsh. See below:
“`
Shell> load “fs*:\vboxapfs.efi”
load: File not found – ‘fs*:vboxapfs.efi’
“`
Any advice?
Several websites indicate that with an AMD processor it is necessary to add the command
VBoxManage modifyvm “Your Virtual Machine Name” –cpu-profile “Intel Core i7-6700K”
But that still hasn’t fixed the problem and I really don’t understand …
what is your problem?
Hi, I’m stuck on the following message:
imageboot_setup_new: successfully authenticated /macOS Install Data/BaseSystem.dmg