Spotify is a Swedish media service with digital music, podcast, and video streaming services. The company is operated by Spotify AB and operates publicly through a Luxembourg-based holding company. Spotify gives you access to millions of songs and content by other artists around the world. Basic features like music playback are completely free, but you can upgrade your account to Spotify Premium. In this article, you are going to Learn How to Install Spotify in Linux (Kali Linux and Ubuntu) Latest Version.
What you can do on Spotify:
- Choose what you want to listen to by browsing and searching.
- Get personalized recommendations, such as Discover Weekly and Daily Mix.
- Make music collections.
- See what music friends, artists, and celebrities listen to.
Steps to Install Spotify in Linux
1. Install Spotify in Kali Linux
Type the following commands one after another in the terminal.
- sudo snap install spotify
- apt-get install spotify-client
Or if the above method is not working, use the following commands to install Spotify in Kali Linux.
- sudo apt install snapd
If SNAPD is already installed, move to the next step.
- sudo systemctl start snapd.service
- sudo systemctl enable snapd.service
- sudo snap install spotify
2. Install Spotify Prerequisites on Ubuntu
Like other programs, installing this program requires prerequisites that to install them. First, open the terminal and go to the root user with the command sudo -i or su.
Now we need to put the address of the repository for Spotify in the resource list or repository path. To do this, there are 2 methods that you can use.
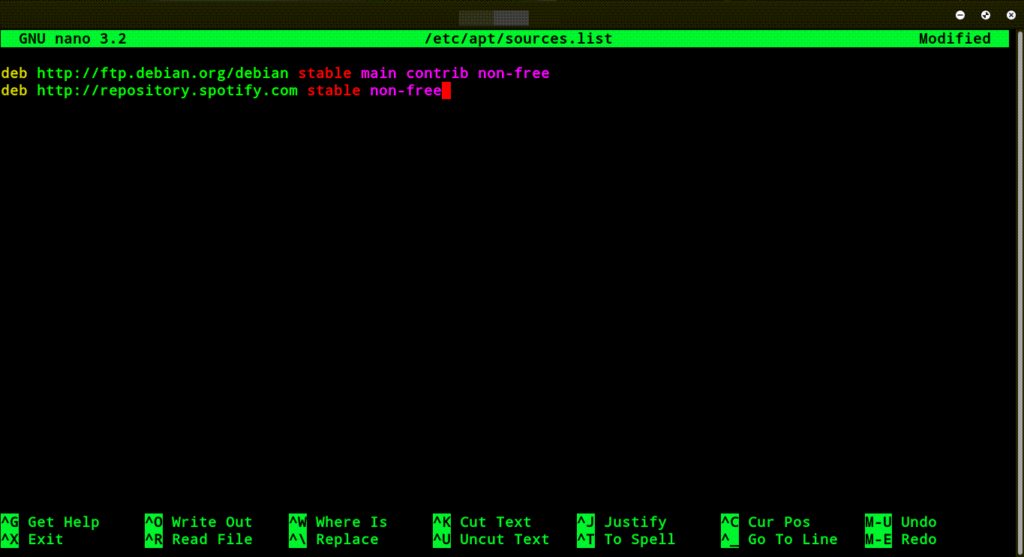
Method #1. With an editor program such as nano, enter the list of repositories according to the following command and add the relevant repository to it.
nano /etc/apt/sources.list
deb http://repository.spotify.com stable non-free

Finally, with the key combination Ctrl + X and hitting the Y key on the keyboard, we save the operation and exit.
Method #2. The following command can be copied and executed directly in the terminal environment. This operation, as in the previous method, puts the required repository in the source.list.
echo “deb http://repository.spotify.com stable non-free” | sudo tee /etc/apt/sources.list.d/spotify.list
The following command can also be used as the above commands.
“sudo add-apt-repository “deb http://repository.spotify.com stable non-free
Then we perform the operation of updating with the following command.
sudo apt-get update
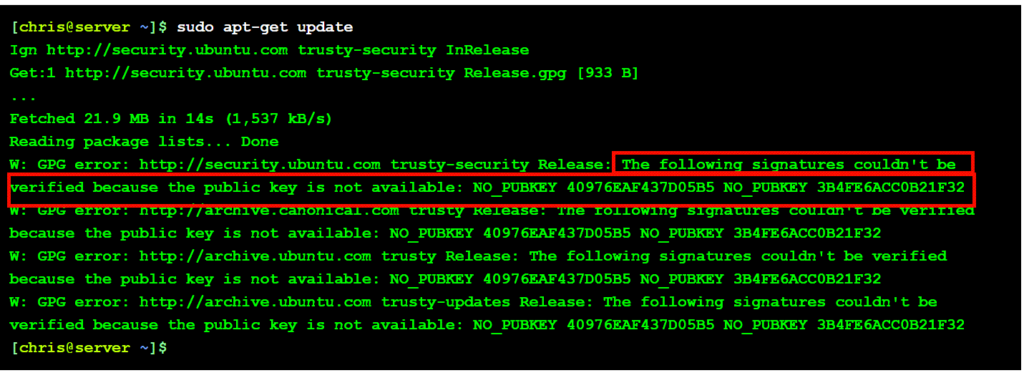
Note: The above error may occur when updating repositories. This error occurs when installing packages from an unreliable repository stating that no verified public keys are available. In this case, we need to add the Ubuntu Linux distribution repository key to the repository for identification. Here are two ways to add a key.

Method #1. We put the following commands together with the encrypted key in the error text at the end of the following command and execute them.
apt-key adv –keyserver keyserver.ubuntu.com –recv-keys 40976EAF437D05B5

Note that the error text may indicate two public keys, in which case the above command must be rewritten and the second key replaced at the end of the command.
NO_PUBKEY 40976EAF437D05B5 NO_PUBKEY 3B4FE6ACC0B21F32
run this command.
apt-key adv –keyserver keyserver.ubuntu.com –recv-keys 3B4FE6ACC0B21F32
Method 2: For Debian/Ubuntu distributions, get the required key, which is a gpg file, from the download subdomain of the Spotify website, and use it to create and add public keys.
curl -sS https://download.spotify.com/debian/pubkey.gpg | sudo apt-key add
After creating the key, we issue the update command again with one of the two methods above.
sudo apt-get update

