It is curiosity that civilizations have improved, people matured, discovered new lands, species created new tech and more. Why not try macOS Ventura, what is the harm in it. It doesn’t matter if you are not using macOS as your daily operating system, just give it a try. Learn and experience, is it better than the version of the OS that you are using. You will find the answer once you test it on a VirtualBox on Windows, Linux, Chrome OS, or even macOS Monterey. So, why are you waiting, start learning How to Install macOS Ventura on VirtualBox on Windows PC.

Prerequisite:
- A Working Windows 11/10,8.1/7 computer.
- At least 40 GB of storage.
- Your computer at least must have 8 GB of RAM.
- The virtualization software is called VirtualBox alongside the VirtualBox extension Pack.
- macOS Ventura ISO Image File.
- And finally, the codes to avoid errors.
Steps to Install macOS Ventura on VirtualBox
If you truly wish to install macOS Ventura on VirtualBox, then you must follow the below 5 methods which are compulsory for everyone. The first step is for newbies to install VirtualBox and the extension pack. Following step 1, and step 2 to create a virtual machine, step 3 is about configuring the setting of Virtual machine VM for the macOS Ventura. Then execute the commands in the terminal and finally perform a clean installation.
Step 1. Install VirtualBox and the Extention Pack
If you are new to Windows (Windows 11, Windows 10, Windows 8.1, or Windows 7), installing software may seem hard but it is not. Mostly installation Of an application on a Windows computer is launching the application and then going through the steps and clicking next. The same rule is applied to VirtualBox too.
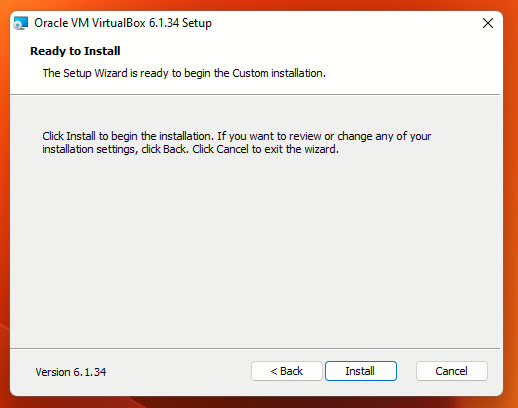
Install VirtualBox:
- Download VirtualBox and VirtualBox extension pack from the virtualbox.org
- Right-click on the installer and click open.
- Please click next on the welcome screen, custom window, and features Window, and move on.
- Select yes.
- Click on the install.
Install VirtualBox Extention Pack:
Now you know how you can install VirtualBox on your computer, for the next step you have to install the VirtualBox extension pack. There are two ways that you can use to install the VirtualBox extension pack.
1. Double-click on the installer of VirtualBox Extention. It will open the VirtualBox> click Install.
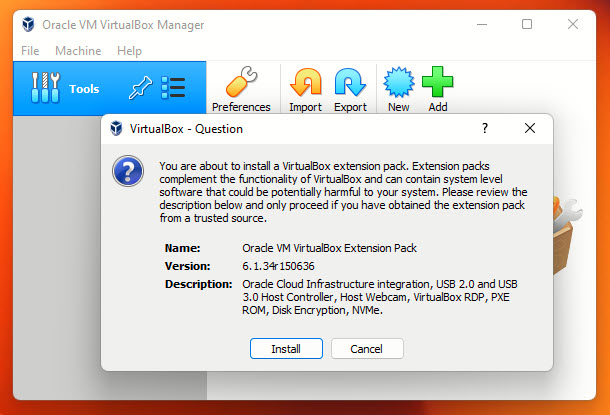
2. Open VirtualBox> click on the preferences> Go to the Extension catogery> Click on the + icon> locate the VirtualBox Extension Pack> Once it is imported, click install.
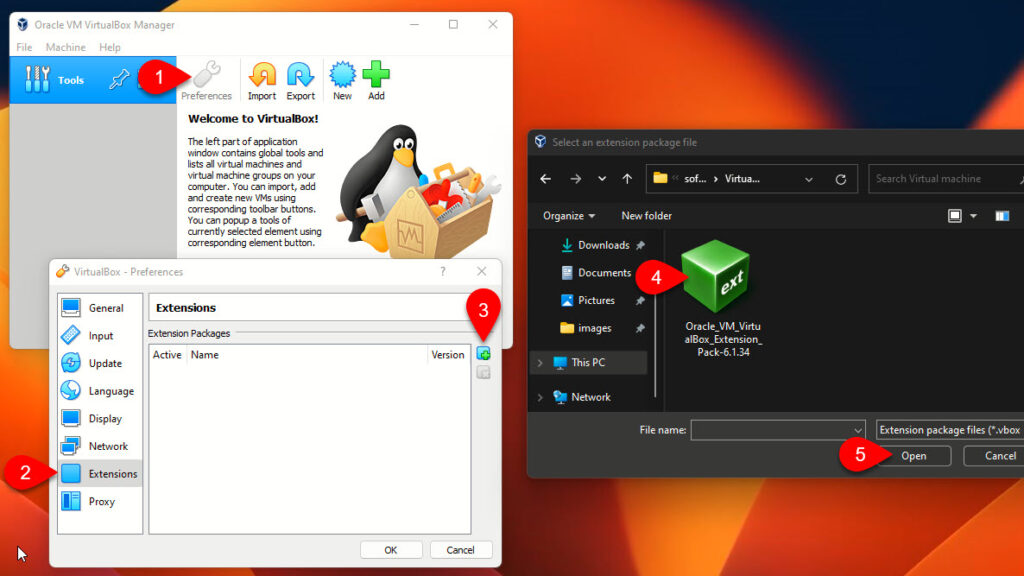
What is the purpose of installing the VirtualBox Extention Pack?
If you do not install the VirtualBox extension pack, then the mouse and keyboard will not work during the installation of the macOS Ventura.
Step 2. Create a Virtual Machine for the macOS Ventura
Furthermore, in the process of installing macOS Ventura on VirtualBox on Windows 11, a creation of a virtual machine is required.
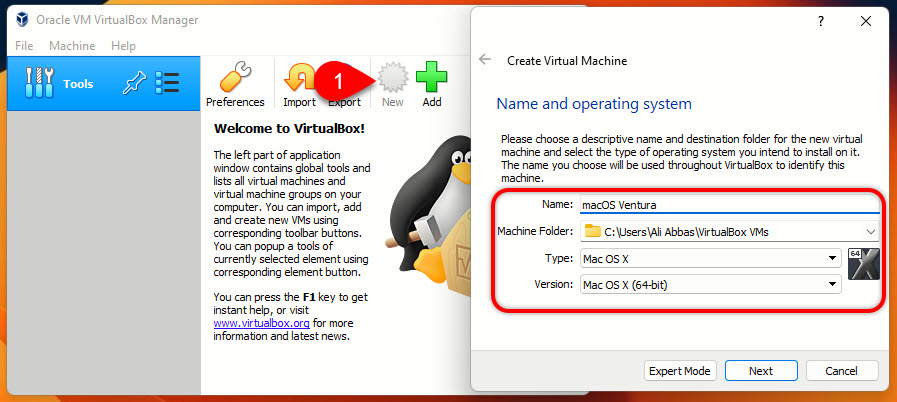
- Please launch the VirtualBox.
- At the top menu bar click on the new.
- Go ahead and name your virtual machine, you can Simply put macOS Ventura. The rest of the settings such as location, guest operating system, and version will be selected automatically upon entering the name of the mac.
4. Make sure that you provide at least provide 4GB of RAM.
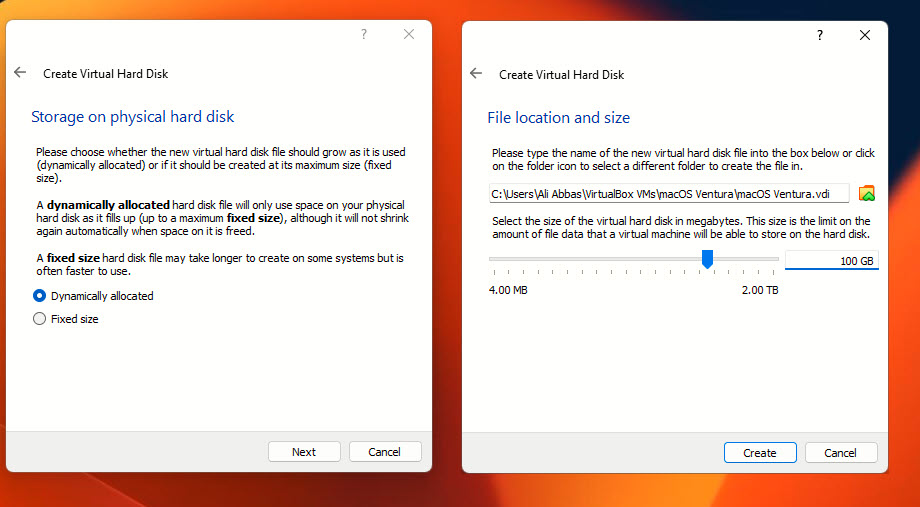
5. Choose to create a new virtual hard disk.
6. You can choose any hard disk type that you wish, however, I will go with the default settings.
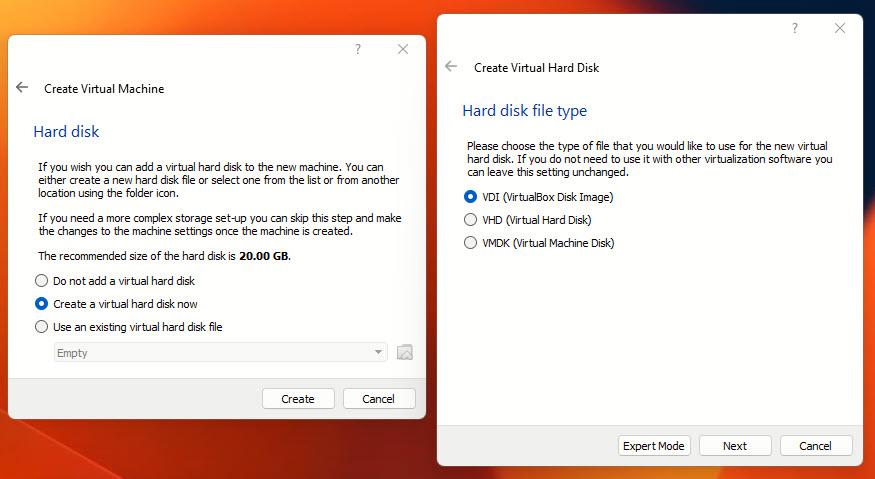
7. For the storage type please choose dynamically allocated.
8. Go ahead and insert the amount of storage for the virtual machine that you need.
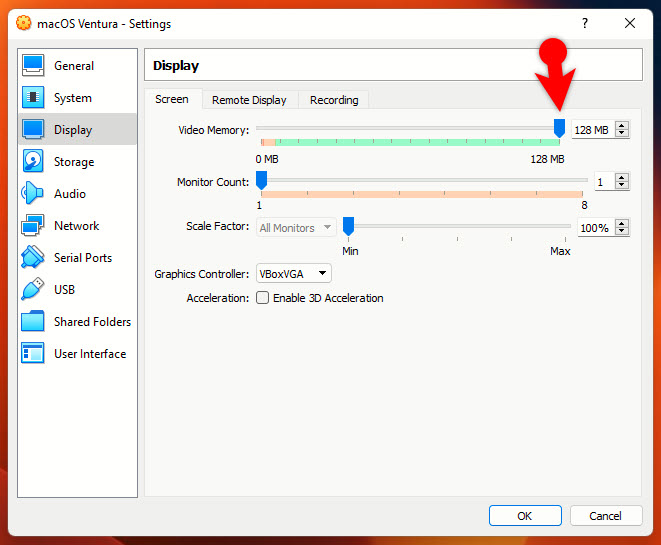
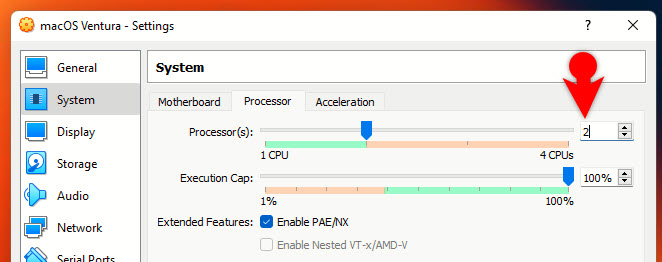
Step 3. Set up Settings for macOS Ventura Virtual Machine
There are some settings that you must configure before performing a clean installation on VirtualBox on Windows PC. These settings are configuring the display, and processor amount, adding the macOS Ventura ISO image and enabling USB 3.0.
Configure Display:
Right-click on the virtual machine which you created earlier and choose settings. Go to the Display tab and increase the video memory to 128 MB.
Configure Processor:
Next, visit the system> processor tab and increase the number of processors to 2.
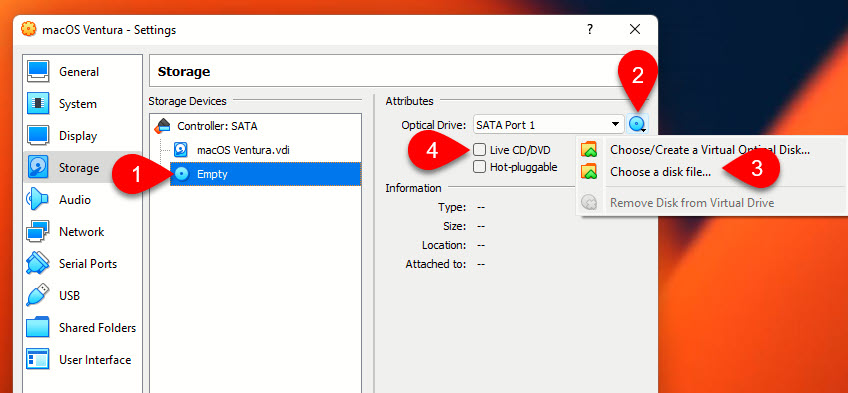
Configure the CD/DVD:
In order to add the macOS Ventura ISO image, go to the storage tab> click on the Empty> Click on the CD icon> Chose a Disk file and locate the ISO. Once the Disk is imported, make sure to check the box “Live CD/DVD”.
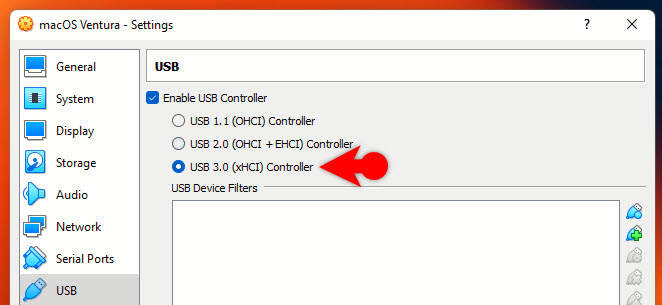
Finally, visit the USB Tab, and enable USB 3.0.
Note: once you have configured the settings apply it to the virtual machine and go to the File menu> choose exit.
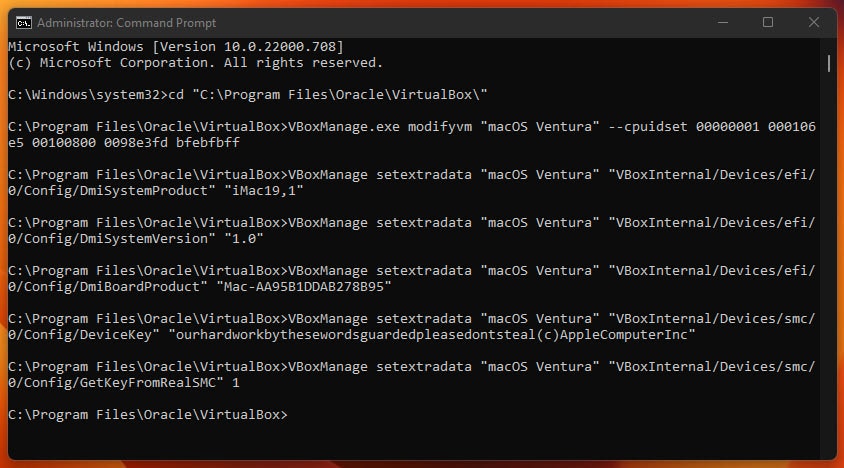
Step 4. Execute the codes using CMD
The purpose of applying these codes or to avoid the limitations that the VirtualBox has and to avoid errors of installing Mac OS on VirtualBox. Once you get the code, make sure that you have must replace the “VM Name” with the name of your Virtual machine.
The simplest method to replace the VM name with the name of your virtual machine is to press control + H. In the Find box type the VM Name and on the next box type macOS Ventura.

Open CMD and run it as administrator then apply all the code one by one on the CMD.
Step 5. Install macOS Ventura on VirtualBox
Welcome to the final step of installing macOS Ventura on VirtualBox on Windows PC.
- Open VirtualBox, right-click on the virtual machine that you created earlier, and choose start.
- Please wait a moment until some line of codes, and the Apple logo is gone. After that select a language in which you are comfortable, in my case English is fine.
- On the macOS recovery utility, choose disk utility.
- There is a small icon also known as view, click on it and choose show all devices.
- Select the hard drive that you created earlier and then erase it. Once you click on arrest, a new dialog box will open where you can configure the settings such as name, format, and scheme.
- After configuring the partition, close the disk utility and you are once again on the MacOS recovery Window, this time instead of disk utility, select install MacOS Ventura.
- Click on agree> once again agree.
- Select the drive that your partition earlier and choose to continue.
- Once this part is done, your MacOS is going to restart and again you have to choose a language, and keyboard layout alongside your country.
- On the accessibility, window click “not now”.
- Agree with the data and privacy.
- On the migration window choose “not now”.
- There are a couple of sign-in methods that you can use to sign in inside your Mac on the VirtualBox. There is an Apple ID and a local account. For now, I will be using the local account so at the bottom, I will choose set up later.
- Agree with terms and conditions.
- Create a computer with a password and a password hint.
- Click Continue.
- If you wish to configure their screen time right away, configure it right now. Or you have the option to configure it later.
- Do you wish to use Siri on your Mac on the VirtualBox, if yes click continue? If not uncheck the box of Siri and click continue.
- Choose a theme for your Mac and move on.
- Wait for the first appearance of the macOS Ventura.
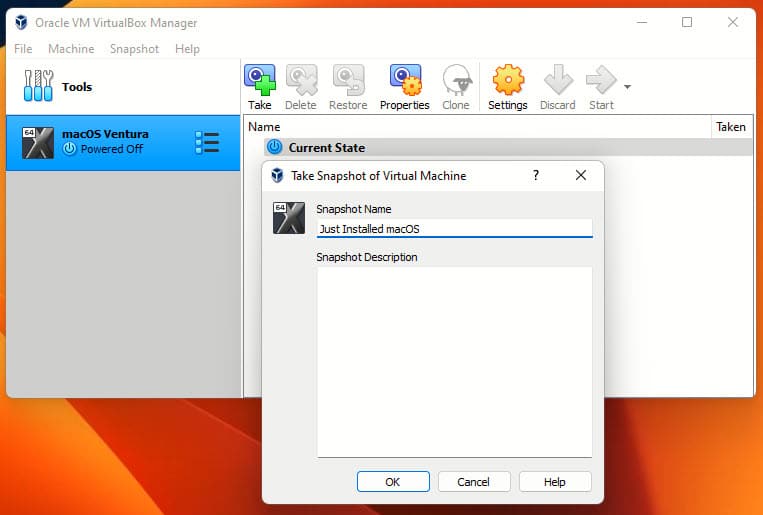
Step 6. Take a Snapshot
A snapshot is like recovery of the MacOS Ventura except it is in the virtual machine. It is necessary because there are uncertain errors that you may face and whenever you are facing such errors you can just simply restore back to the stable version of macOS Ventura.
To take a snapshot click on the Machine menu> Tools> Snapshots. A New Window will open> click on take, name your Snapshot and click OK.
Also Read: