Do you want to install windows 11 on your PC that does not support TPM 2.0 and secure boot? And still, you are looking for a way to Create Windows 11 Bootable USB for Unsupported PC. Don’t worry, because in this post you will learn the easiest way to create a bootable USB for an unsupported PC or laptop.

One of the main requirements of windows 11 is TPM 2.0 and secure boot, and according to Microsoft computers which are released after 2016 can handle windows 11. However, older PC’s which also include 2016 and 2015 cannot support windows 11 except there are some gen 7 laptops that can support Windows 11. Also if you are one of those cheeky guys that are looking for a way Create Windows 11 Bootable USB for Unsupported PC, the first step for you is to purchase a USB flash drive.
Also creating a bootable USB of Windows 11 is the same as Windows 10, Windows Server, and others. The main problem here is Microsoft TPM 2.0 and secure boot, you have to bypass that step. And besides Microsoft is pushing the customers to upgrade to their computer to the 8 generations of processors. It means generation 8 computers are the very first computers that can support windows 11. Well, have No Fear because in this tutorial we are going to hack our way to install windows 11 on an unsupported PC by bypassing the TPM 2.0, CPU, and secure boot all at the same time.
[Cautions]– it is true that you can install windows 11 on an unsupported PC or laptop, still, it does not mean that it will perform amazingly. Depending on your PC or laptop, your windows make get corrupt, or it may not function properly. That’s why Microsoft has advised users against installing windows 11 on unsupported devices since they will not get any future security updates. So, keep these points in mind since no one will take responsibility if it is damaged.
Overview
As I said earlier, the way to bootable USB on for Windows 11 is the same as you are creating bootable USB for Windows 10 or Server. The catch here is that we have to bypass the TPM 2.0, secure boot, and the processor. You can do it either by creating a registry and then implementing it during the installation, or you can use Rufus. Yes, Rufus has released a new version, which has the ability to bypass CPU, TPM 2.0, and secure. This way you can create a bootable USB for an Unsupported PC or Laptop.
- So, the first step for you is to get Rufus from their official website.
- The next thing that you need is the windows 11 ISO image, you can get it from Microsoft official website. or simply follow this article and learn How to download Windows 11 Officially for free?
What is Rufus and Why you should use it?
Rufus is a very powerful application that you can use to create a variety of bootable USB’s four different versions of the operating systems. With the help of Rufus, you can create bootable USB for Linux distributions, windows operating systems, and even FreeDOS disk images. Not only that but with the help of the Rufus, you can also create a Window to Go too. It is a very flexible application, which is not just familiar with the different file systems, but also capable of configuring the bootable USB.
Also, during the installation of windows on your computer, have you ever seen the below errors or no.
- Windows cannot be installed on this disk the selected disk is of the GPT partition style
- Or Windows cannot be installed on this disk the selected disk is of the MBR partition style
Well if you have seen these errors, then probably it is because of the partition Style. The good thing about Rufus is that during creating a bootable USB you can configure the partition style too. Whether you want the partition to be a GPT partition or an MBR. Now, these features were already available inside Rufus, with the new update of Rufus, they have improved it even more. Which is to bypass the TPM 2.0, the processor, and the secure boot.
Fat32, NTFS, UEFI, Grub, ReactOS, SysLiunx are the partition style that this small application can support. This means you can install Windows(Any version) Linux (Any distro) inside devices like Raspberry Pi, Laptop, Desktop, Workstation, and more.
In simple words, Rufus is clean, free, it has tons of features, and finally, it is fast for creating bootable USB for any operating system except macOS.
Steps Create a Bootable USB for Unsupported PC or Laptop
Step #1. Get Windows 11 ISO Image
Without the operating system, you cannot create a bootable USB. So you have to download Windows 11 ISO image from Microsoft’s official website. If you already have the ISO of Windows 11, then you are good to go however if you don’t have just click on the below link and learn how to download windows 11 for free legally.
Step #2. Download Rufus
To get it started the first step for you is to get Rufus from their official website. Or simply click on the below links to download the Rufus installer or portable version. Although I’m going to use the portable version to create a bootable USB for Windows 11.
Last updated 2021.10.23:
Step #3. Attach the Pen drive to the Computer
After getting Rufus, you have to insert your USB flash drive into the computer. Also, you have to make sure that your USB flash drive must be at least 8GB or higher. And also remember that during creating a bootable USB for Windows 11, your USB flash drive will be completely partitioned. It means the data will be erased, so take a backup of your files.
After our attaching the USB flash drive to the computer, open the Rufus application. It is going to detect the USB flash drive automatically.
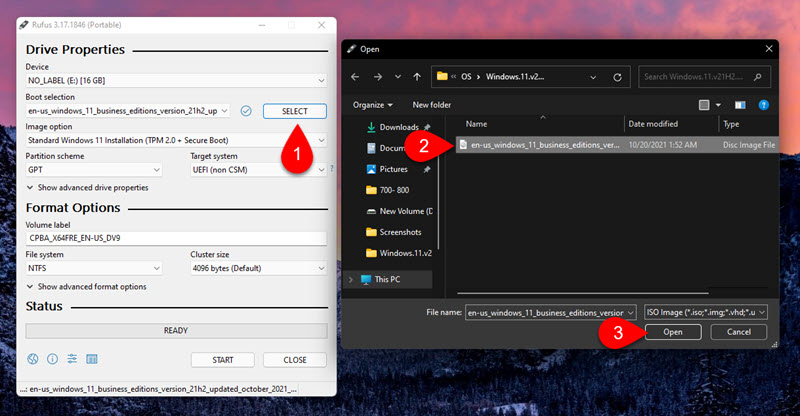
Step #4. Locate the Windows 11 ISO Image
Next, you have to select the ISO of Windows 11 that you have downloaded from the Microsoft official website. You can do it by clicking on select, and then by locating the ISO of Windows 11.
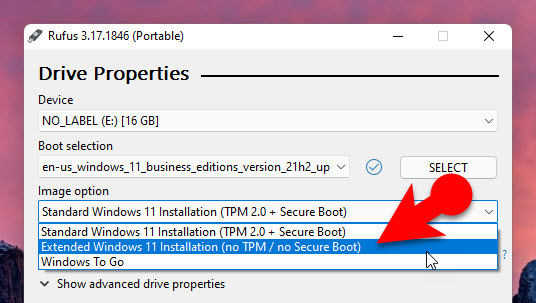
Step #5. Configure Image options
After selecting the ISO of Windows 11, under the image option, you have to choose Extended Windows 11 Installation (no TPM / no secure boot).
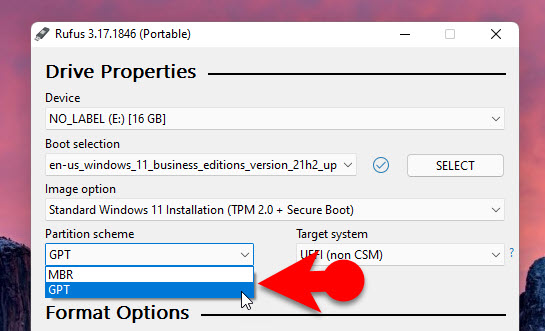
Step #6. Choose Your Partition Style
Next, you have to configure the partition style depending on your hard drive partition. Mostly the newer generation of computers are having GPT as their main partition, however, older computers have MBR.
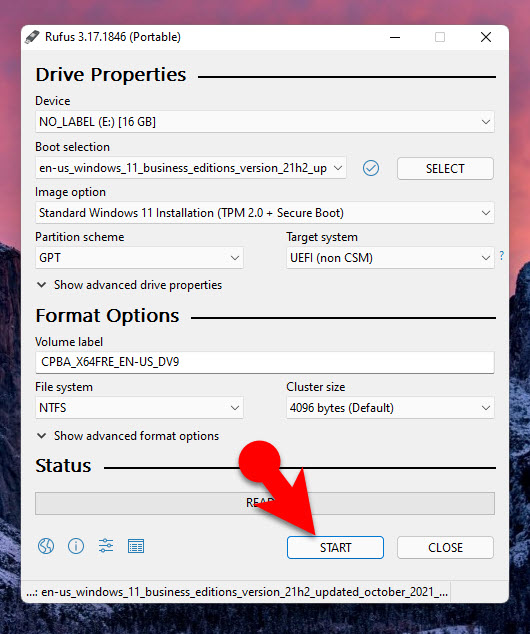
Step #7. Start
Don’t do anything else with the other settings, and once you are OK simply click start, and creating the process of bootable USB will be done easily without any problem.
Step #8. You are Ready For Clean Installation
The moment the USB flash drive is formatted, the ISO files are copied inside the USB flash drive, a close notification will appear, which means the USB Flash drive is ready.