MacOS 10.15 Catalina is newly presented by apple for Apple series of Laptop and Desktop systems. As every time the new OS comes with new features, functionalities, better performance, more secure privacy rules and finally a new design with a new name. This time Apple moved from the desert place to a far more beautiful and amazing Island on California, announced in WWDC 2019.

The 2019 WWDC event was focused on tvOS, WatchOS 6, iPadOS, iOS 13, Mac Pro 2019 and finally the macOS 10.15 Catalina (the next generation of Apple OS). This newly introduced OS has outstanding features of the sidecar, separated music apps, screen time (Brought from iOS to App Store on PC) and more. Sidecar is an app which allows using the iPad as a mirrored monitor for more space. The Apple Sidecar supports several apps such as Adobe Illustrator, Affinity Designer, Affinity Photo, Cinema 4D, CorelDRAW, DaVinci Resolve, Final Cut Pro, Maya, motion and more. The other improvements are charging iPad wireless within the 10 meters range, however, it can charge the phone wired too. Apple Pencil is introduced where you can draw even more sketches, write, edit a photo in apps easily. Screen Time can show you usage reports, downtime, App limitation, communication limits, Family Sharing. More enhanced security features are added up as Gatekeeper which will ensure the new apps installation via internet and app store. For all the new features of macOS 10.15 Catalina visit the official site of Apple for macOS Catalina.
Since macOS 10.15 Catalina has the Apple File system which is completely different from Windows. The truth is mac users can easily test the Windows 10, Linux, Zorin OS so easily with the ISO of them. And Since the macOS 10.15 Catalina in dmg, you can’t install and test it on VM as easy as windows on a mac. 7
To test the macOS 10.15 Catalina on VMware on Windows PC, you need to download the macOS 10.15 Catalina Virtual machine disk file (VMDK). The VMDK file is pre-configured settings just like a clone of the VM. When you access is granted to VMDK file, install VMware on Windows and load the VMDK file to install it. Here is the step by step Guide to install macOS 10.15 Catalina on VMware on Windows PC.
Configuring the settings of VMware is easy but when you are about to start the installation process you may encounter one of the below errors.
- The Selected Virtual Disk incompatible with this Workstation.
- This virtual machine requires AVX2 but AVX is not present.
- Fix The CPU has been disabled by the guest OS
- EFI VMware Virtual SATA Hard Drive Unsuccessful
- Vmware Unrecoverable Error on macOS Mojave & Catalina
- Boot Loop While Installing macOS Catalina on VMware
- macOS Mojave and Catalina Screen Resolution on VMware
- How to Fix macOS 10.15 Catalina Errors? Part 1
- Fix macOS Catalina Errors to Install on VMware on Windows Part 2
How to Fix EFI VMware Virtual SATA Hard Drive Unsuccessful Error?
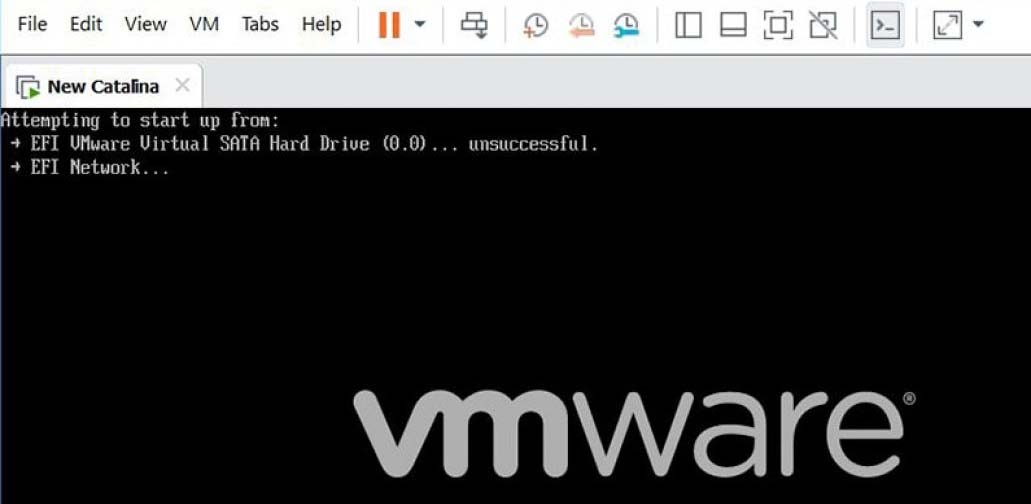
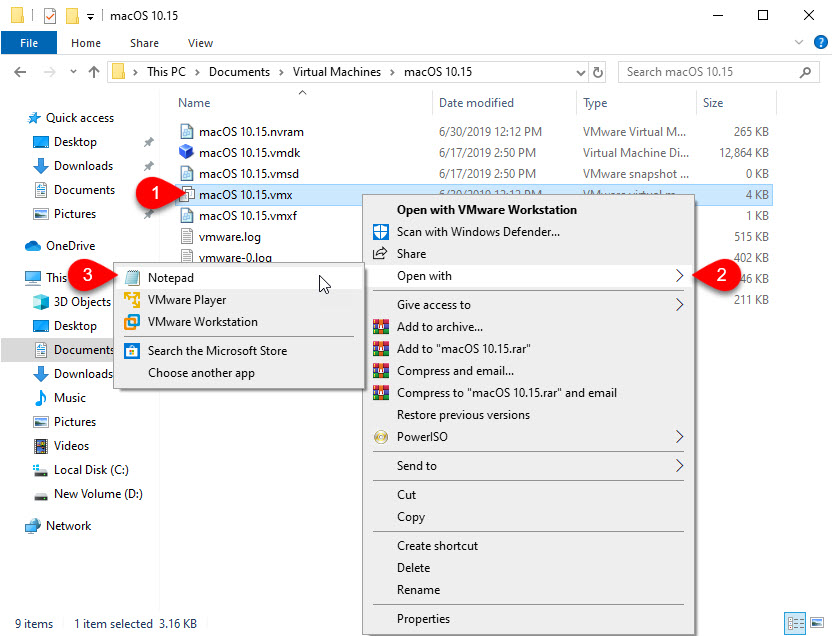
This error occurs because you have not inserted the config file specifically built for macOS. Once the macOS VMDK file is attached to the Virtual Machine, go to file menu> and exit the Vmware. Then open the location where the VM is saved, find a file with vmx extension. Right-click and open with it with Notepad.
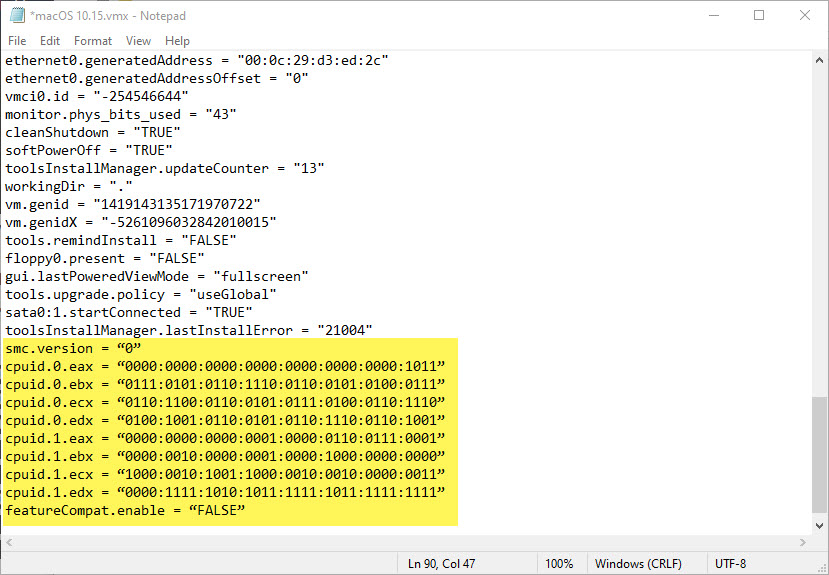
Scroll down to the end and add the smc.version = “0” code.

Note: If your Laptop’s processor is AMD you have to copy and paste the below codes in the VMX file.
smc.version = “0”
cpuid.0.eax = “0000:0000:0000:0000:0000:0000:0000:1011”
cpuid.0.ebx = “0111:0101:0110:1110:0110:0101:0100:0111”
cpuid.0.ecx = “0110:1100:0110:0101:0111:0100:0110:1110”
cpuid.0.edx = “0100:1001:0110:0101:0110:1110:0110:1001”
cpuid.1.eax = “0000:0000:0000:0001:0000:0110:0111:0001”
cpuid.1.ebx = “0000:0010:0000:0001:0000:1000:0000:0000”
cpuid.1.ecx = “1000:0010:1001:1000:0010:0010:0000:0011”
cpuid.1.edx = “0000:1111:1010:1011:1111:1011:1111:1111”
featureCompat.enable = “FALSE”
However, if this code didn’t work, Change the VMWare Player /Workstation Pro compatibility version to 10.x
How to Fix VMware Unrecoverable Error on macOS Mojave & Catalina?
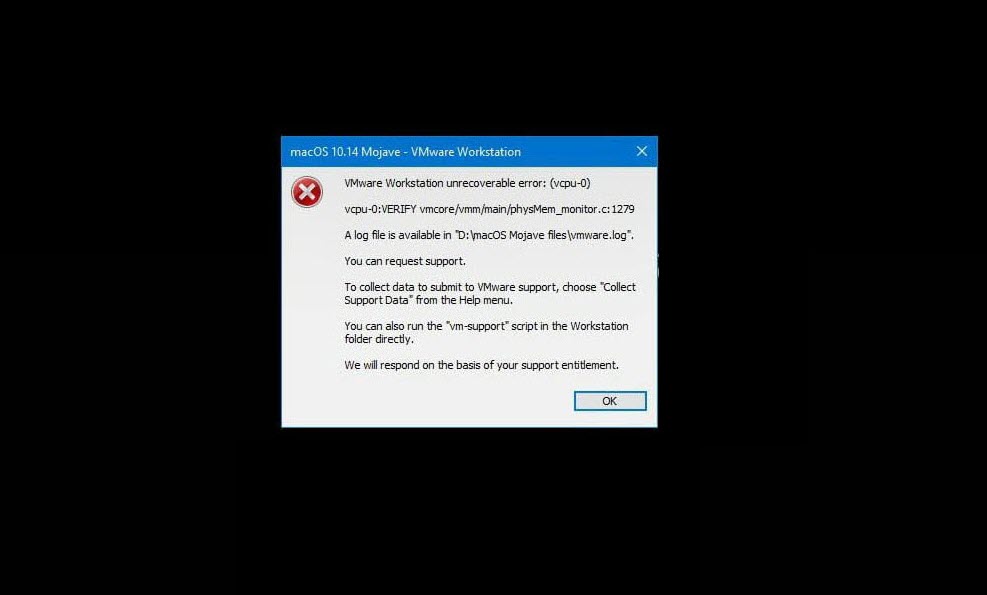
If you ever faced the EFI VMware Virtual SATA Hard Drive Unsuccessful Error, and when you find How to fix the error. Certainly, the Unrecoverable Error will be sorted out too. Because both of the errors can be solved with the same steps. So, Read the first header, to fix the VMware Unrecoverable Error.
How to Fix Boot Loop While Installing macOS Catalina on VMware?
The minute you are finished with the setup of VMWare for installing macOS 10.15 Catalina. You are going towards the installation procedure, however, you can’t move from the Apple logo, which won’t go further, this is known as the Boot Loop. I have no clue regarding why this continues occurring yet I will demonstrate a Guide which will the fix issue in no time.
Step 1. Shutdown the Virtual machine
If you are still stuck on the Boot loop problem, go to menu and power of the Guest OS on Virtual machine.
Step 2. Edit the Virtual Machine settings
When the Virtual Machine is killed, you will be on the primary window of the powered off Virtual Machine. Click on the Edit Virtual Machine Settings.

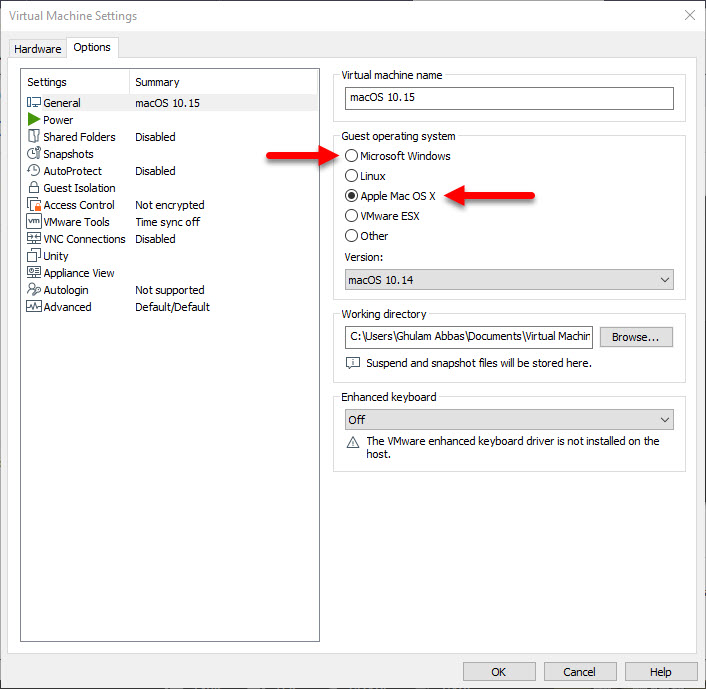
Step 3. Change the Guest Operating system
OK, Move to the options tab, change the guest operating system from Microsoft Windows to Apple Mac OS X. If the Apple he mac OS X is already selected, change it to Microsoft Windows and retry to install macOS 10.15 Catalina. You have to keep doing it until you are successful with the installation.
How to Fix macOS Mojave and Catalina Screen Resolution on VMware?
Congratulations for installing macOS Mojave or macOS Catalina on VMware on Windows PC. However once the installation is done, the screen resolution is another problem which you will face. Most of the VMware tools will do the job but sometimes the VMware Tools won’t respond.
To Fix the screen resolution problem of Catalina and Mojave on VMware, launch the Spotlight by holding the Windows key + space Key. Search for Terminal for applying codes, copy and paste the below codes inside the Terminal and hit enter.
sudo defaults write /Library/Preferences/com.apple.windows server DisplayResolutionEnabled -bool NO
Final Words
The second part of How to Fix macOS 10.15 Catalina installation error on VMware on Windows PC, ends here. Keep in mind these errors are not just on macOS 10.15 Catalina, they have also occurred on macOS 10.14 Mojave and high sierra. The good thing, they can be fixed with the method as introduced, so, please share it is worth of sharing.
ozan@Ozans-Mac ~ % sudo defaults write /Library/Preferences/com.apple.windows server DisplayResolutionEnabled -bool NO
2019-08-21 18:03:43.622 defaults[535:7723] Unexpected argument -bool; leaving defaults unchanged.
This command recommended for screen resolution gives Unexpected argument -bool exception.. Do you have any idea?
What kind of unexpected things occurs with this tool? For screen resolution, there is another command too.
sudo defaults delete/Library/Preferences/com.apple.windowserver.plist DisplayResolutionEnabled